

The following are my experiences and processes over almost my entire build and swap. It's nearing the end as I'm waiting now for warm weather to have it dyno tuned. I'm hoping this info may help others in their quest. It's been a long road of almost 2 years and countless hours of research and bothering other members of Club3g.com. Without this forum and some key members, this build would have never taken place.
2003 GTS
Manual Trans
I performed this swap using parts from 3 different engines. Here are the 3 vehicles and their corresponding VIN numbers I used for selection of parts.
2003 Mitsubishi Eclipse GTS w/ Manual Trans - 4A3AC74H83E156019
3.0 liter V6 SOHC 6G72
2007 Mitsubishi Galant GTS w/ Auto Trans - 4A3AB36S97E025546
Non Mivec 3.8 liter V6 SOHC 6G75
(Engine removed from this vehicle for the engine swap)
2002 Mitsubishi Diamante LS w/ Auto Trans - 6MMAP67P42T020894
3.5 liter V6 SOHC 6G74
-----------------------------------------------------------------------------------------------
Finding a good engine:
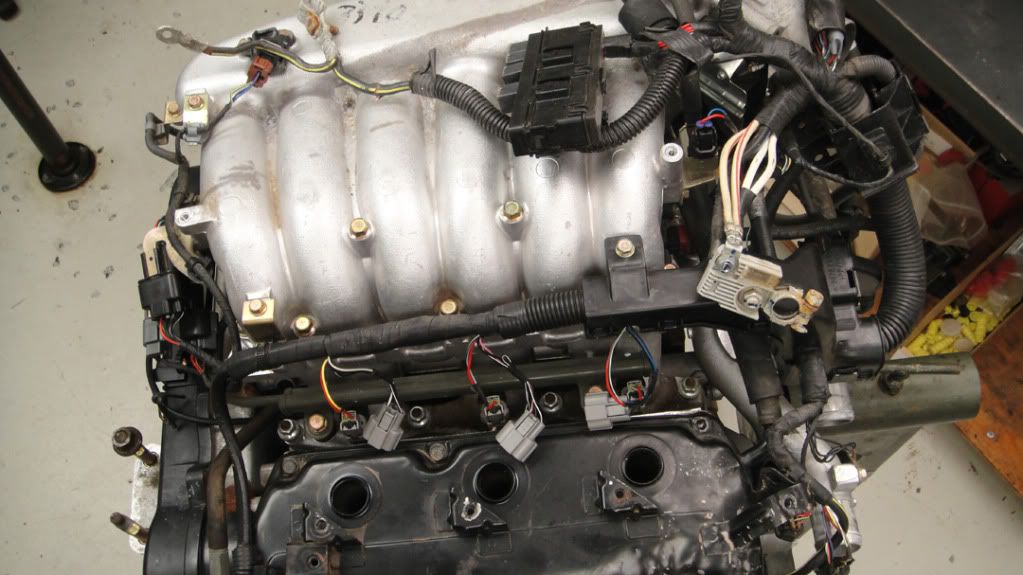
It took weeks of daily scouring to find an engine I really wanted. I ended up finding a 3.8 Non Mivec out of a 2007 Mitsubishi Galant GTS. It only had an astonishing 3000 miles accumulated on it. The engine was listed on car-part.com on the east coast. This was an awesome find. I wanted an engine that wouldn’t need new valve guides, new valves, excessive machine work, etc. I had it truck shipped to WI.
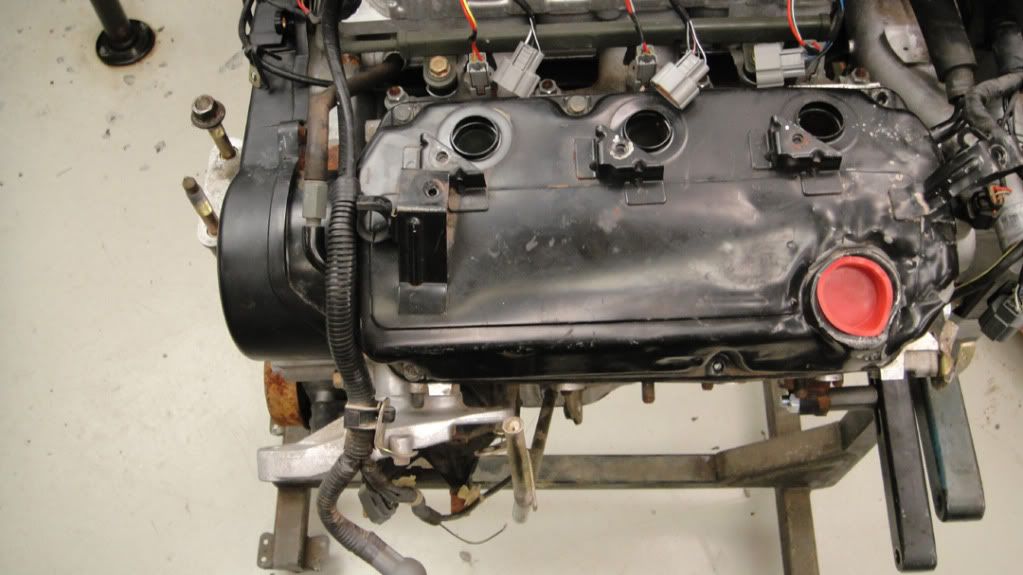
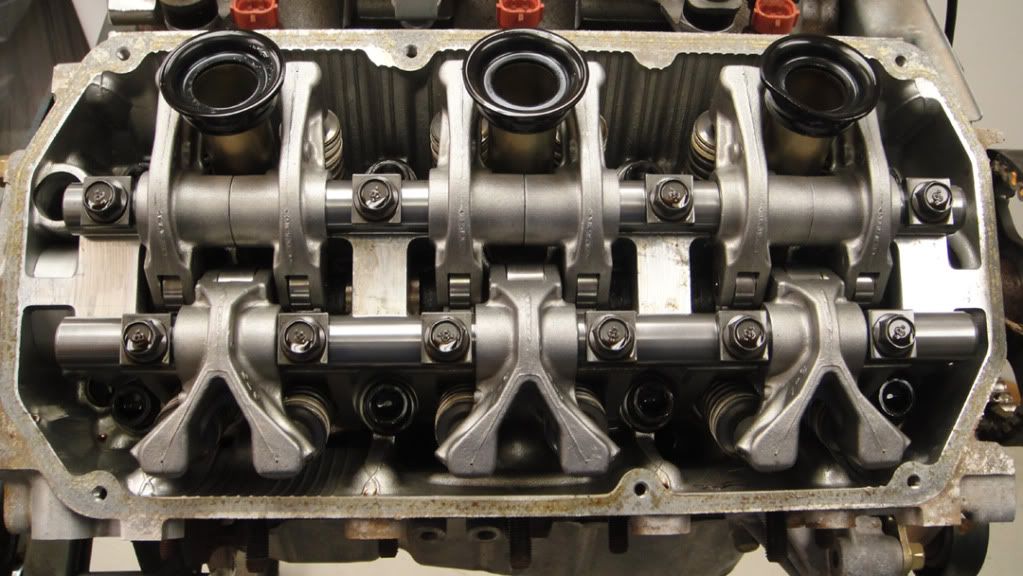
After some investigation with the VIN I found that the car was a rental and was in a bad accident. The car was totaled, but the engine was in one piece except for a few items. It was a front end collision. The front valve cover was dented in, the oil cap was broken and the basically new 6g75 upper intake manifold was dented right were the map sensor was supposed to be installed. Additionally, the oil pan was dented-in enough to cause concern. After removing the valve cover and oil pan, I was relieved to find no contact had been made with the internal engine components and not a spot of corrosion.
Thankful to find ZERO corrosion:
-----------------------------------------------------------------------------------------------
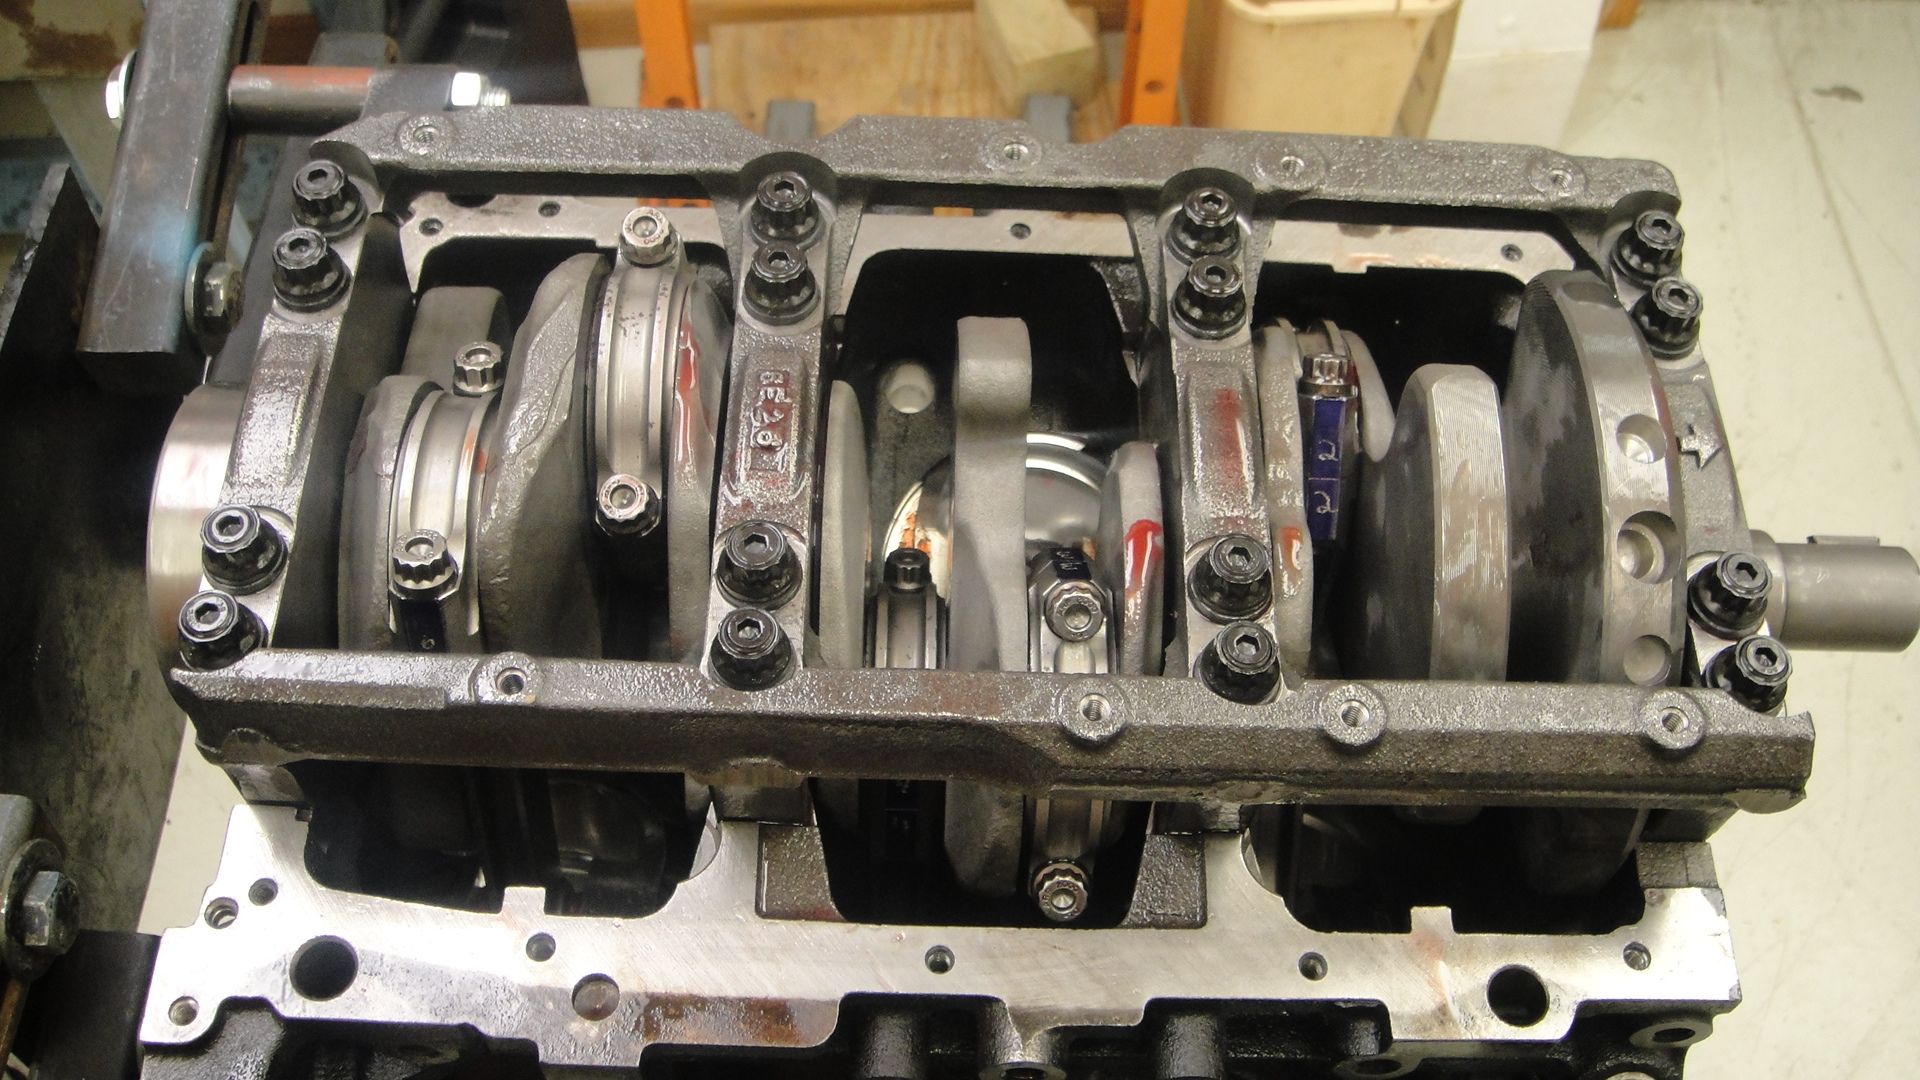
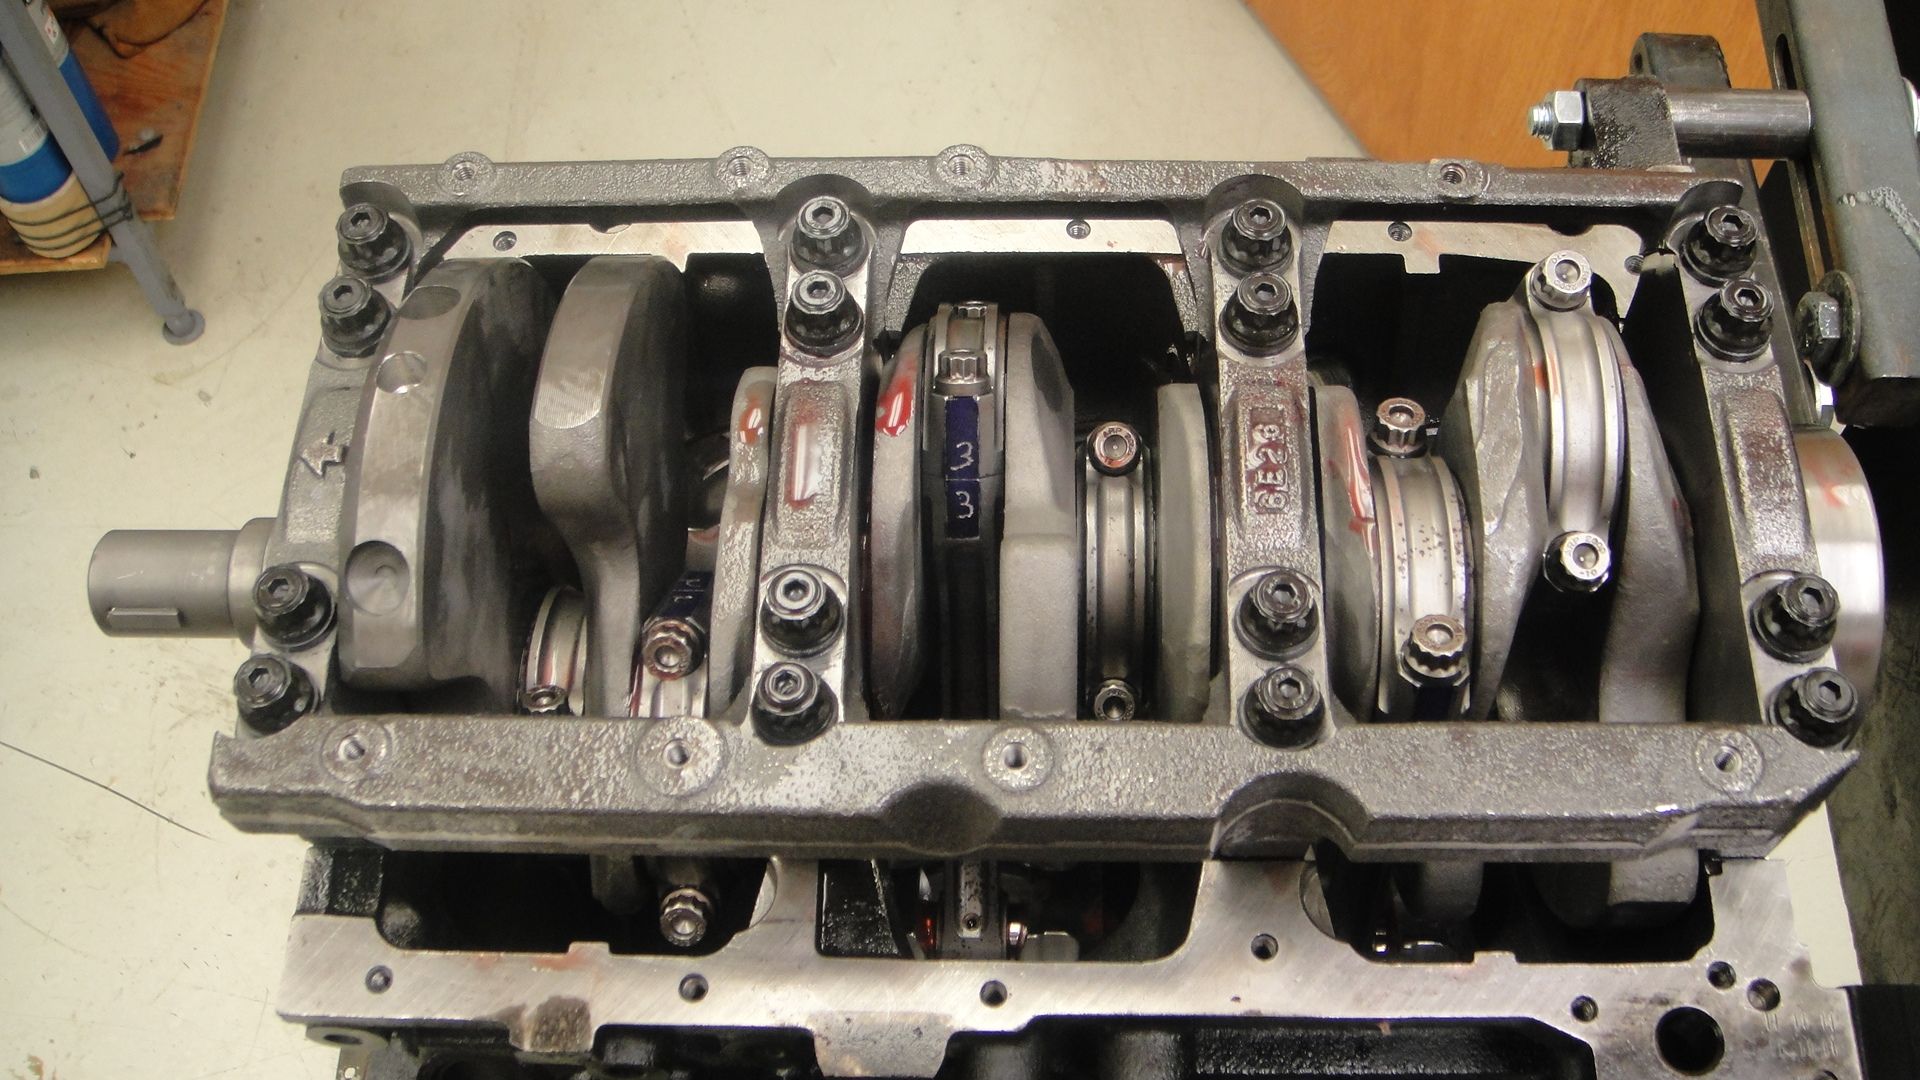
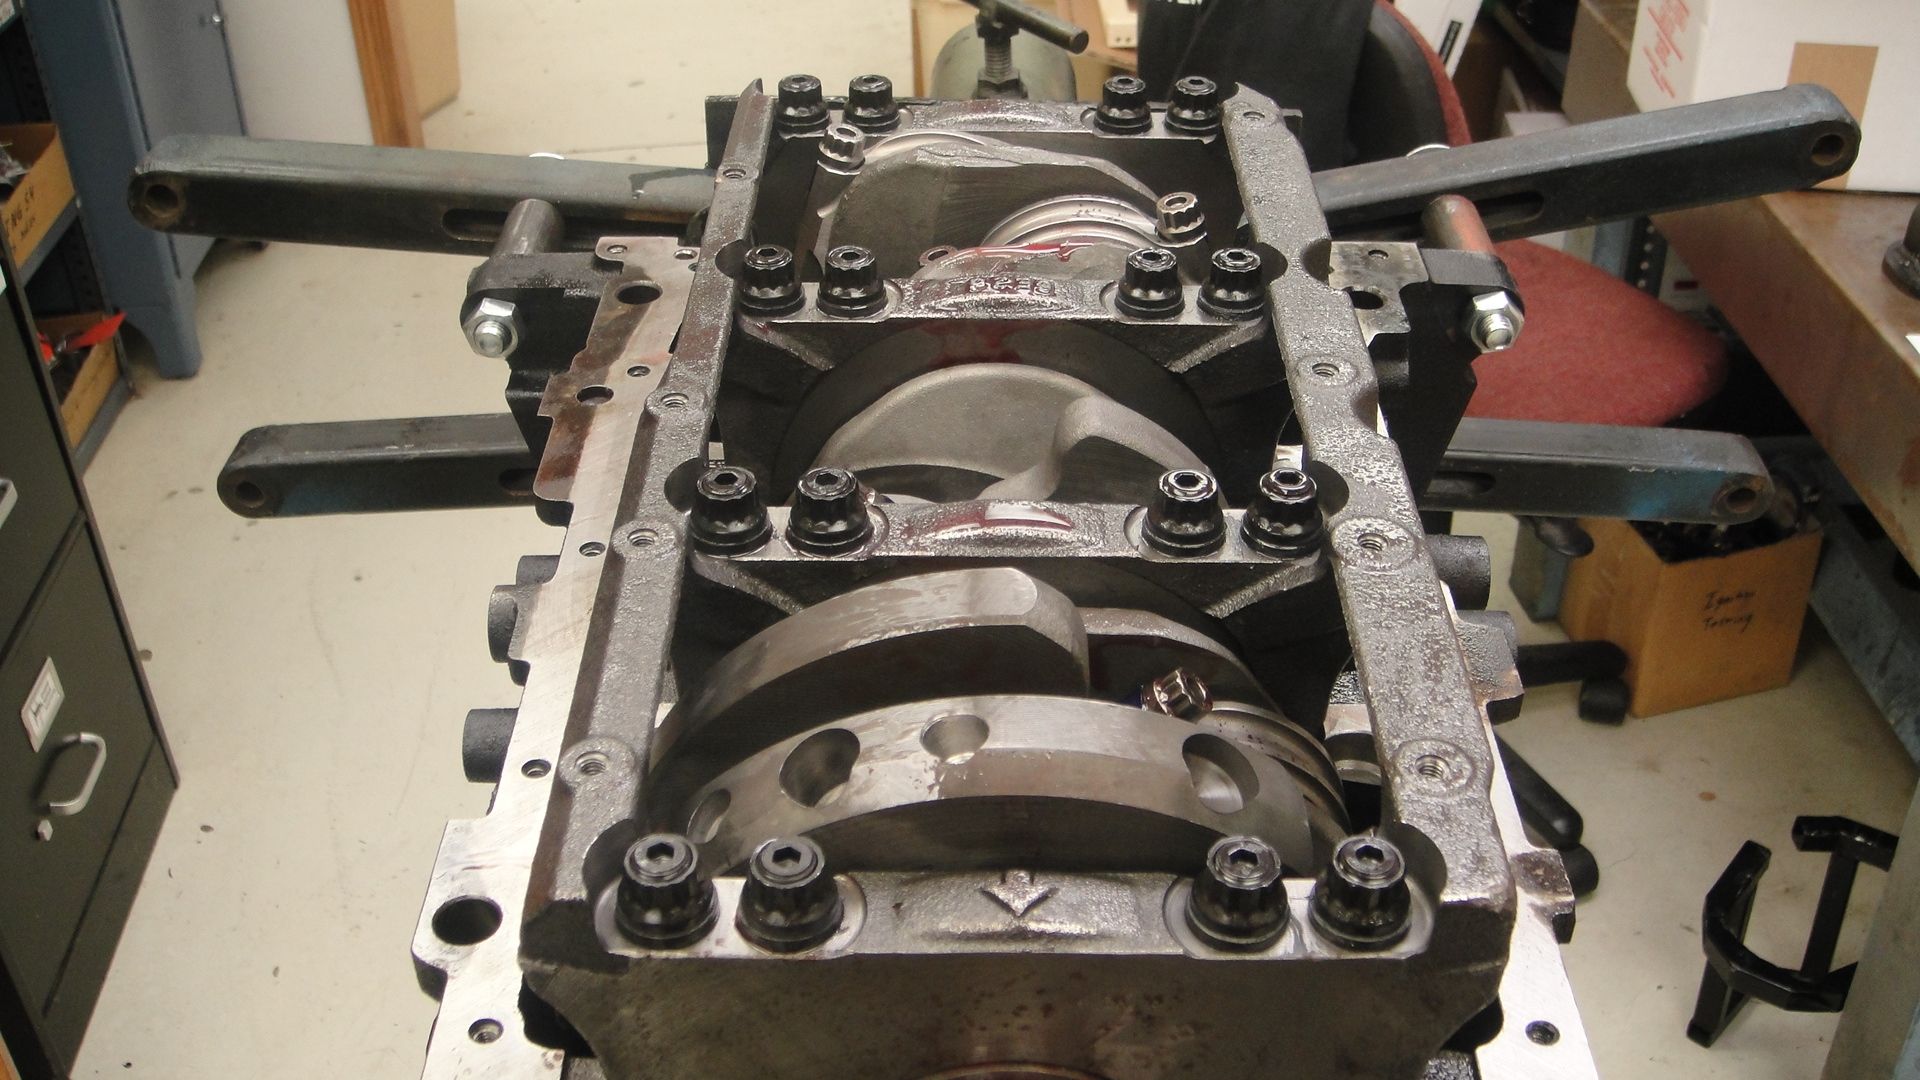
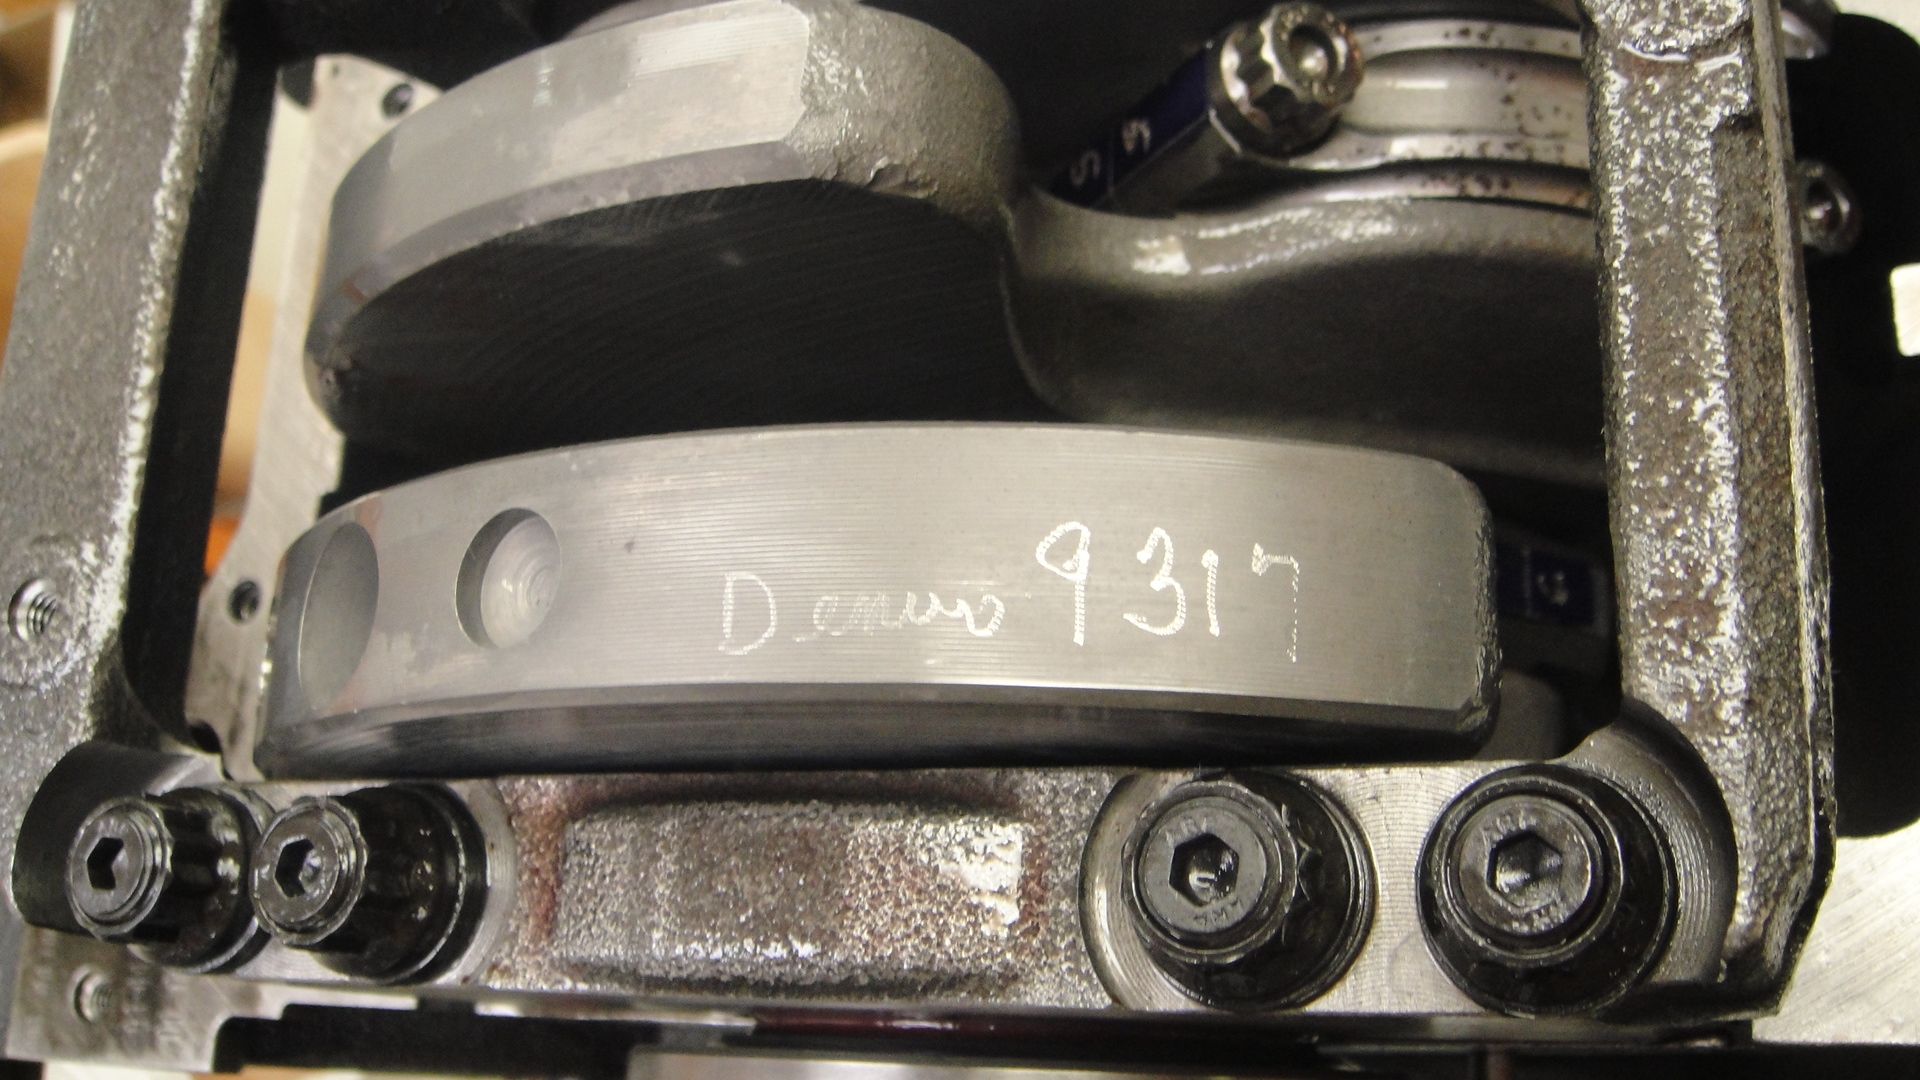
Lower End:
The 6g75 comes from the factory with a forged crankshaft and 4 bolt main bearing caps. To complement the set up, I had the crankshaft nitrited, straightened, polished, and balanced. All new Clevite Trimetal 77 main bearings and rod bearings were also installed after being coated by Calico. (Calico Coatings) This coating helps the bearings hold oil in the event of shock loading i.e. what’s experienced when using nitrous oxide or drag racing. To finish it off, the main bearing bolts were replaced with ARP studs and nuts. The entire rotating assembly was balanced including the aluminum flywheel and pressure plate. Even the harmonic dampener was checked.
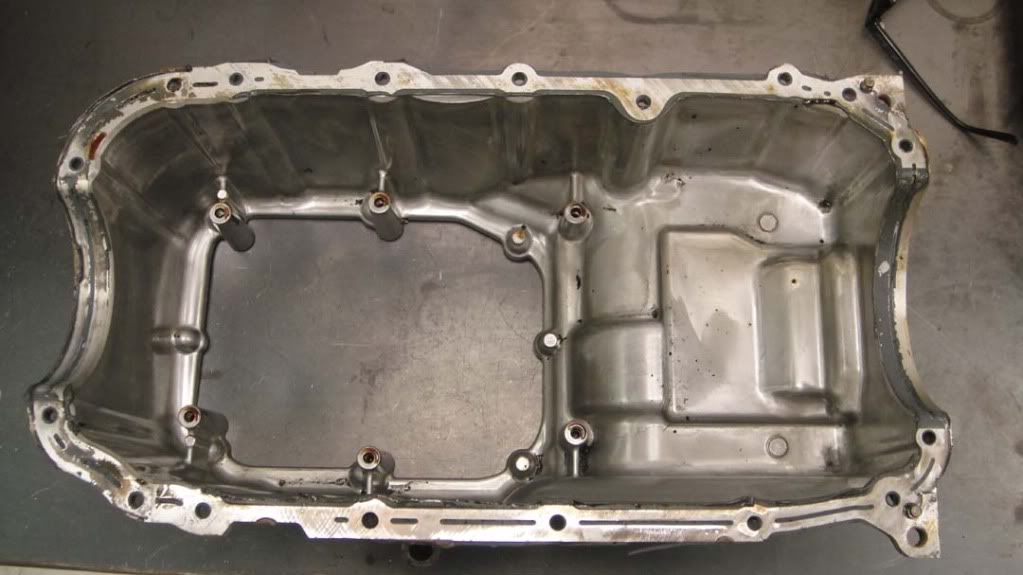
The MIVEC version of the 6G75 found in the 4g Eclipses and Galant Ralliart utilize an oil pan baffle that helps direct oil to the oil pump pick up tube during +/- G forces. I purchased this baffle and fit it to my non mivec oil pan. The threaded holes to attach the baffle were already in the original oil pan, so all I had to do was bolt it in.
Here is the oil pan as it comes on the non-mivec models:
Here is the oil pan baffle used on the mivec engines:
Here are a couple pics of the baffle installed to the oil pan:
-----------------------------------------------------------------------------------------------
Pistons, Connecting Rods, and Displacement:
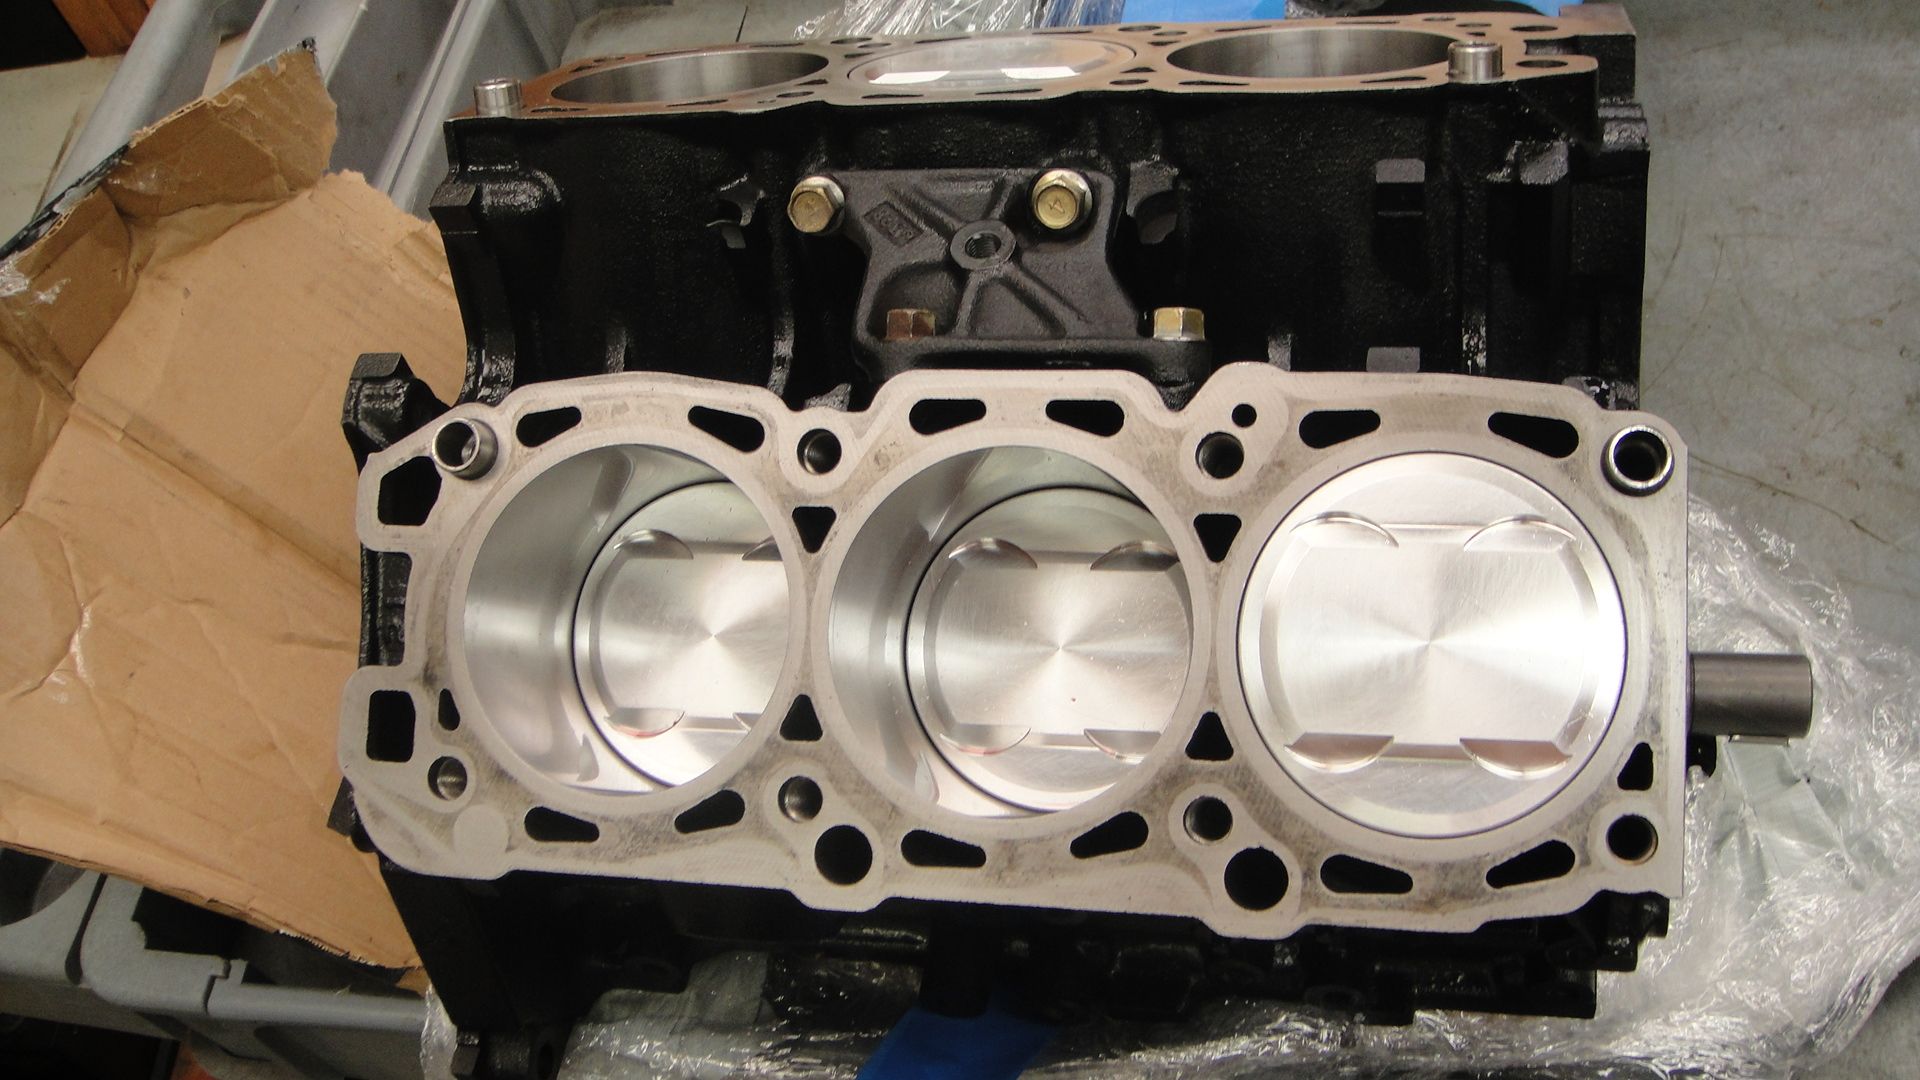
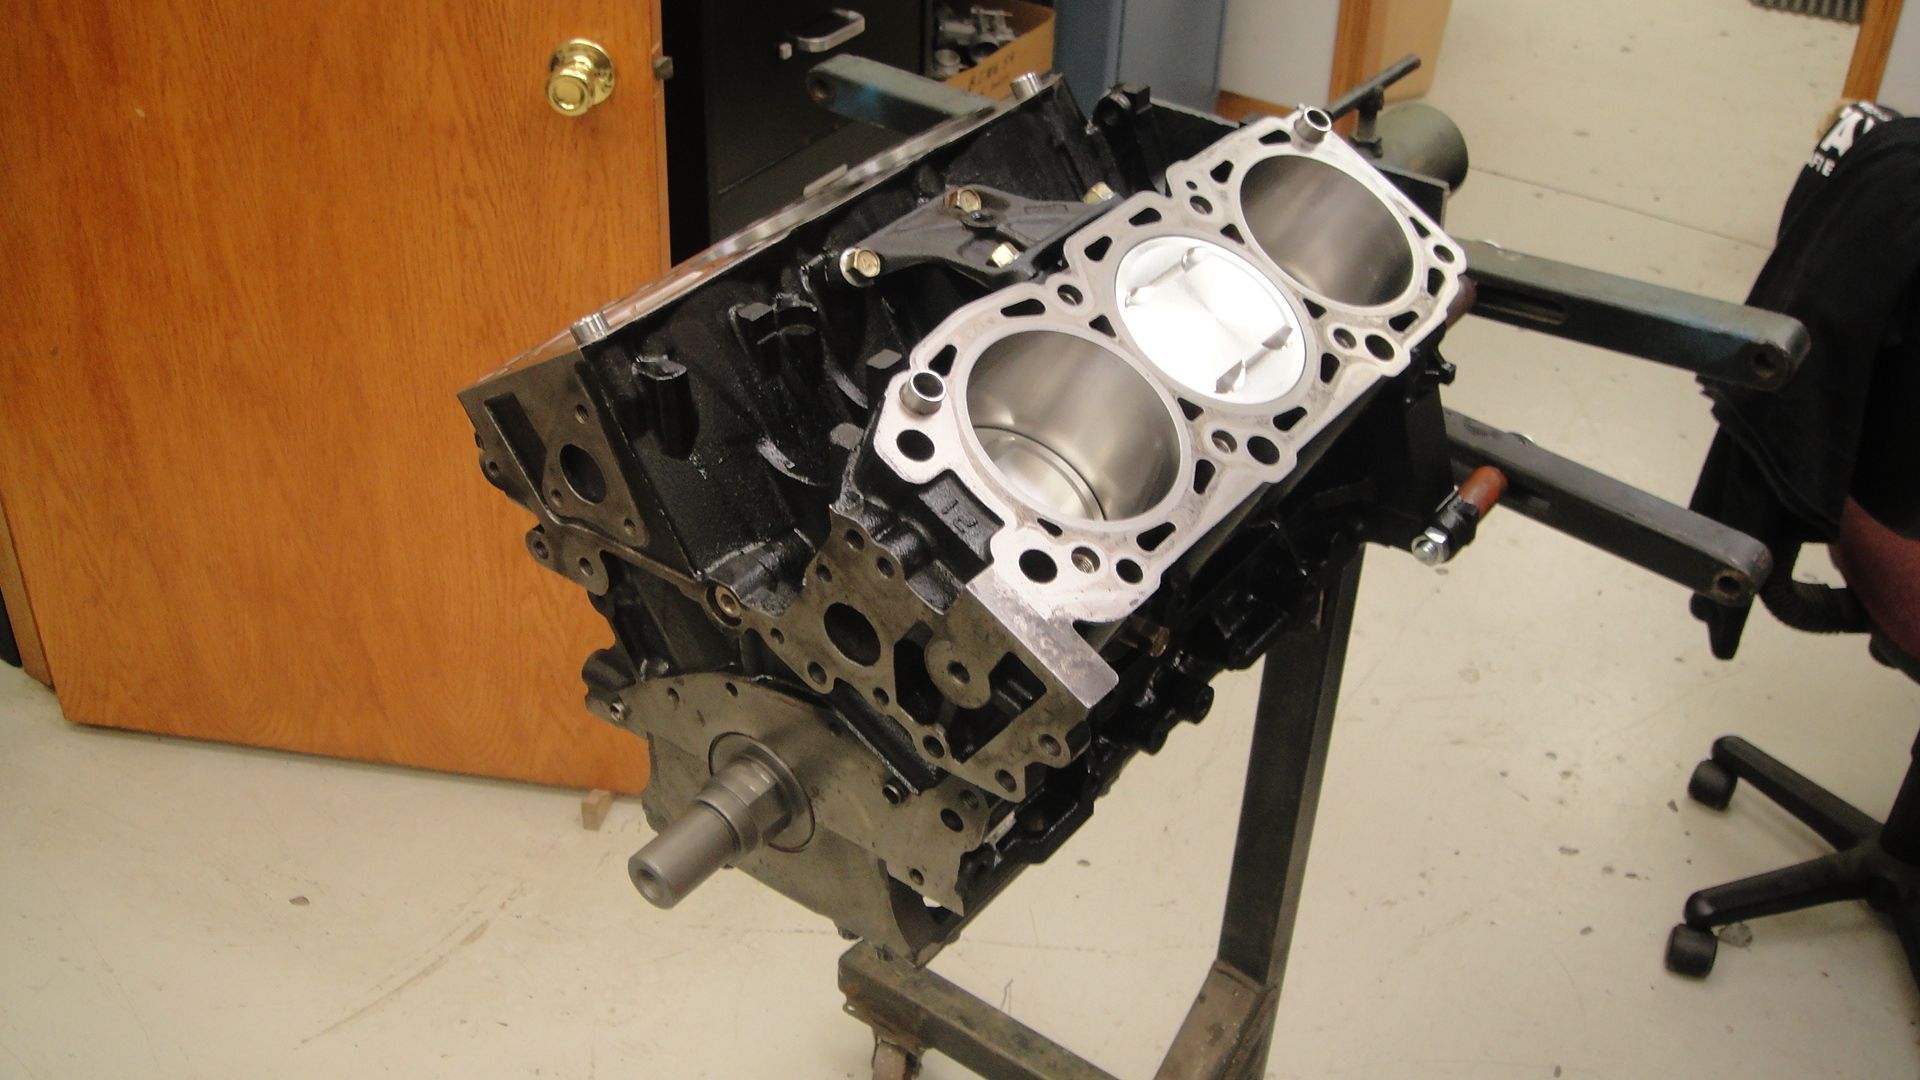
I wanted to increase the stock 3.8 liters of displacement to whatever would be possible, but still safe for up to a +100 shot of nitrous and have a long life 100,000+ miles. The block was sonic tested and the consensus of the testing facility and the engine builder was that the bores could be opened up from the stock 95mm to 97mm. This would be an increase in bore size of 2mm (.080”) raising the total displacement from 3.8 liters (232 ci) to 4.0 liters (244 ci). Custom head gaskets were produced by Cometic to accommodate the larger bore size.
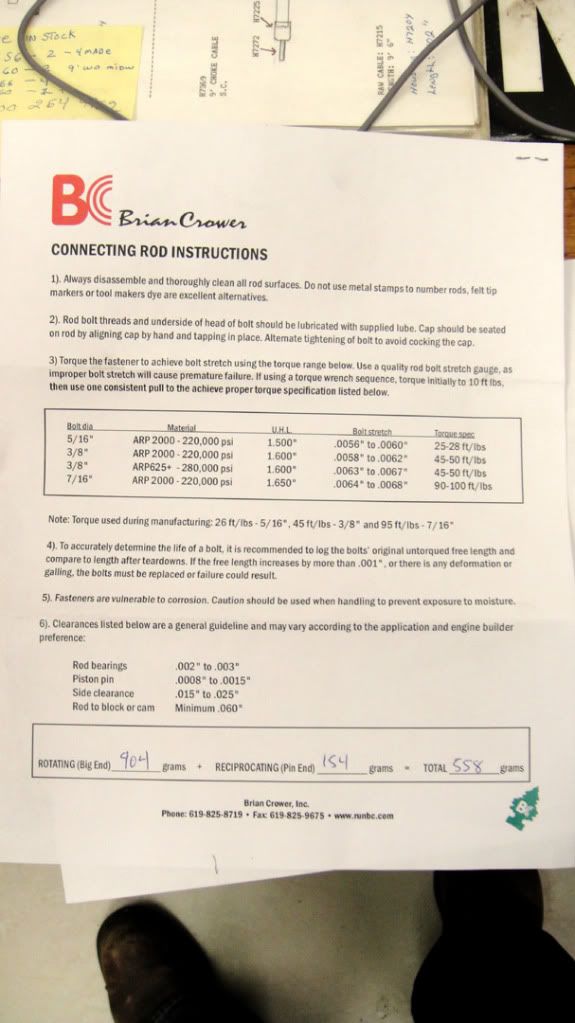
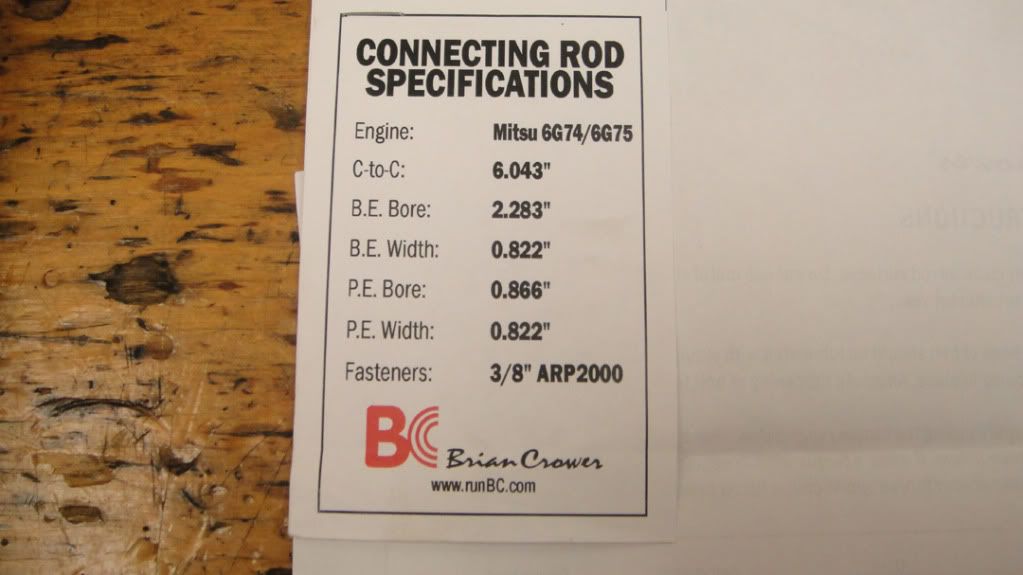
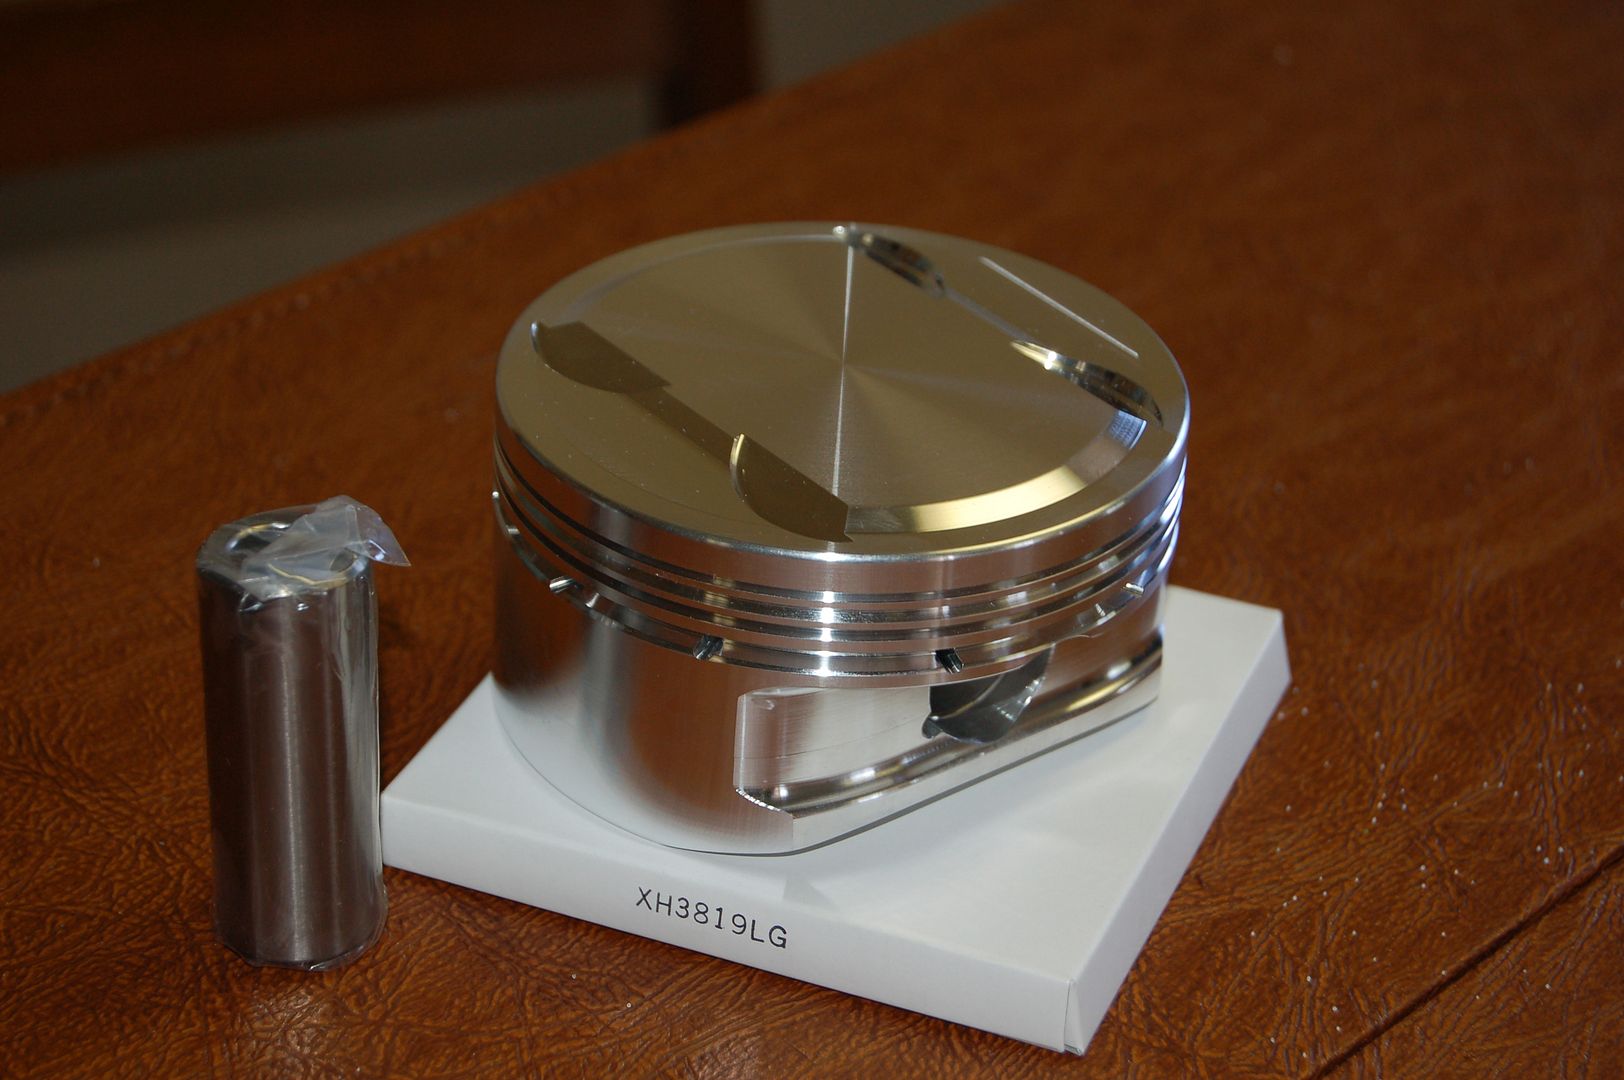
As for pistons I went with custom 10.5:1 pieces produced by CP. They’re forged instead of cast like the stock pistons. For the connecting rods, I selected Brian Crower Sportsman Series with ARP hardware (BC6139). They are good to 200hp per cylinder, obviously more than I’ll ever need.
I also looked into increasing displacement via increasing the stroke. It was originally thought that the engine could be stroked another 1mm to 2mm but because I had already purchased the Brian Crower connecting rods, I would have to scrap those and get custom ones made. There was not enough room between the piston pin and piston rings to make a shorter piston so that was out. If custom rods were produced and the crankshaft machined, an estimated total displacement of 4.1 liters to 4.2 liters could be achieved. This would be an extremely high cost to horsepower ratio though for the additional 100ccs to 200ccs of displacement. I decided to stay with the Brian Crower connecting rods and didn’t pursue increasing the stroke.
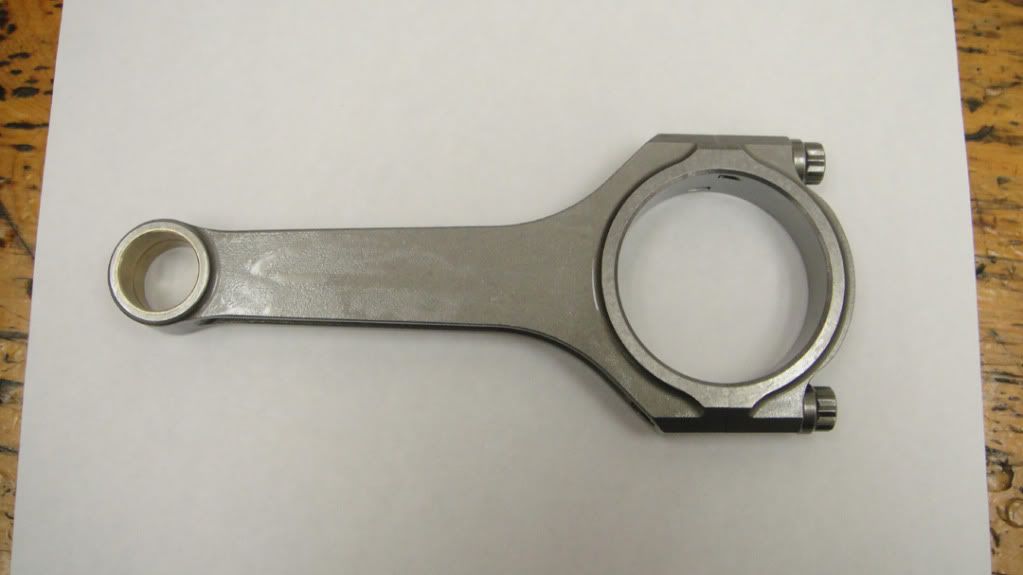
Connecting Rods:

Custom 10.5:1 Oversized Pistons:
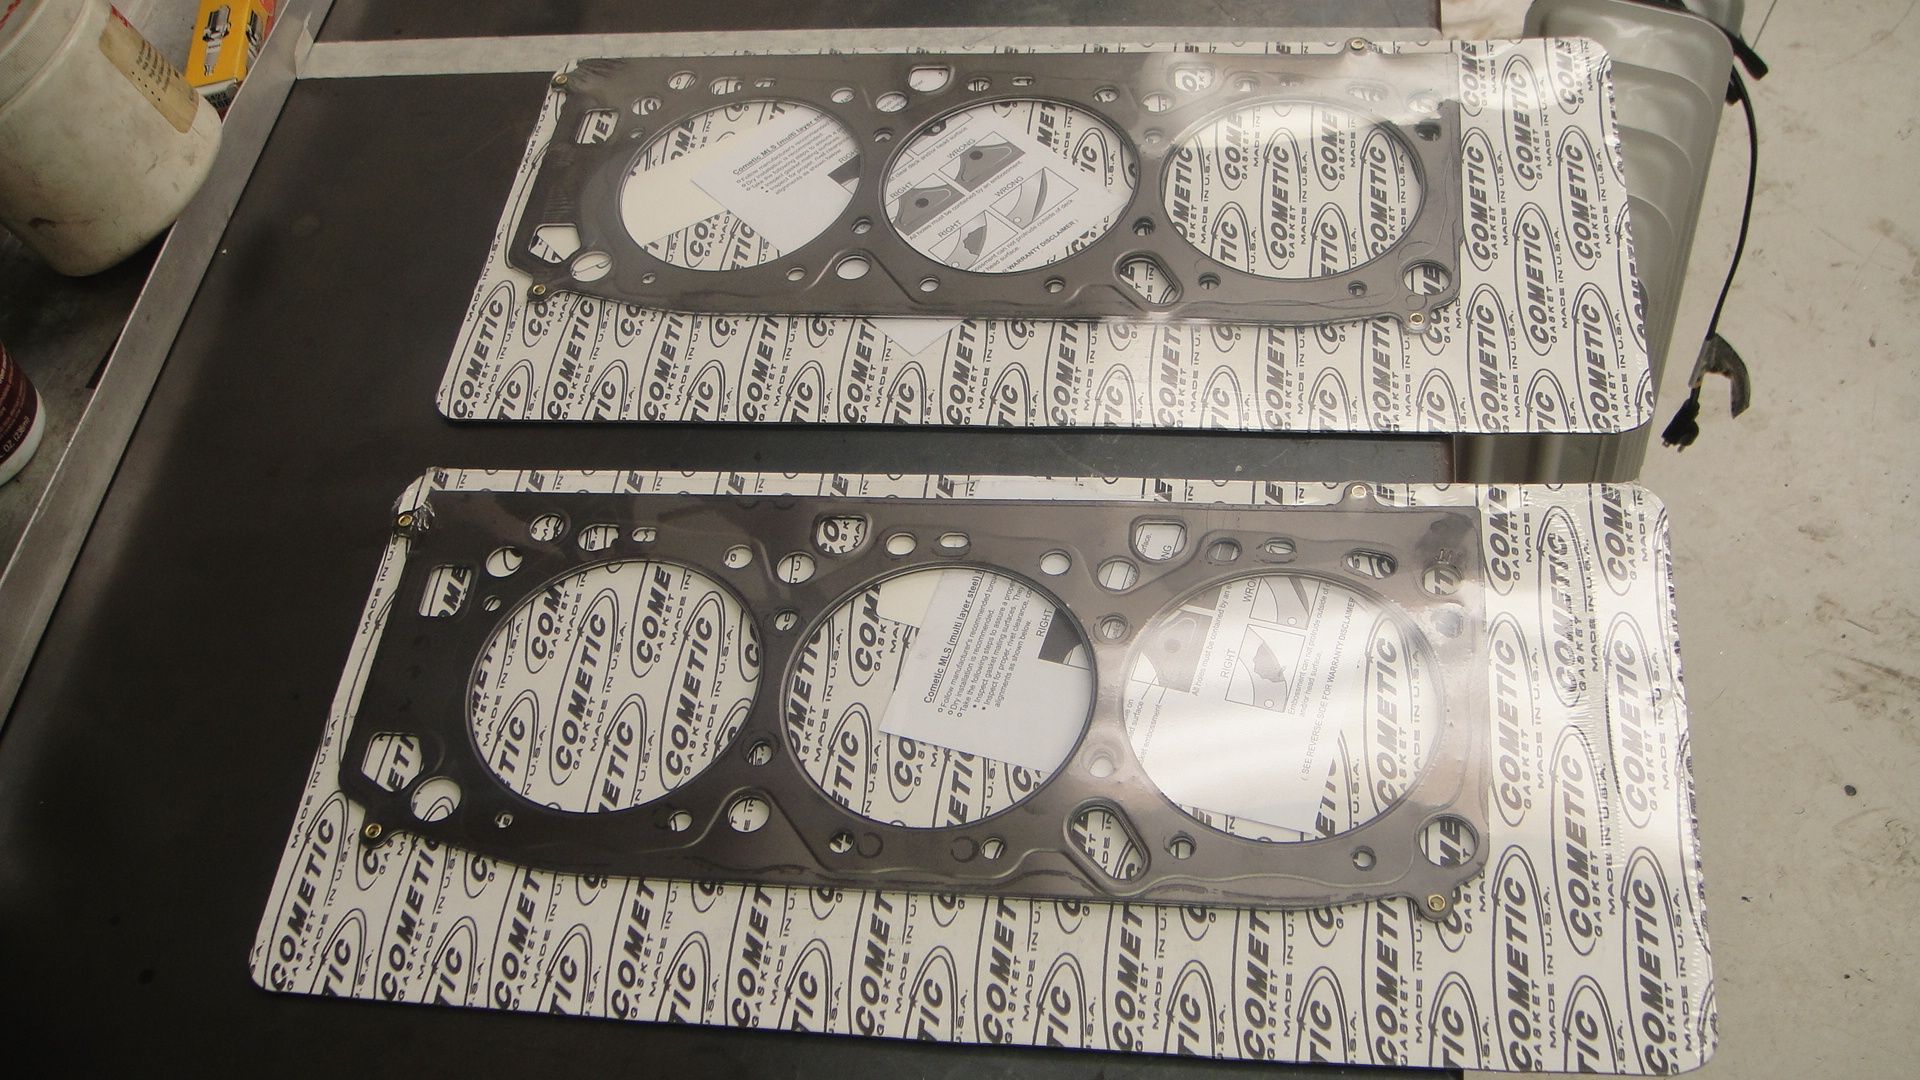
Custom Head Gaskets:
All machining and short block assembly was done by Advanced Engine Concepts in Green Lake, WI. They have a boring/honing plate for the 6G75 engines and do excellent work.
Here are some pictures after it came back from the engine builder:


-----------------------------------------------------------------------------------------------
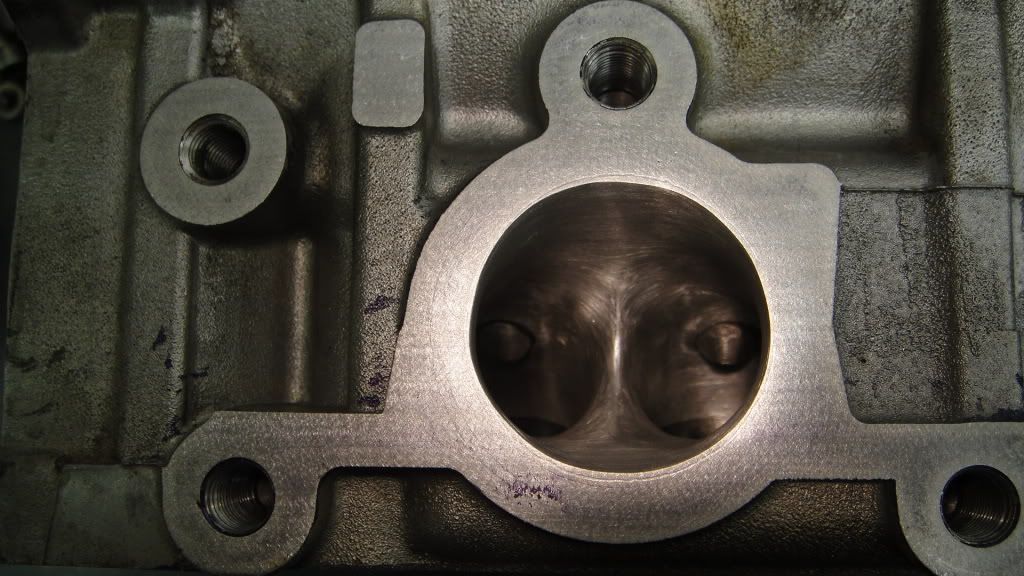
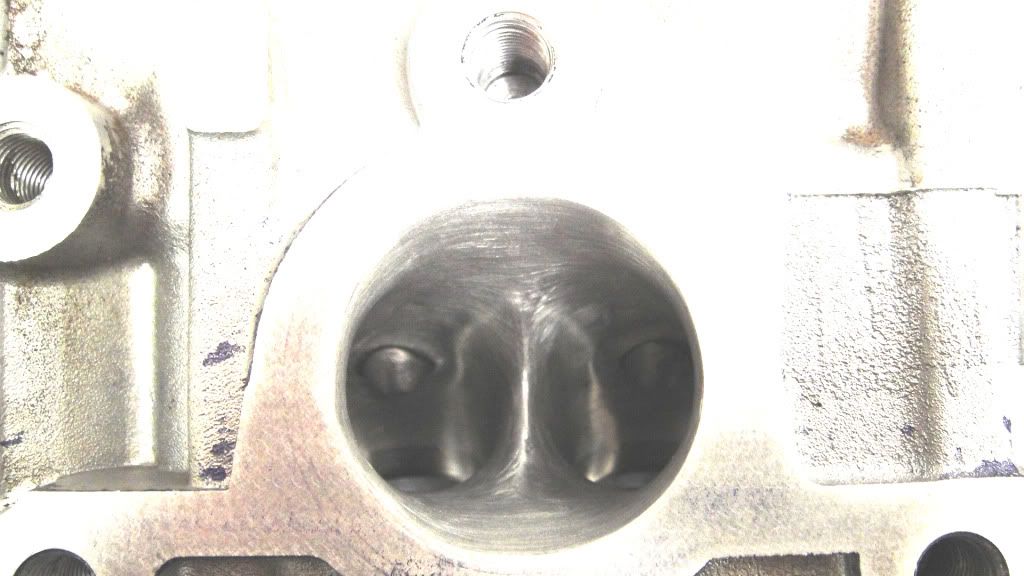
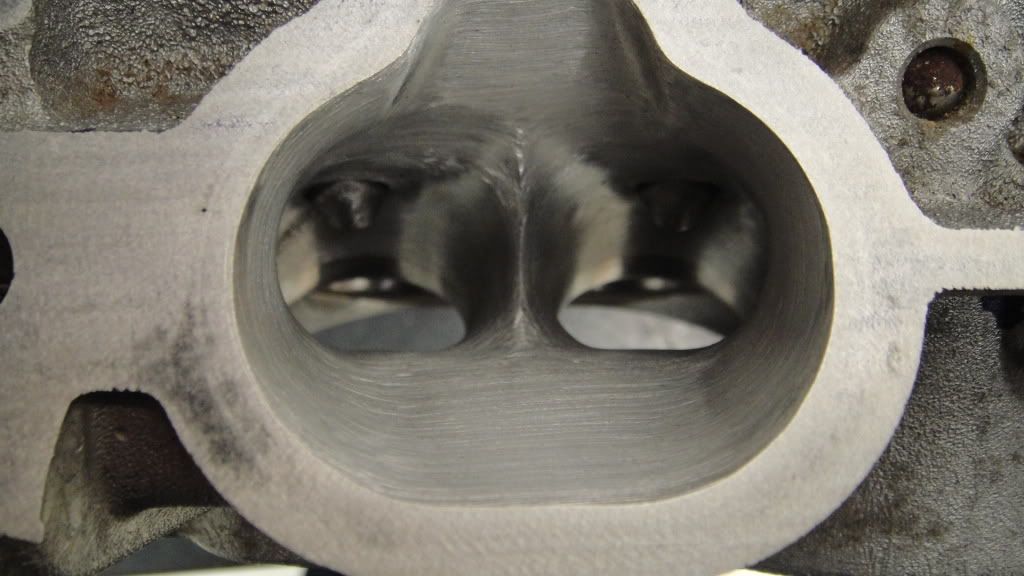
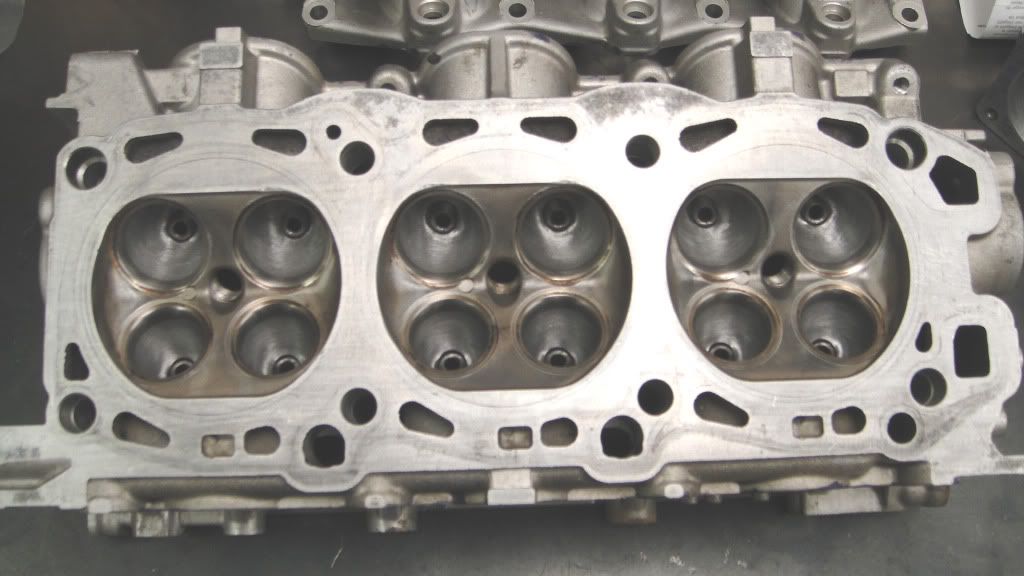
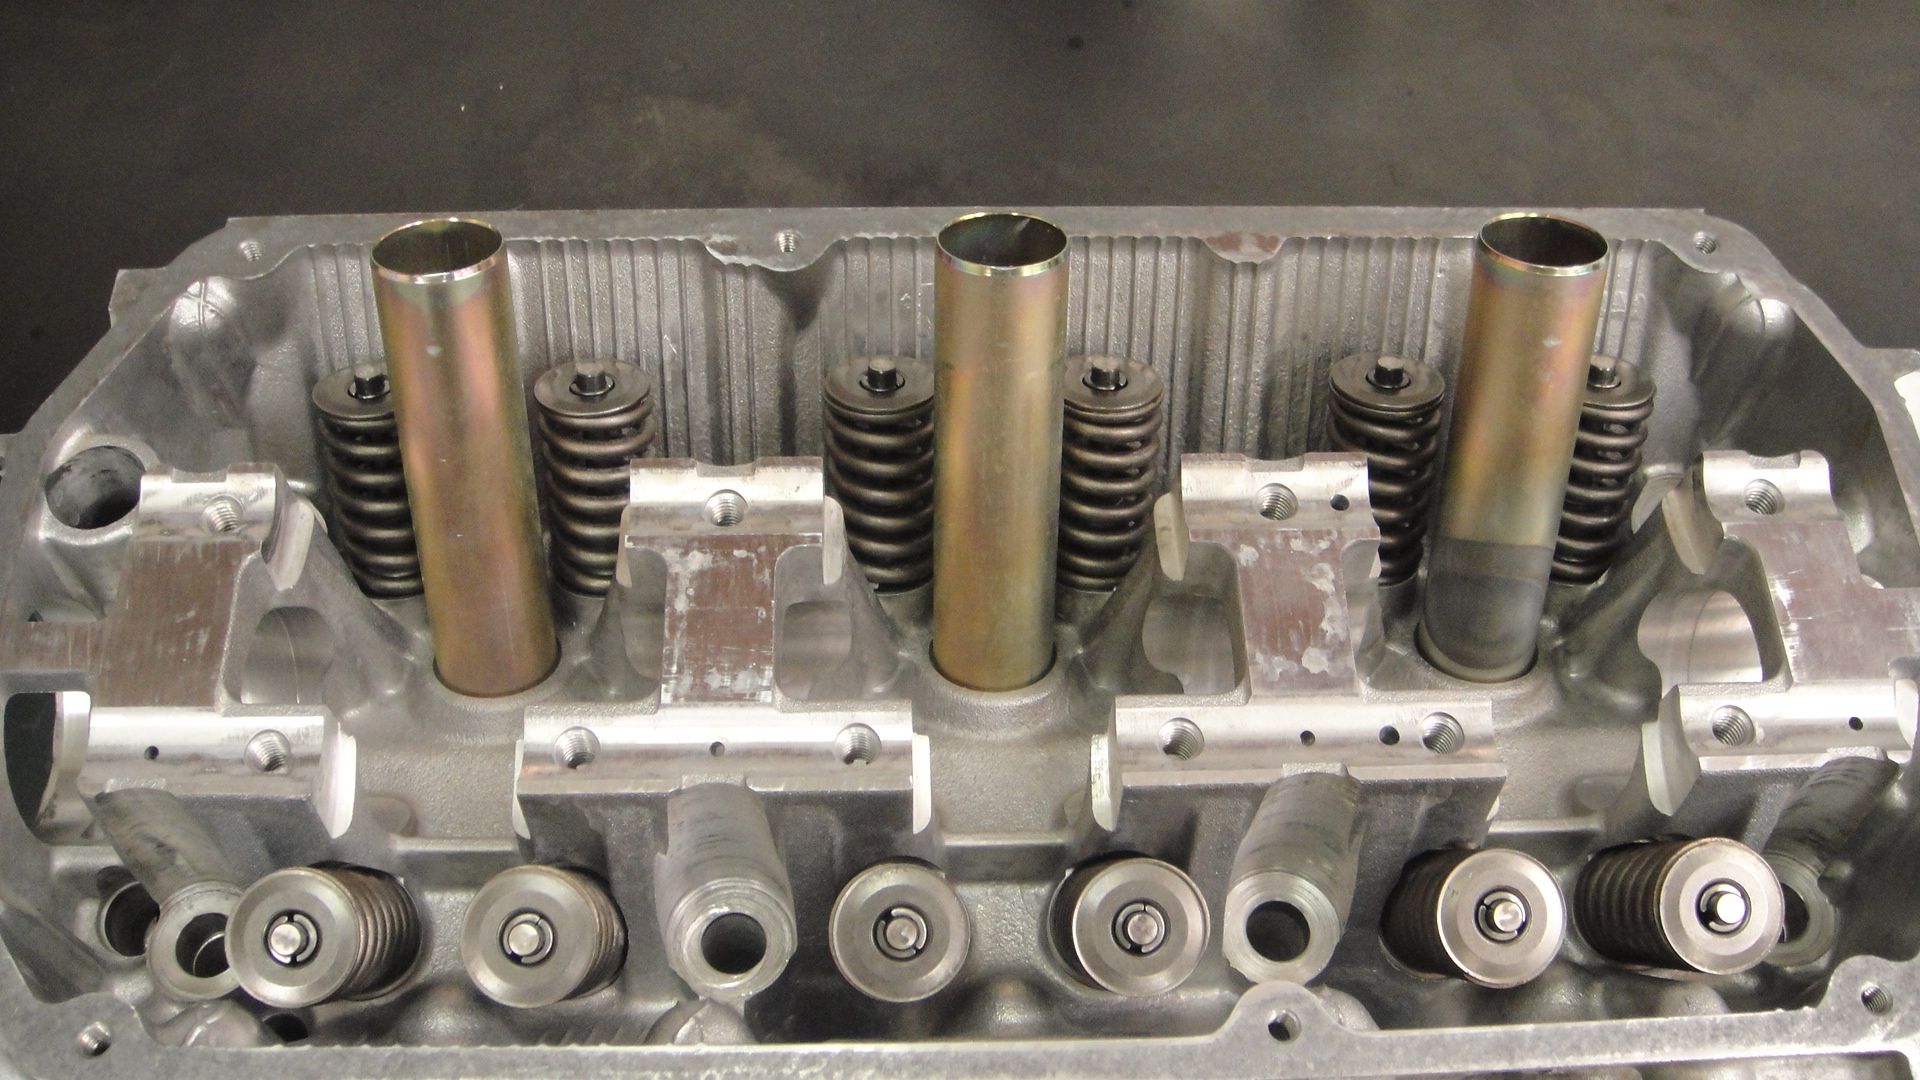
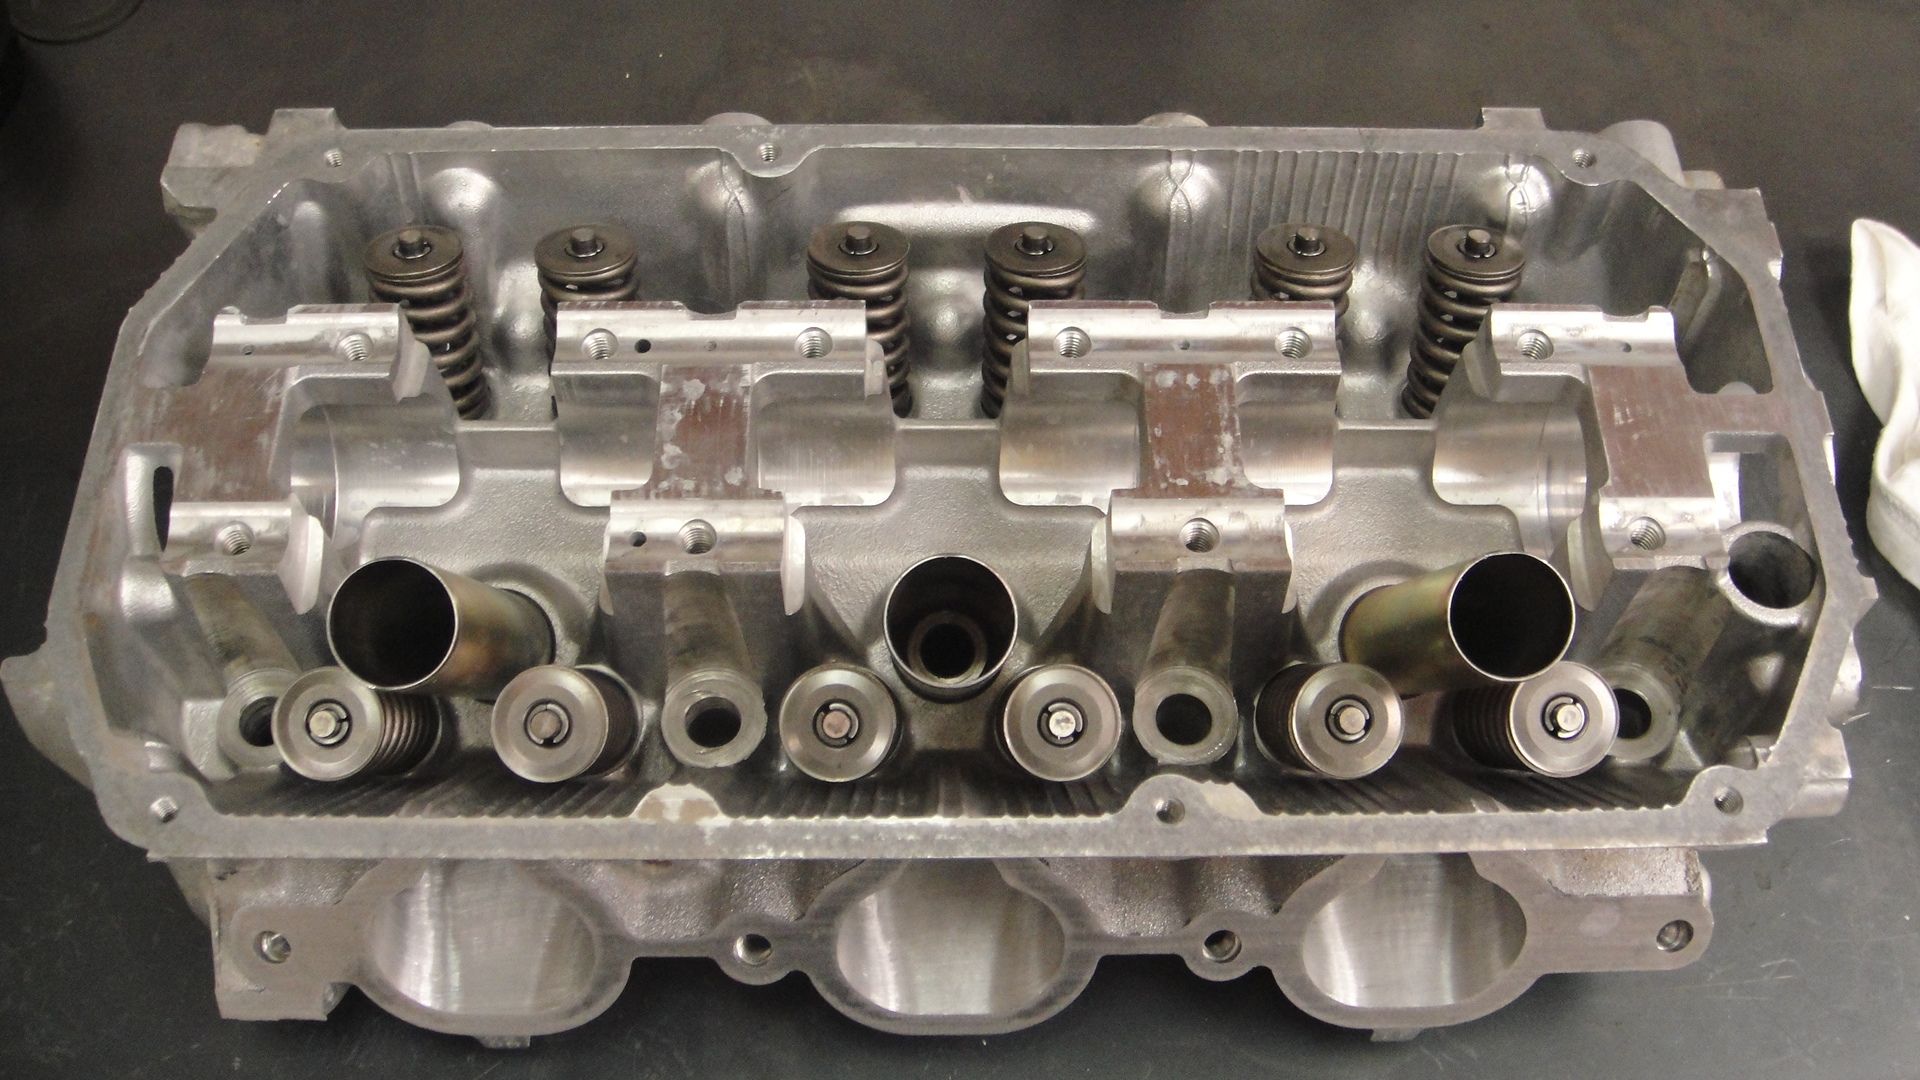
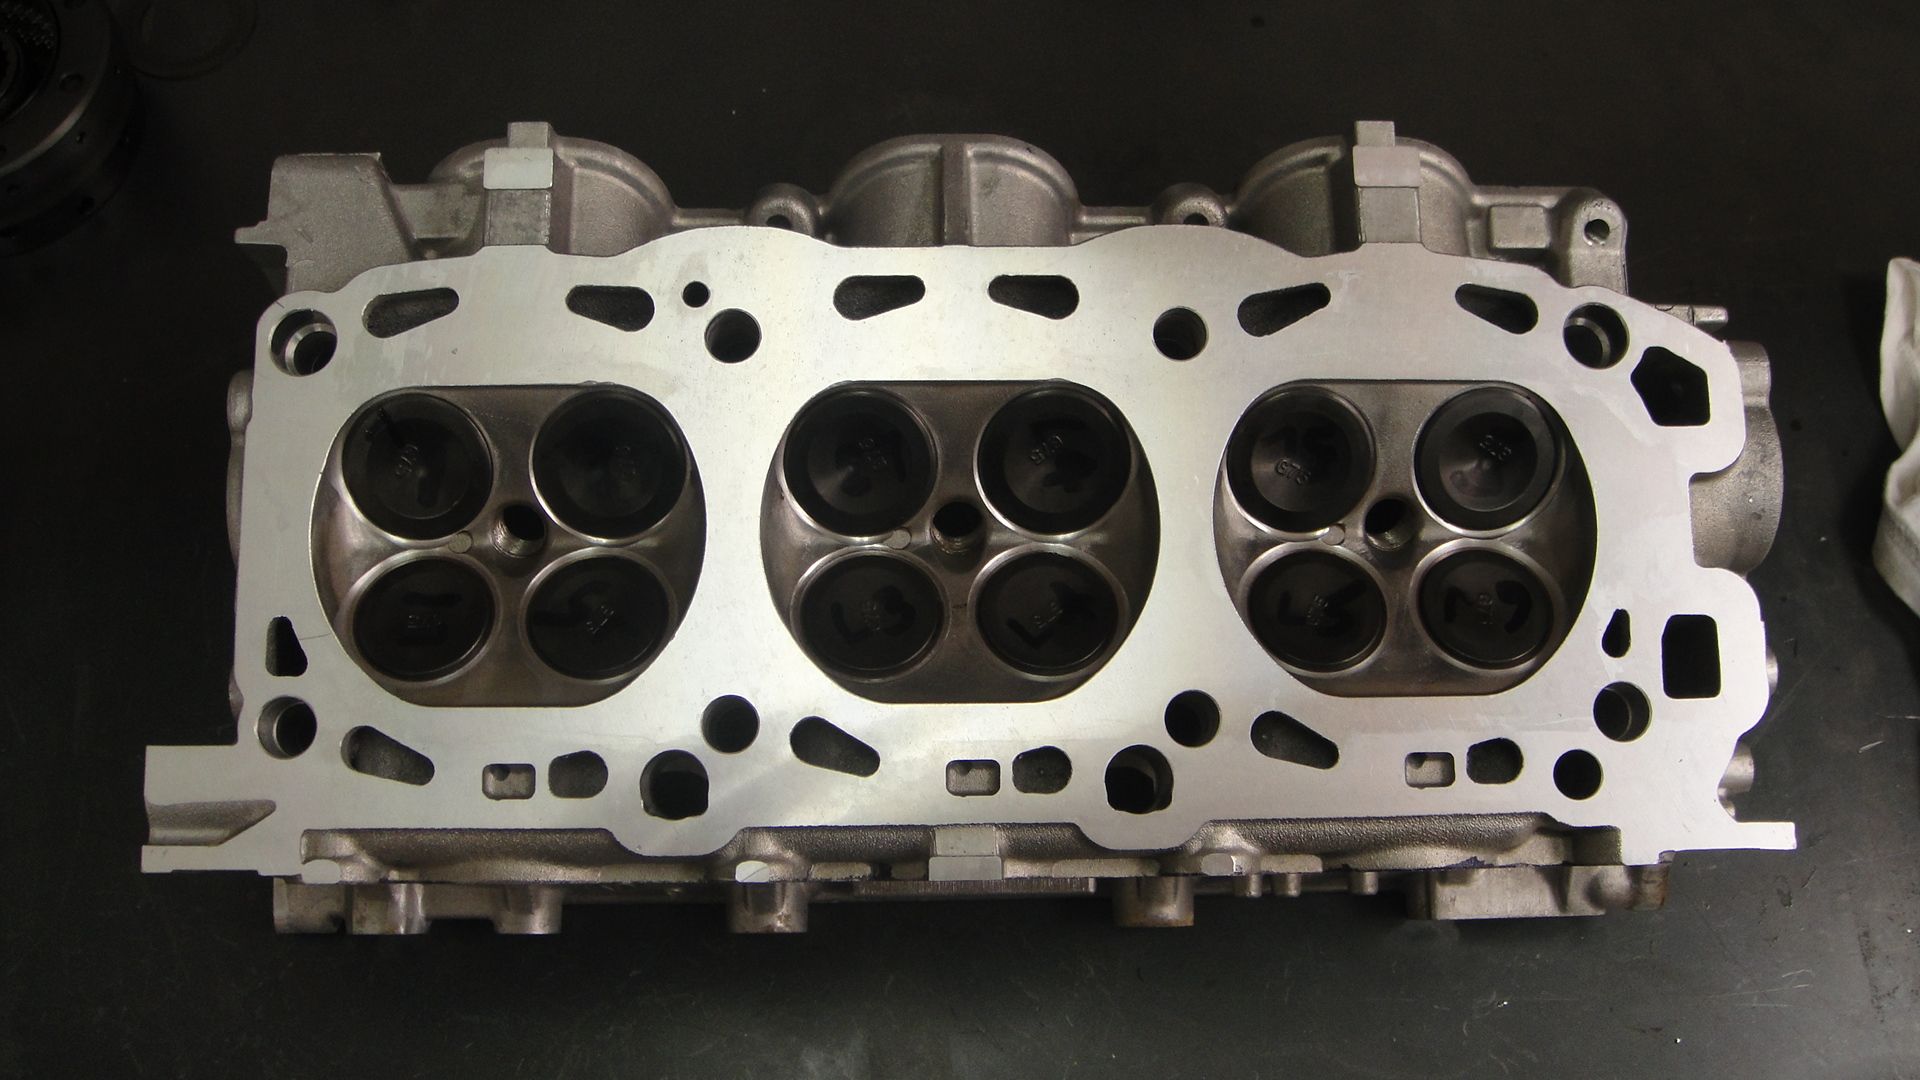
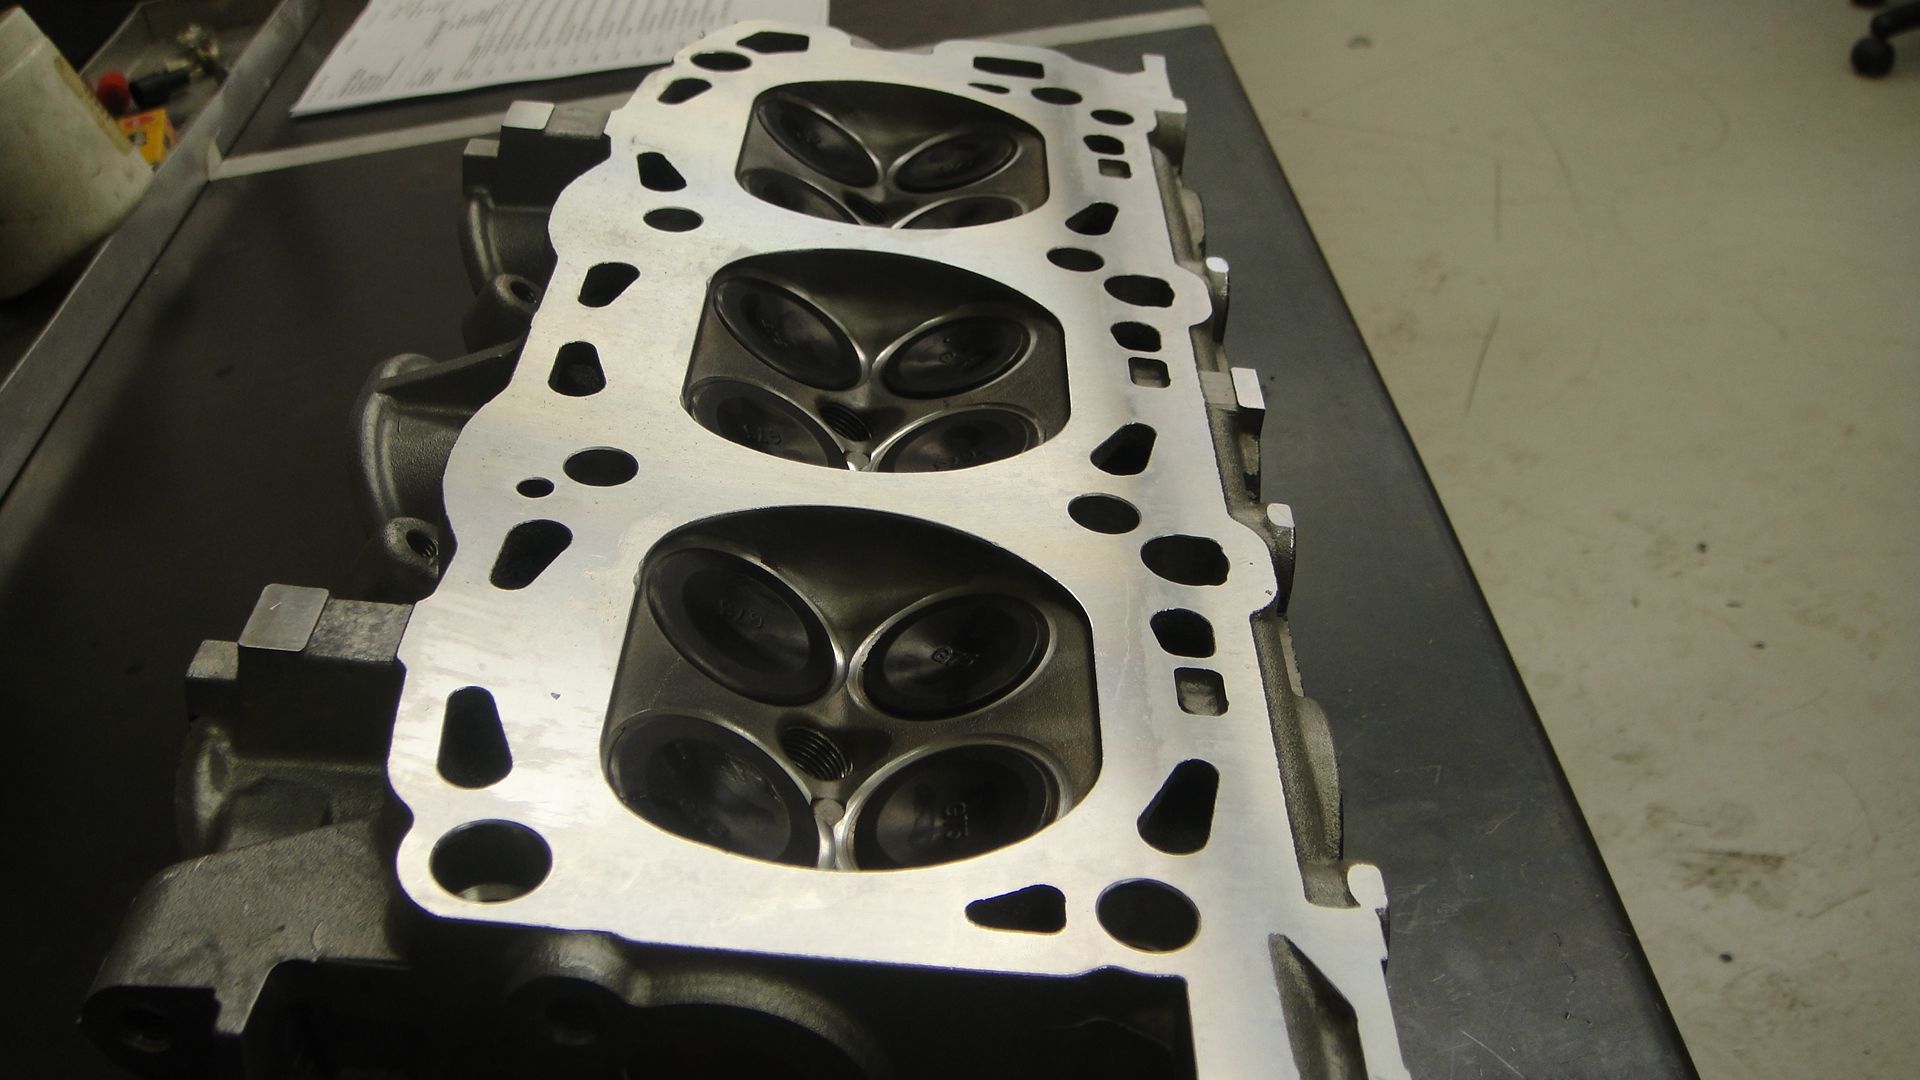
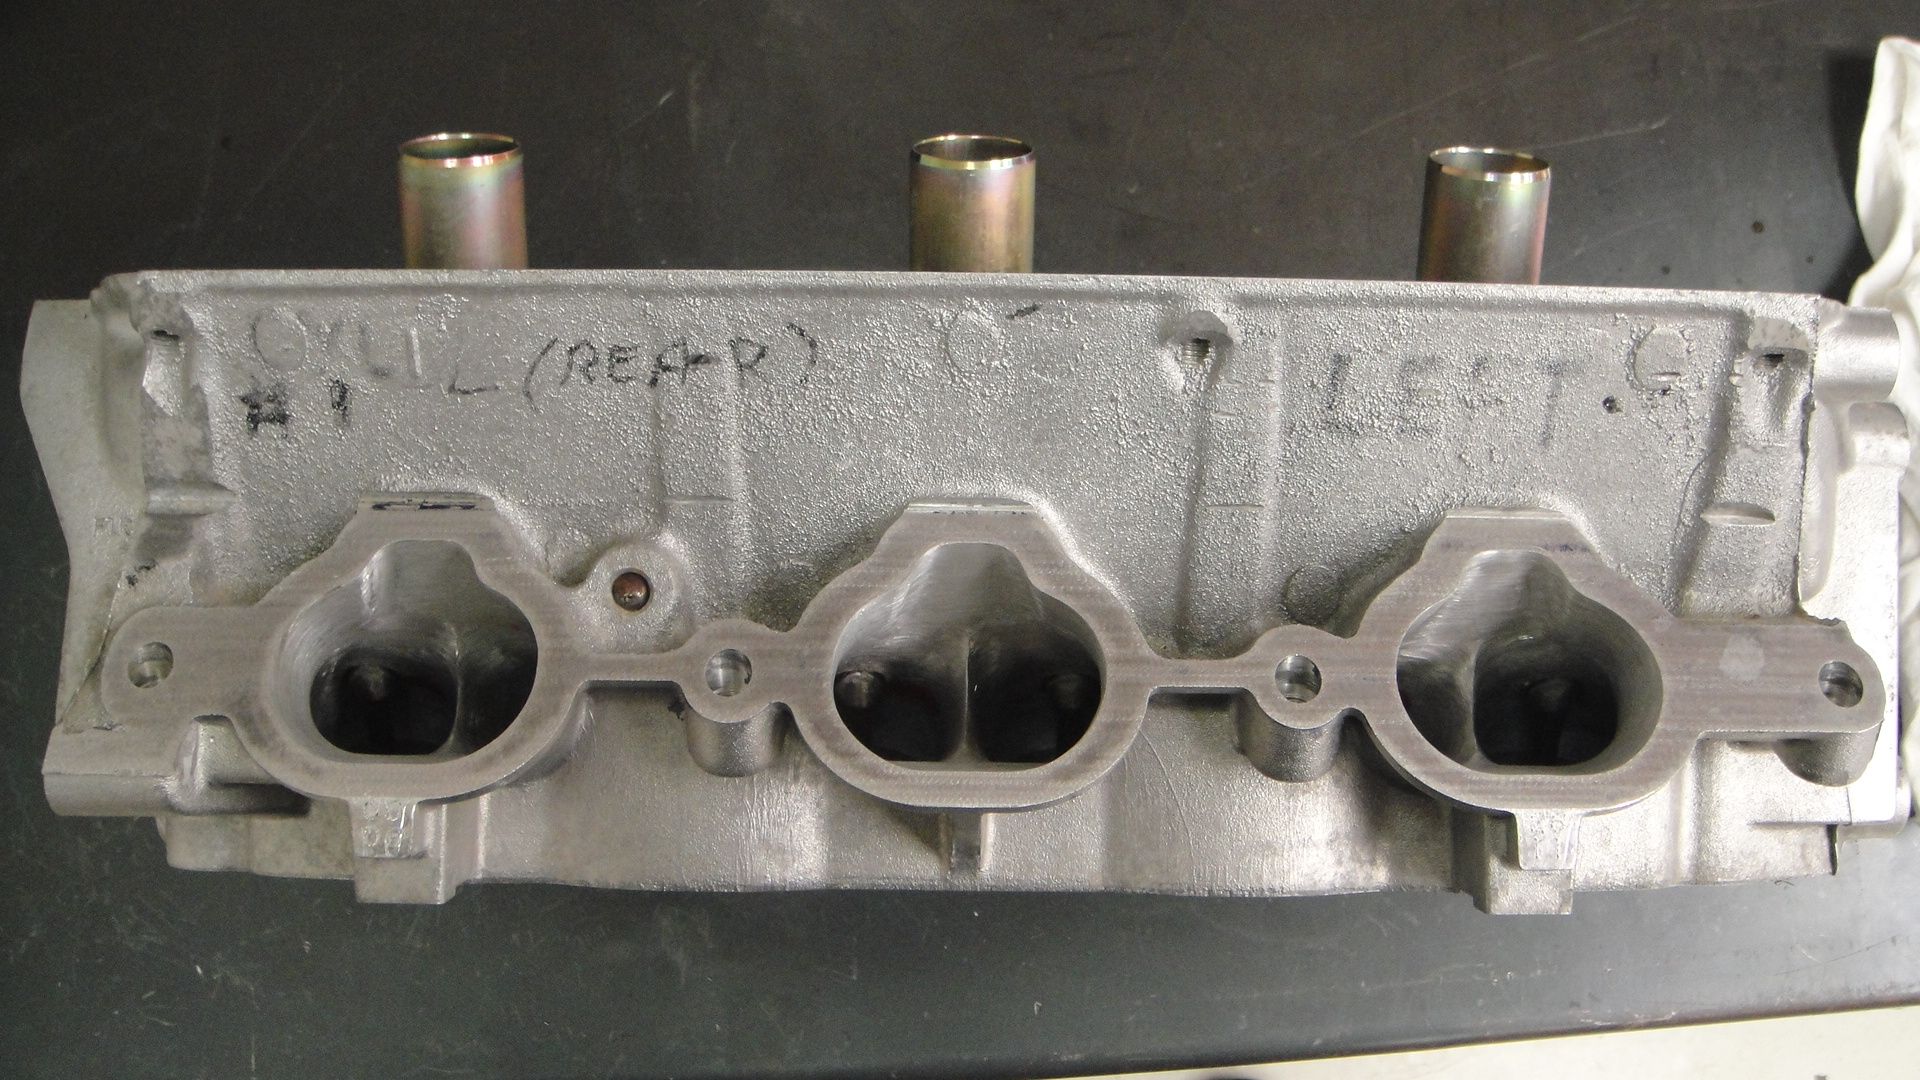
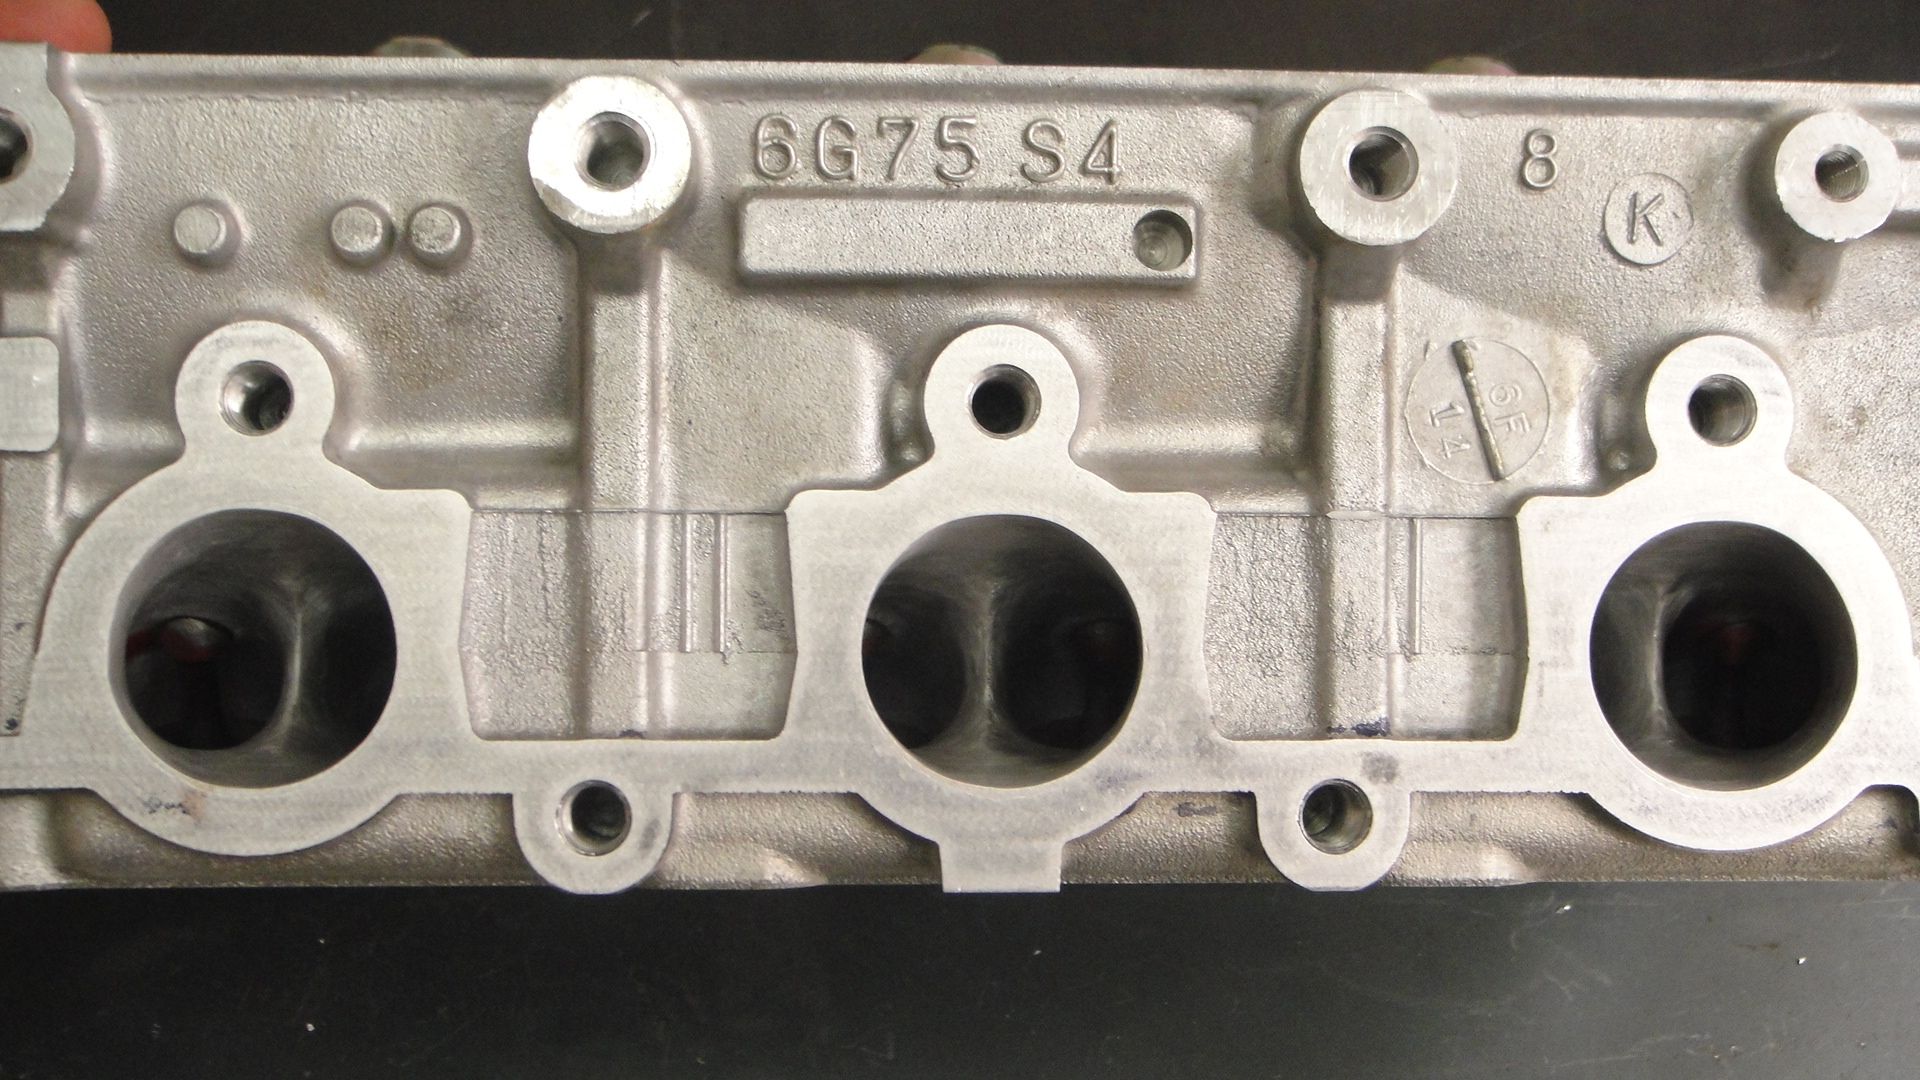
Cylinder Heads:
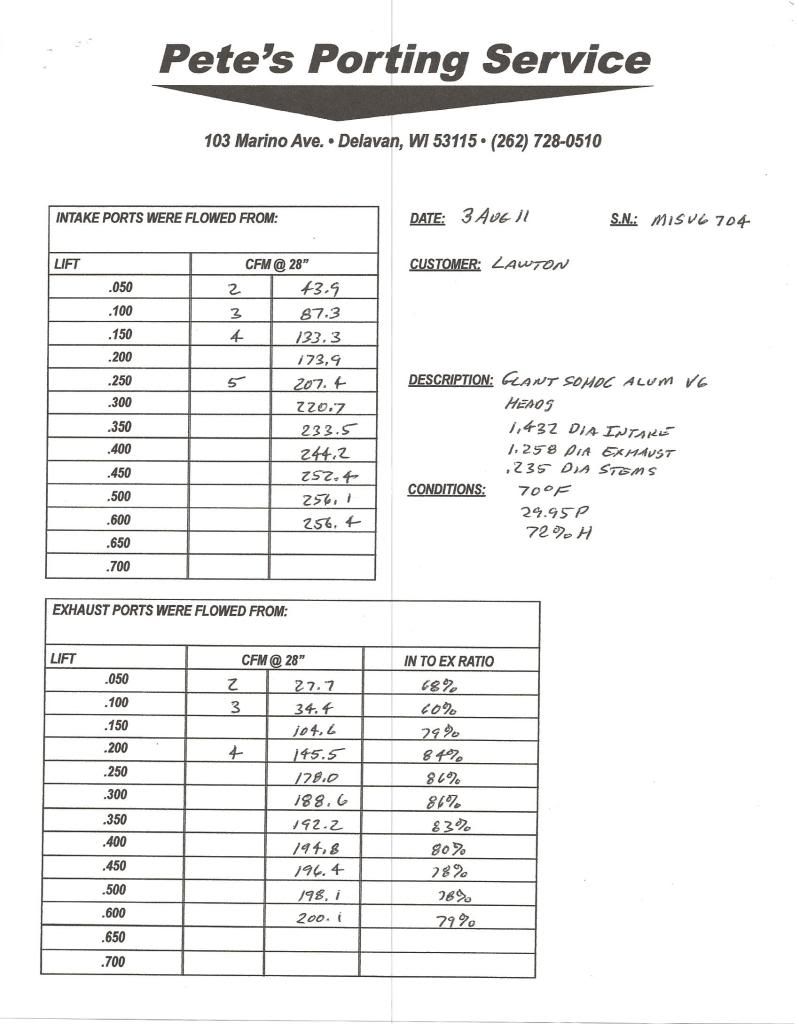
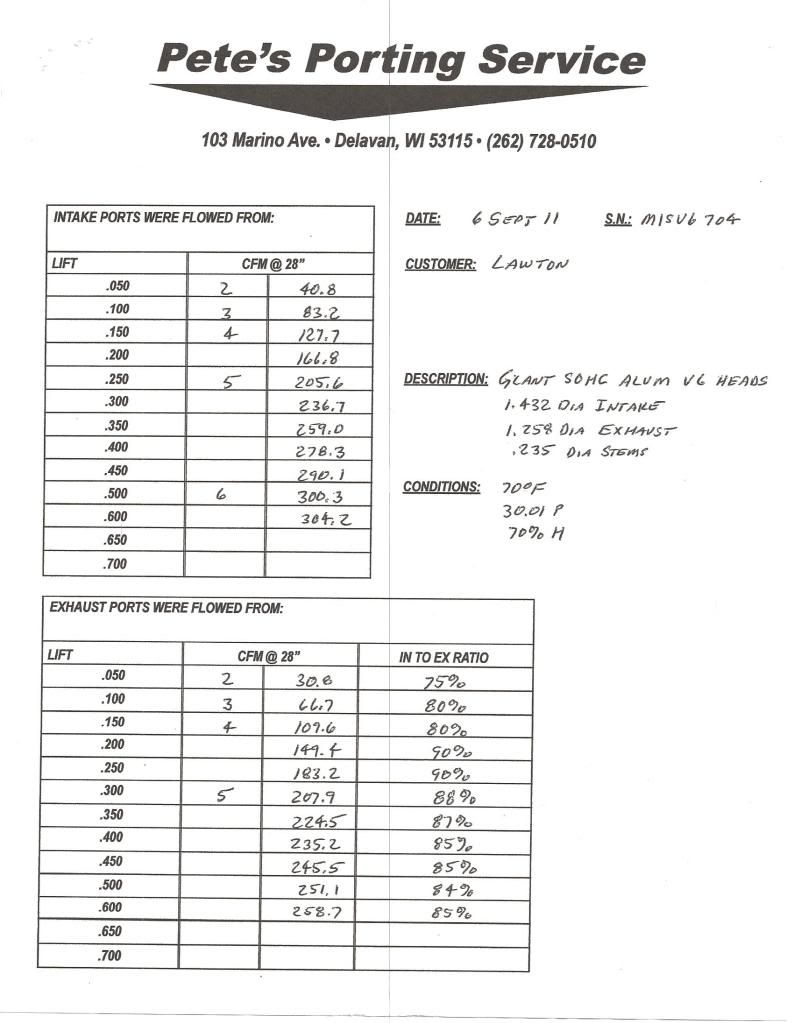
The cylinder heads and gasket set were sent in for a complete professional port job & gasket match. See work sheets for before and after flow numbers. The combustion chambers were also polished for possible nitrous use.
A radius valve job was then performed and a minimal truing cut was made to ensure flatness at gasket surface. After machining and cleaning, the valves were installed using Racing Performance Works heavy duty valve springs with the original valve cotters and spring retainers. I was pleased to find out the heads come with stainless valves stock.
The stock cam shafts were replaced with Racing Performance Works Stage 2 cam shafts. This set was made specifically for a manual transmission and naturally aspirated engine. I had to specifically ask for this grind as RPW no longer offers different grinds for automatic and manual transmissions. These are made from new blanks, not reground existing parts. To finish off the valve train, Fidanza adjustable camshaft wheels were installed with ARP hardware.
Cam timing was set to centerline between exhaust and intake lobes max lift TDCE on both banks. The spacing between the intake and exhaust lobes on the right bank is slightly further apart. I was told by Racing Performance Works that this is normal and allows for belt stretch. This difference can even be found on the OEM cam shafts. It will not cause any appreciable effects on performance or drivability.
The original 6g72 valve covers fit the new 6g75 perfectly except for one point. The PCV air inlet tube in the rear valve cover was too tall for the new custom upper intake manifold. It was cut down to 8mm in height and a 90 degree AN fitting was installed to clear the manifold. The rear valve cover was also fitted with an AN4 threaded oil return port for a bypass oiling system or any future turbo installation.
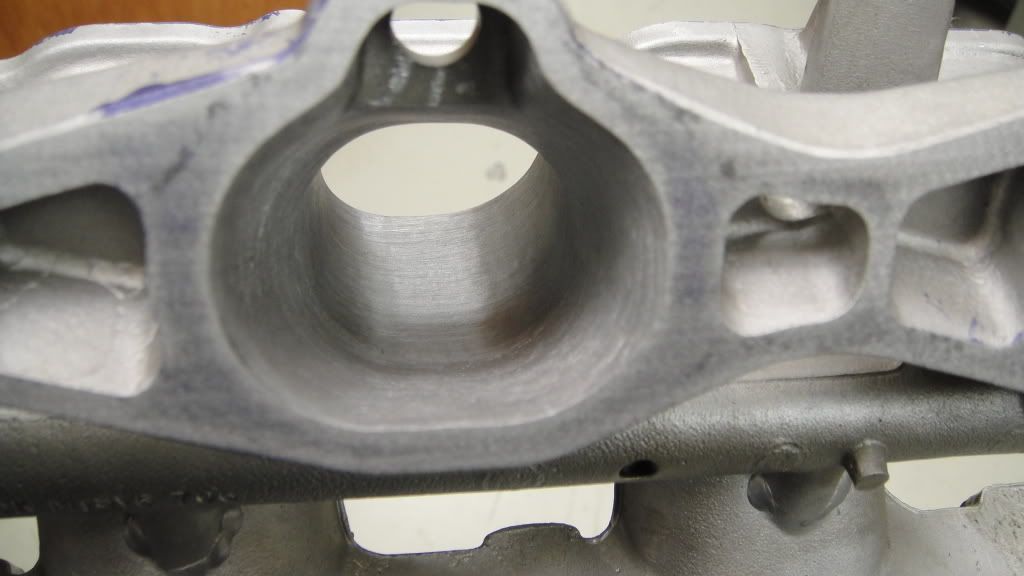
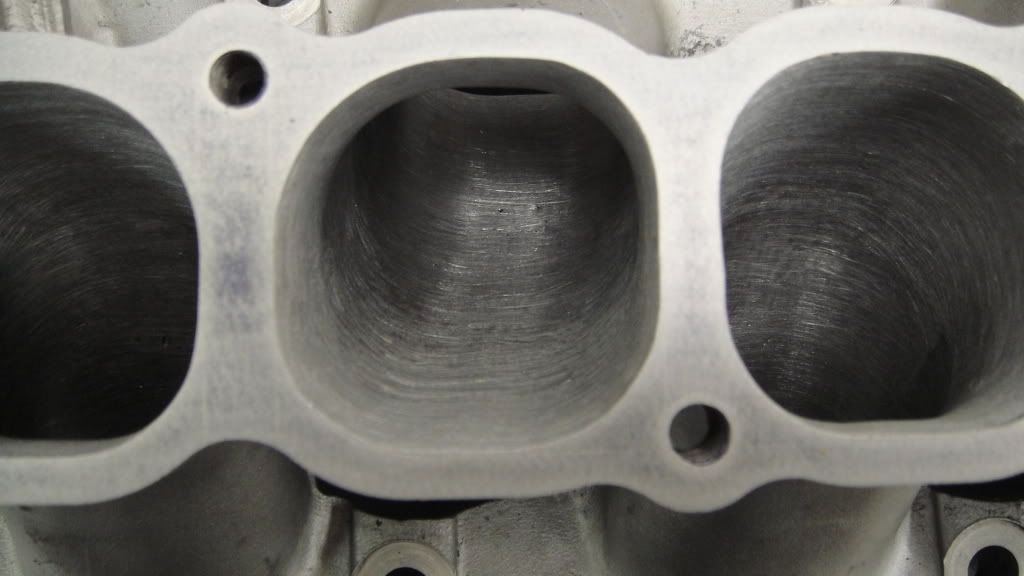
During Porting and Head Work:
Head Flow Numbers:
Before Porting:
After Porting:
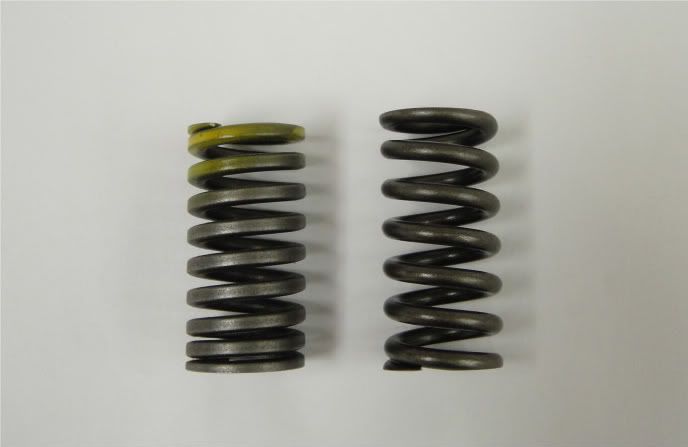
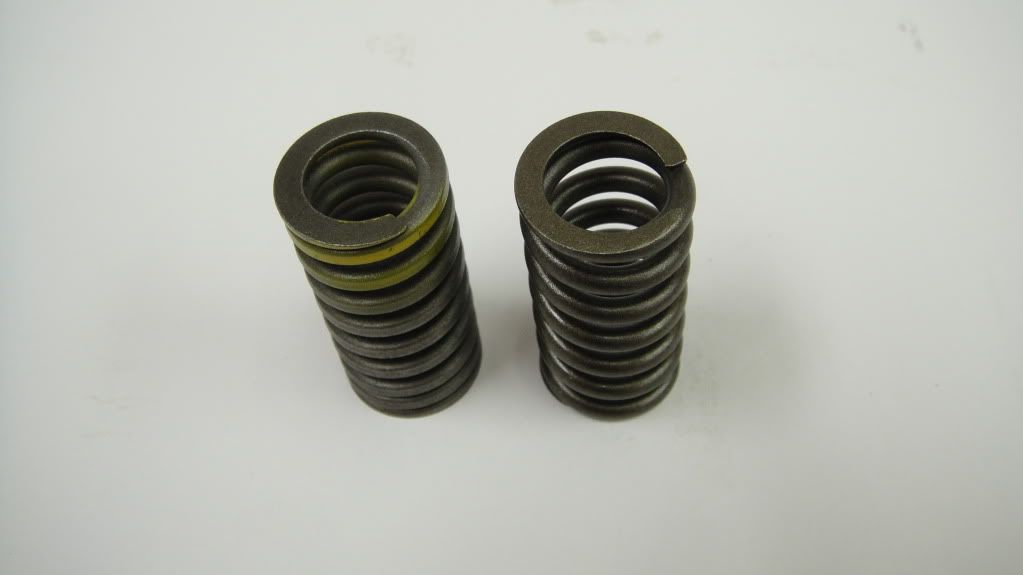
Here are some comparisons between the stock 6G72 3.0 liter valve spring and RPW heavy duty:
-----------------------------------------------------------------------------------------------
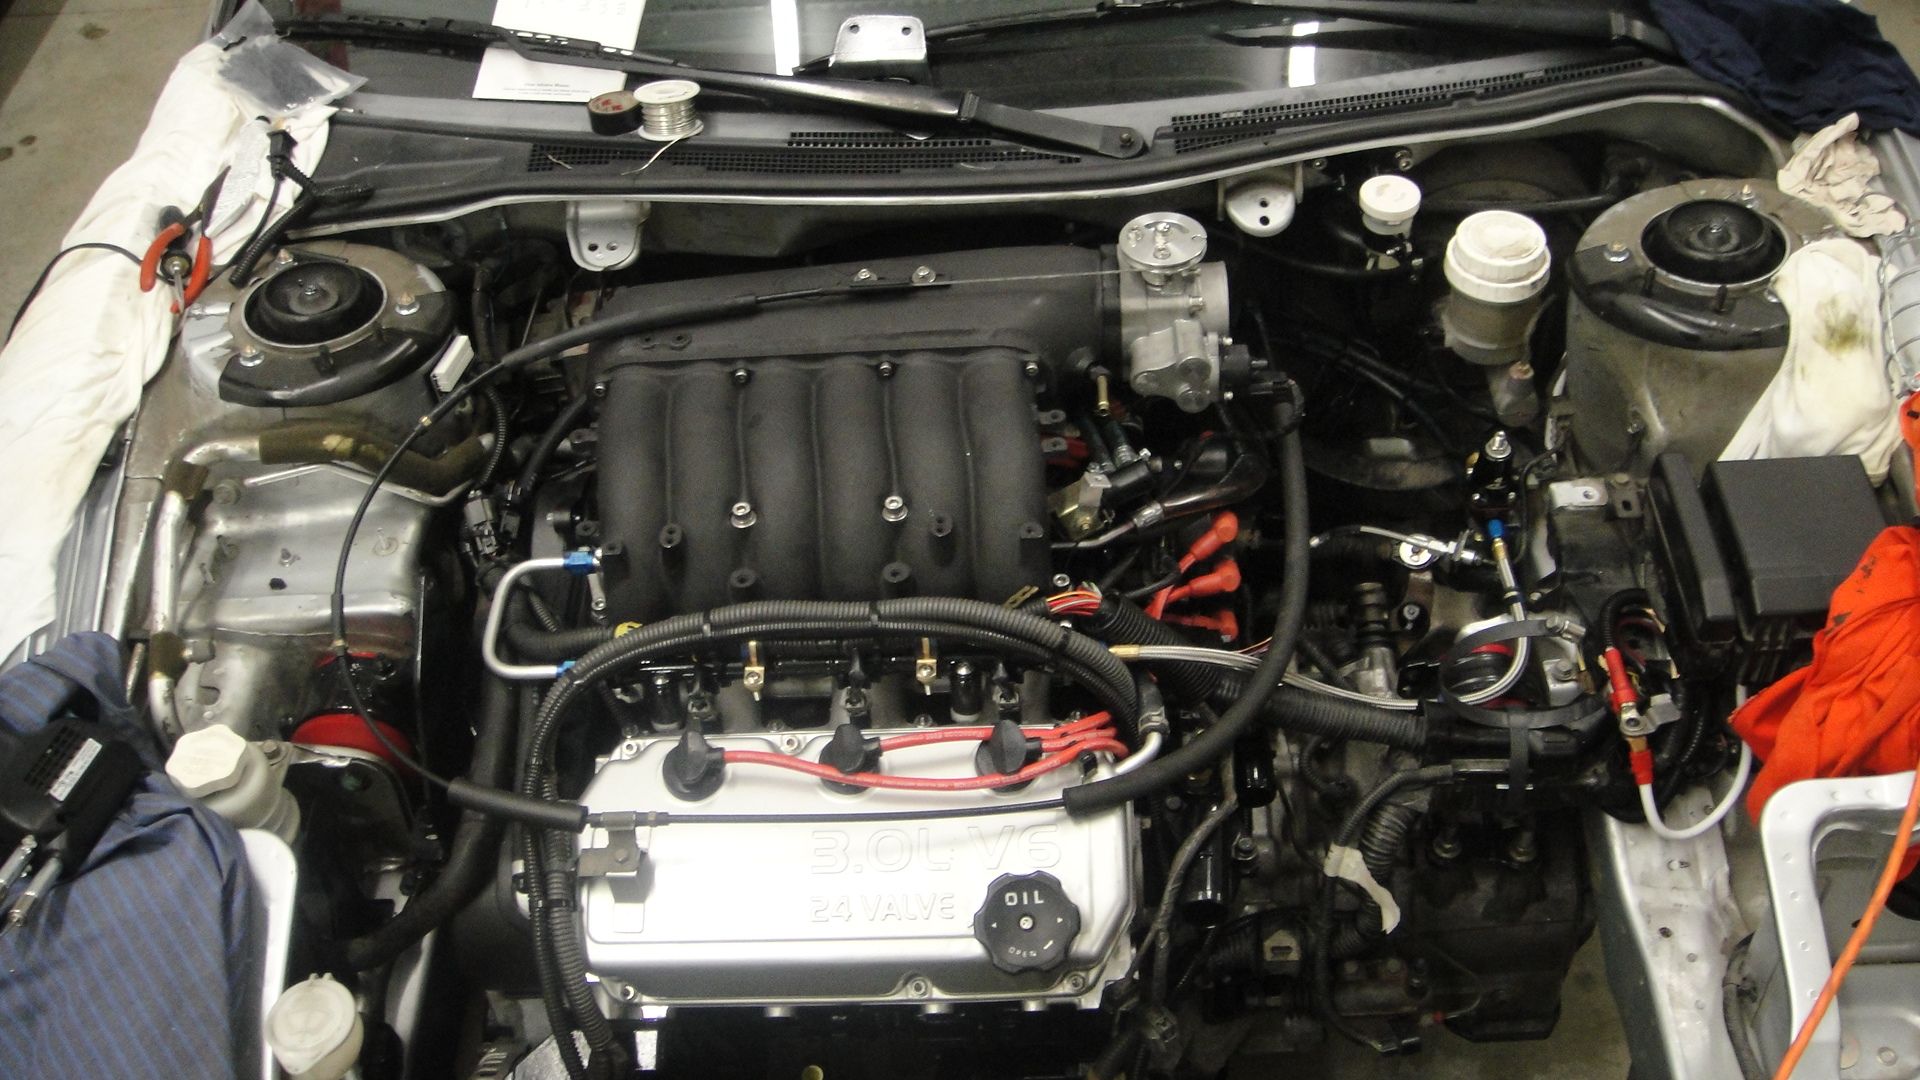
Intake:
For the lower intake manifold the 6g74 Diamante piece is used, also ported and gasket matched. There were holes in the runners at which the old PCV system used to flow into the engine. These holes were weld filled and dressed during porting for a smooth runner surface. This lower intake manifold also allows the use of the Mitsubishi 3000gt fuel rails which is why it was selected over the 6g75 lower.
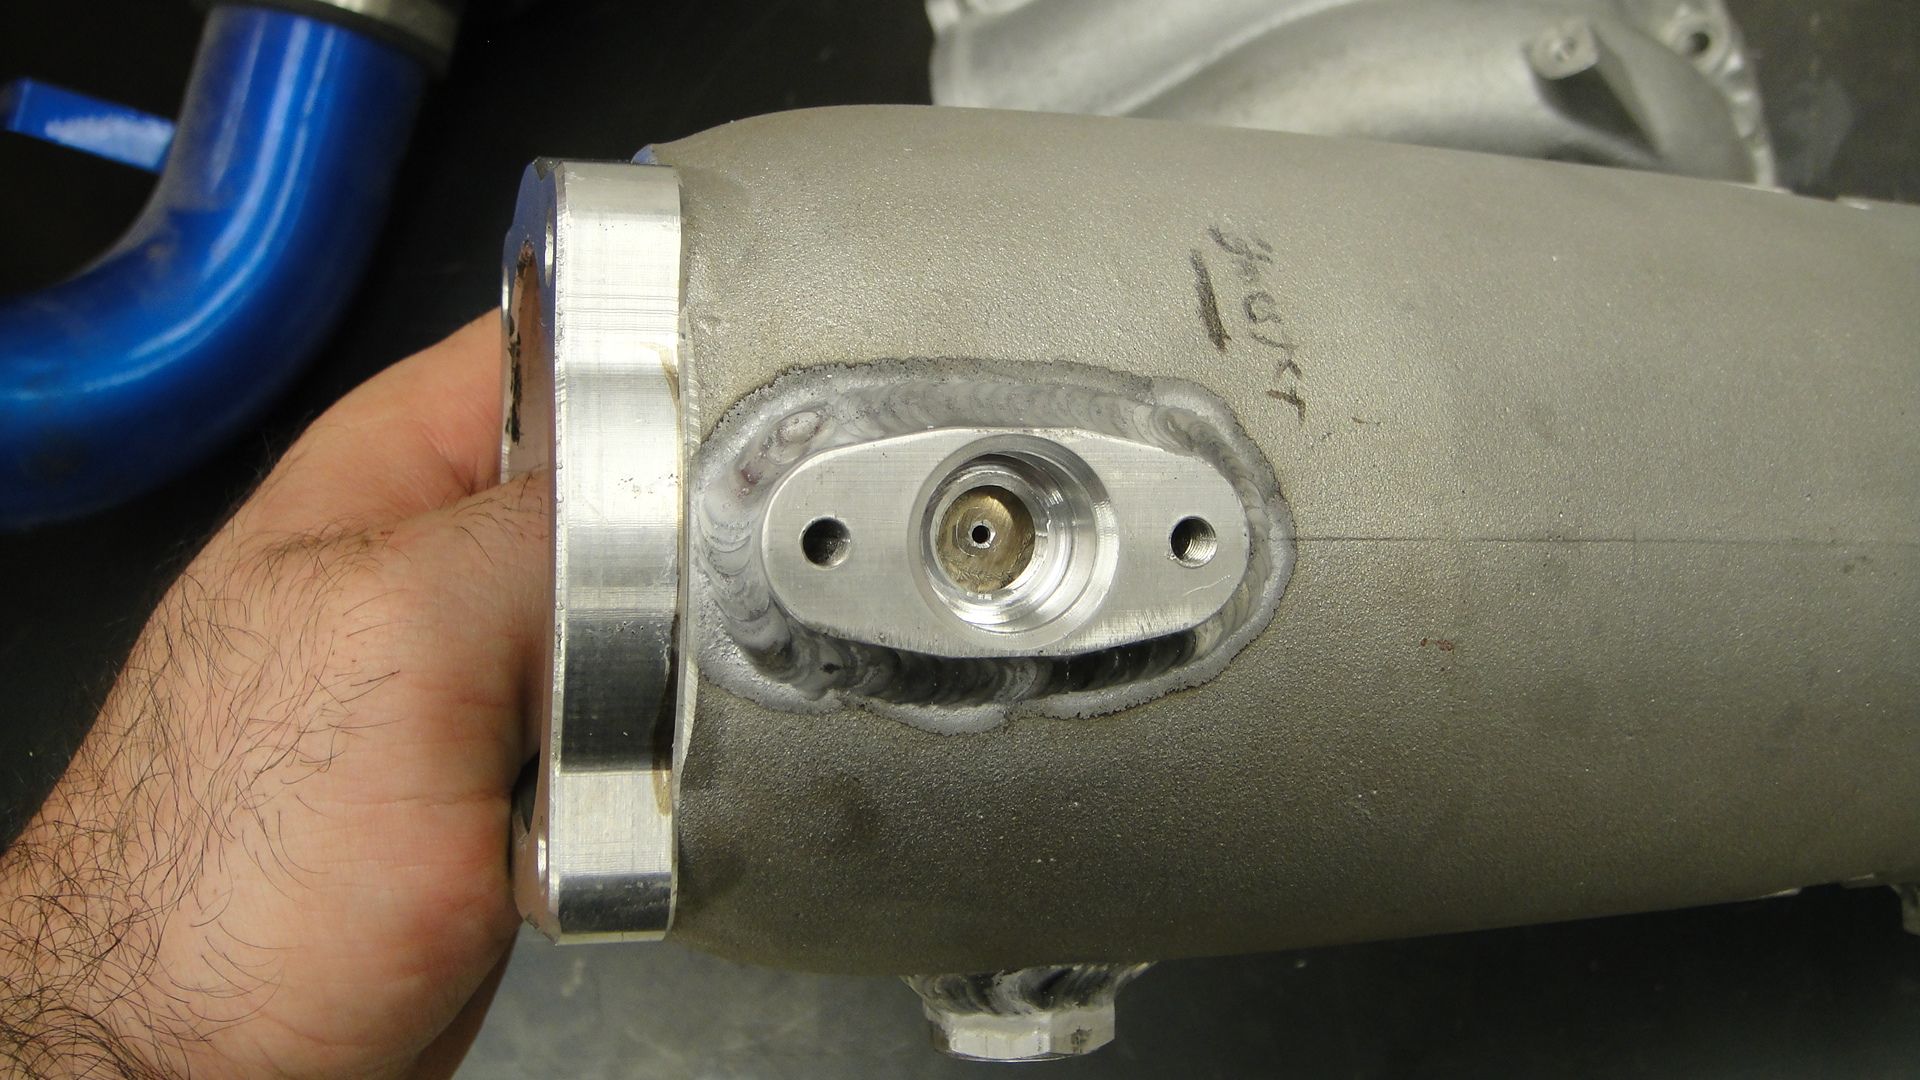
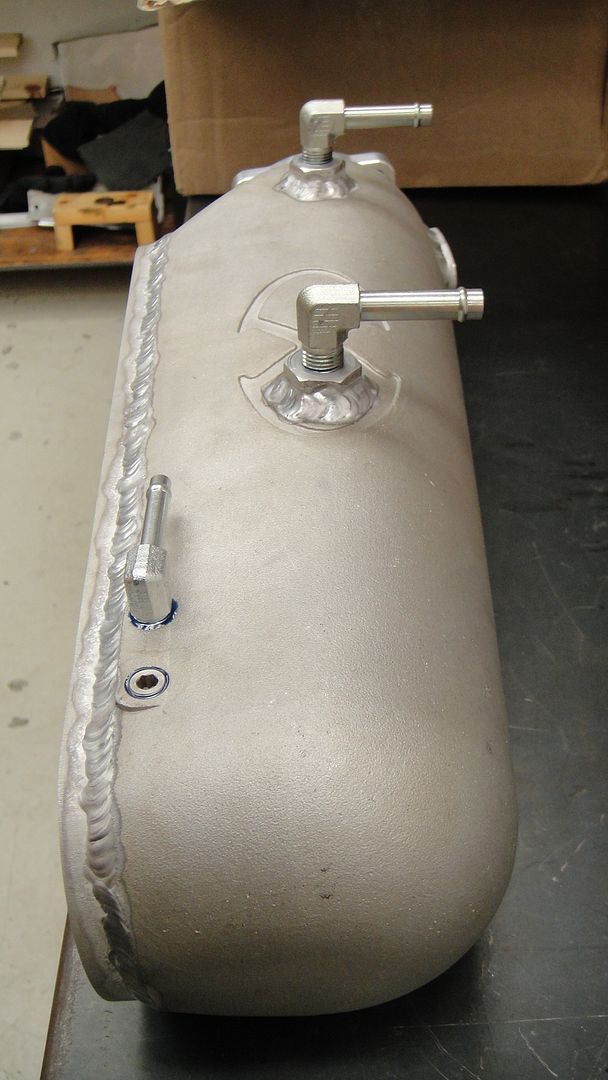
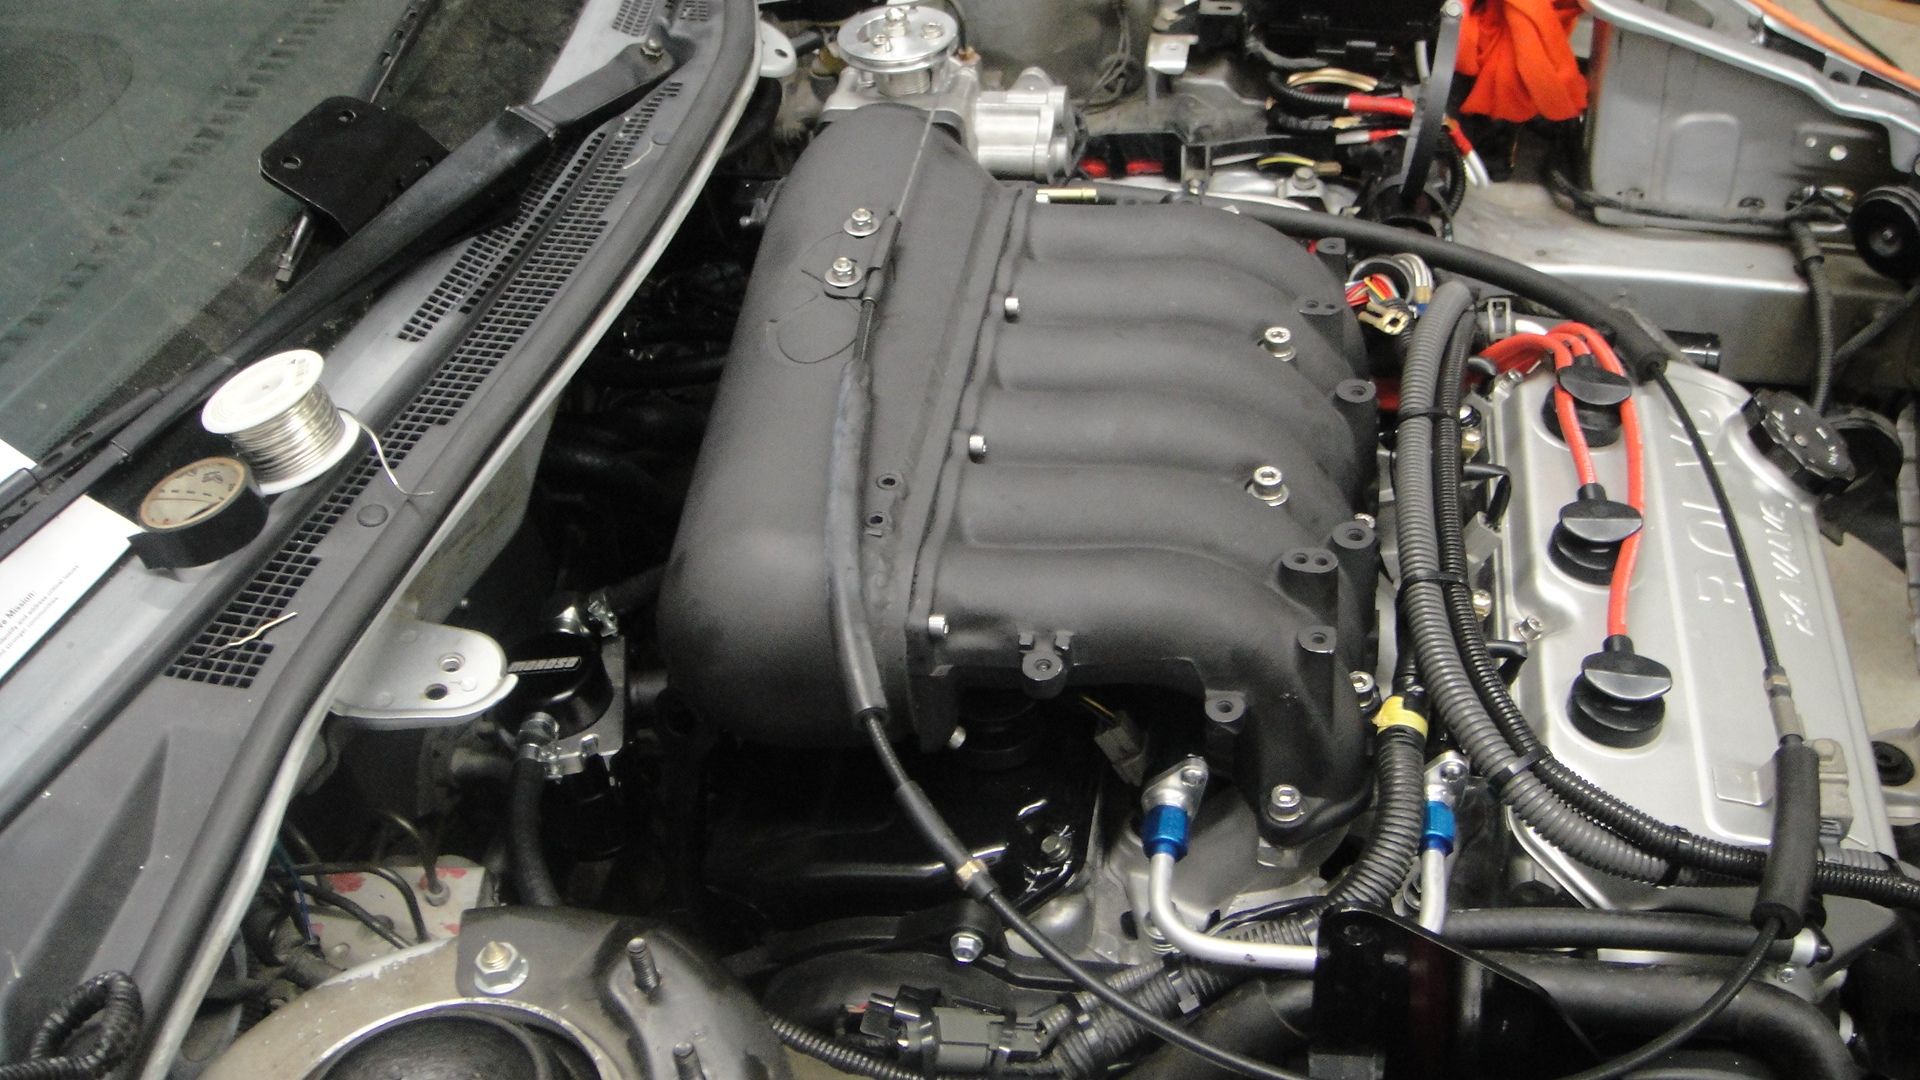
After much research and deliberation, I decided to go with a custom upper intake manifold from Xcessive Manufacturing. This intake manifold is designed more for the mid to upper RPM ranges. It has a 3.5 liter plenum and utilizes the Hyundai XG 350 intake runners. These runners are large and will bolt to the lower intake manifold. The upper intake manifold was also ported and gasket matched. The upper manifold itself did not have the needed provisions for brake booster vacuum, PCV, fuel pressure regulator, MAP sensor, etc. So all of these items needed to be installed to the manifold. A Moroso air/oil seperator was also installed to keep the intake tract clean.
DO NOT ATTEMPT TO DISASSEMBLE OR MODIFY ANY THROTTLE BODY. THIS IS MODIFICATION THAT SHOULD BE DONE BY PROFESSIONALS ONLY. A Full Blown Motorsports 70mm EVO throttle body was selected. It was disassembled and the half shaft mod was performed. No spare parts are available for the throttle body (at the time I inquired, maybe they are now), so I had to improvise when replacing the bearings and seals. The bearings they use are some Chinese bearing that's not available in the USA unless you order some ungodly amount like 500 or 1000 directly from China. I found a bearing that fit well, has more bearing surface area and is made in the USA. It's slightly wider than the original but works great. DO NOT ATTEMPT TO DISASSEMBLE OR MODIFY ANY THROTTLE BODY. THIS IS MODIFICATION THAT SHOULD BE DONE BY PROFESSIONALS ONLY. A new EVO 8 IAC and TPS were installed to the unit. This throttle body does not have provisions for cruise control. The stock throttle cable was adapted to fit on top of the new upper intake manifold to operate the throttle body.
Lower Intake after Porting:
Upper Intake Manifold:


Installing the Needed Ports and Fittings:


Throttle Body Half Shaft Mod:
Before

After - There are no butterfly screws shown in this pic. DON'T FORGET TO INSTALL THEM

You can use an EVO 8 TPS on a 3g Eclipse. All you need to do is swap the pins in your OEM TPS connectors like this:

In order for the hood to close, clearance must by made by cutting and forming some of the metal on the hood. The throttle body itself and throttle cable kept the hood open:

-----------------------------------------------------------------------------------------------
Lubrication:
A new OEM oil pump was installed. A Mishimoto oil filter sandwich adapter was installed to monitor oil temperature and provide a source of pressurized oil for the bypass oil filtration set up or any future turbo set up.

-----------------------------------------------------------------------------------------------
Accessory Brackets, Tensioners, and Belts:
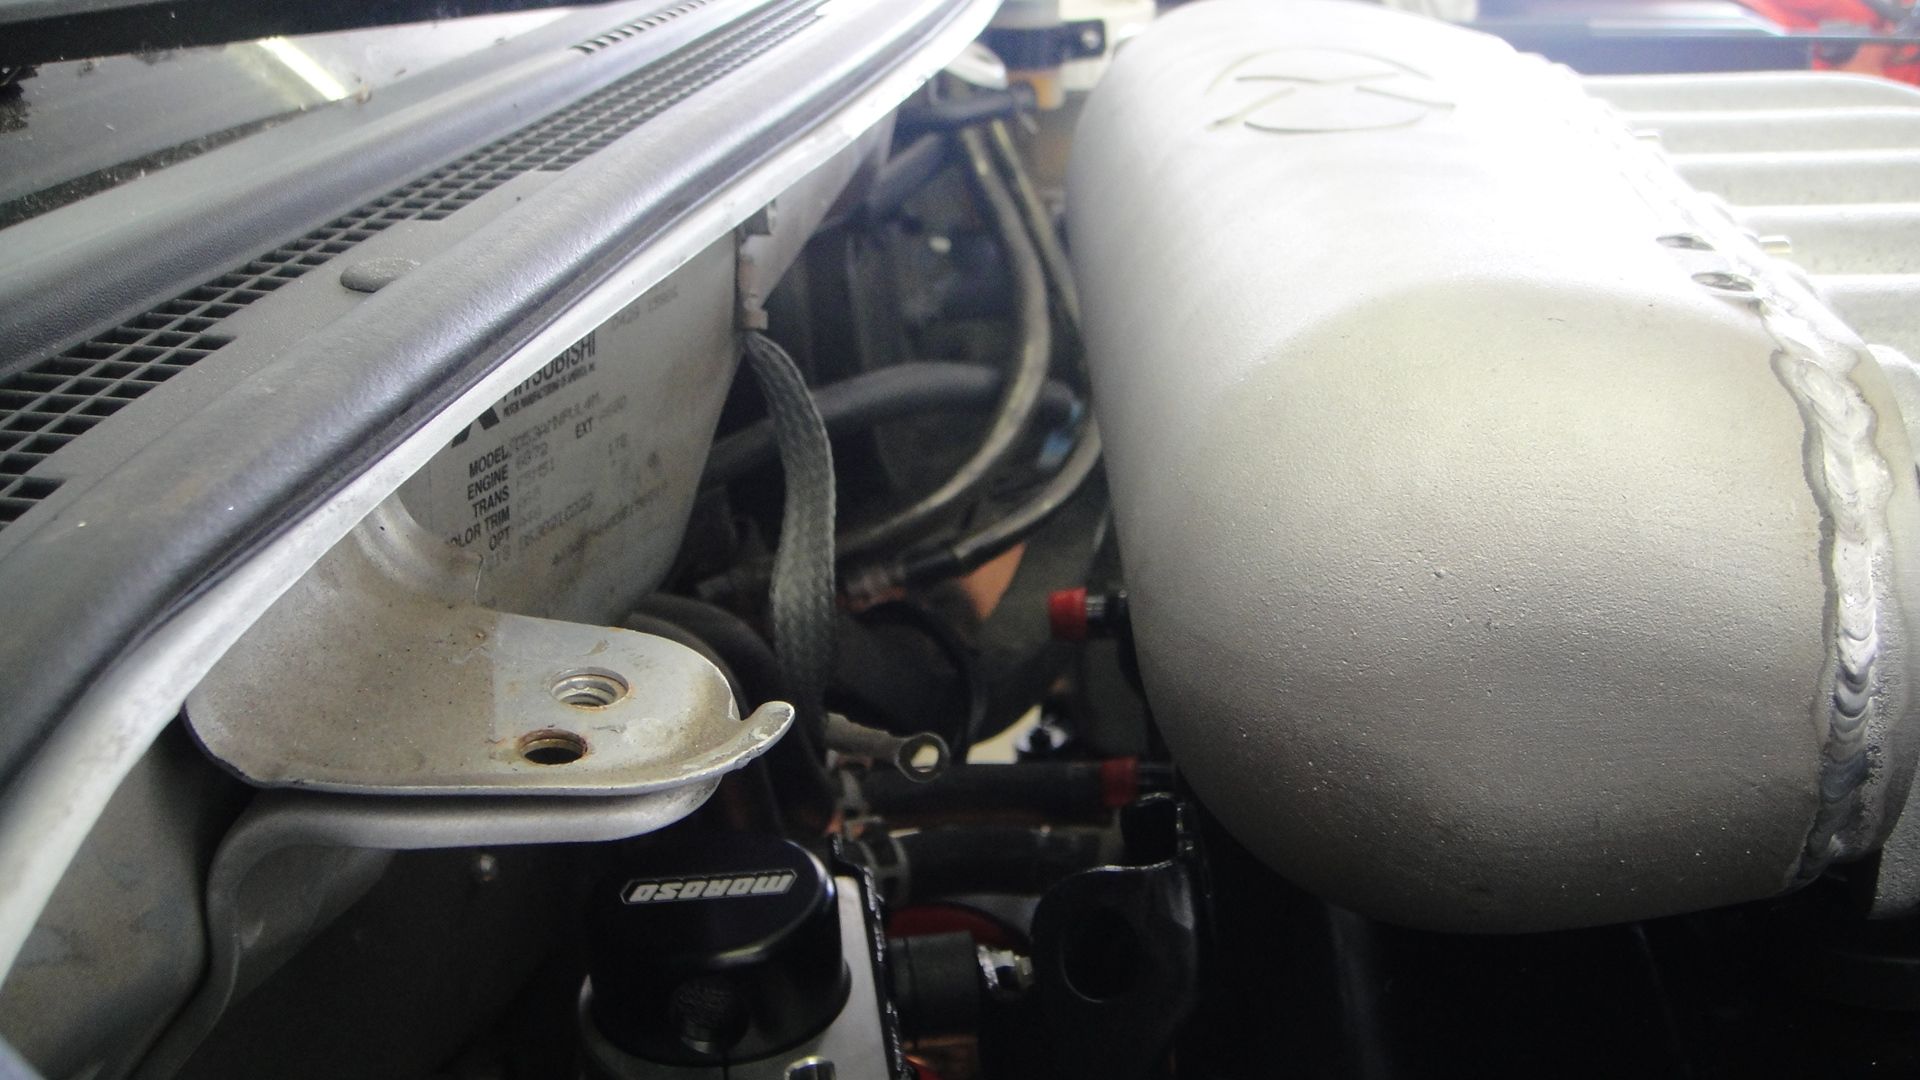
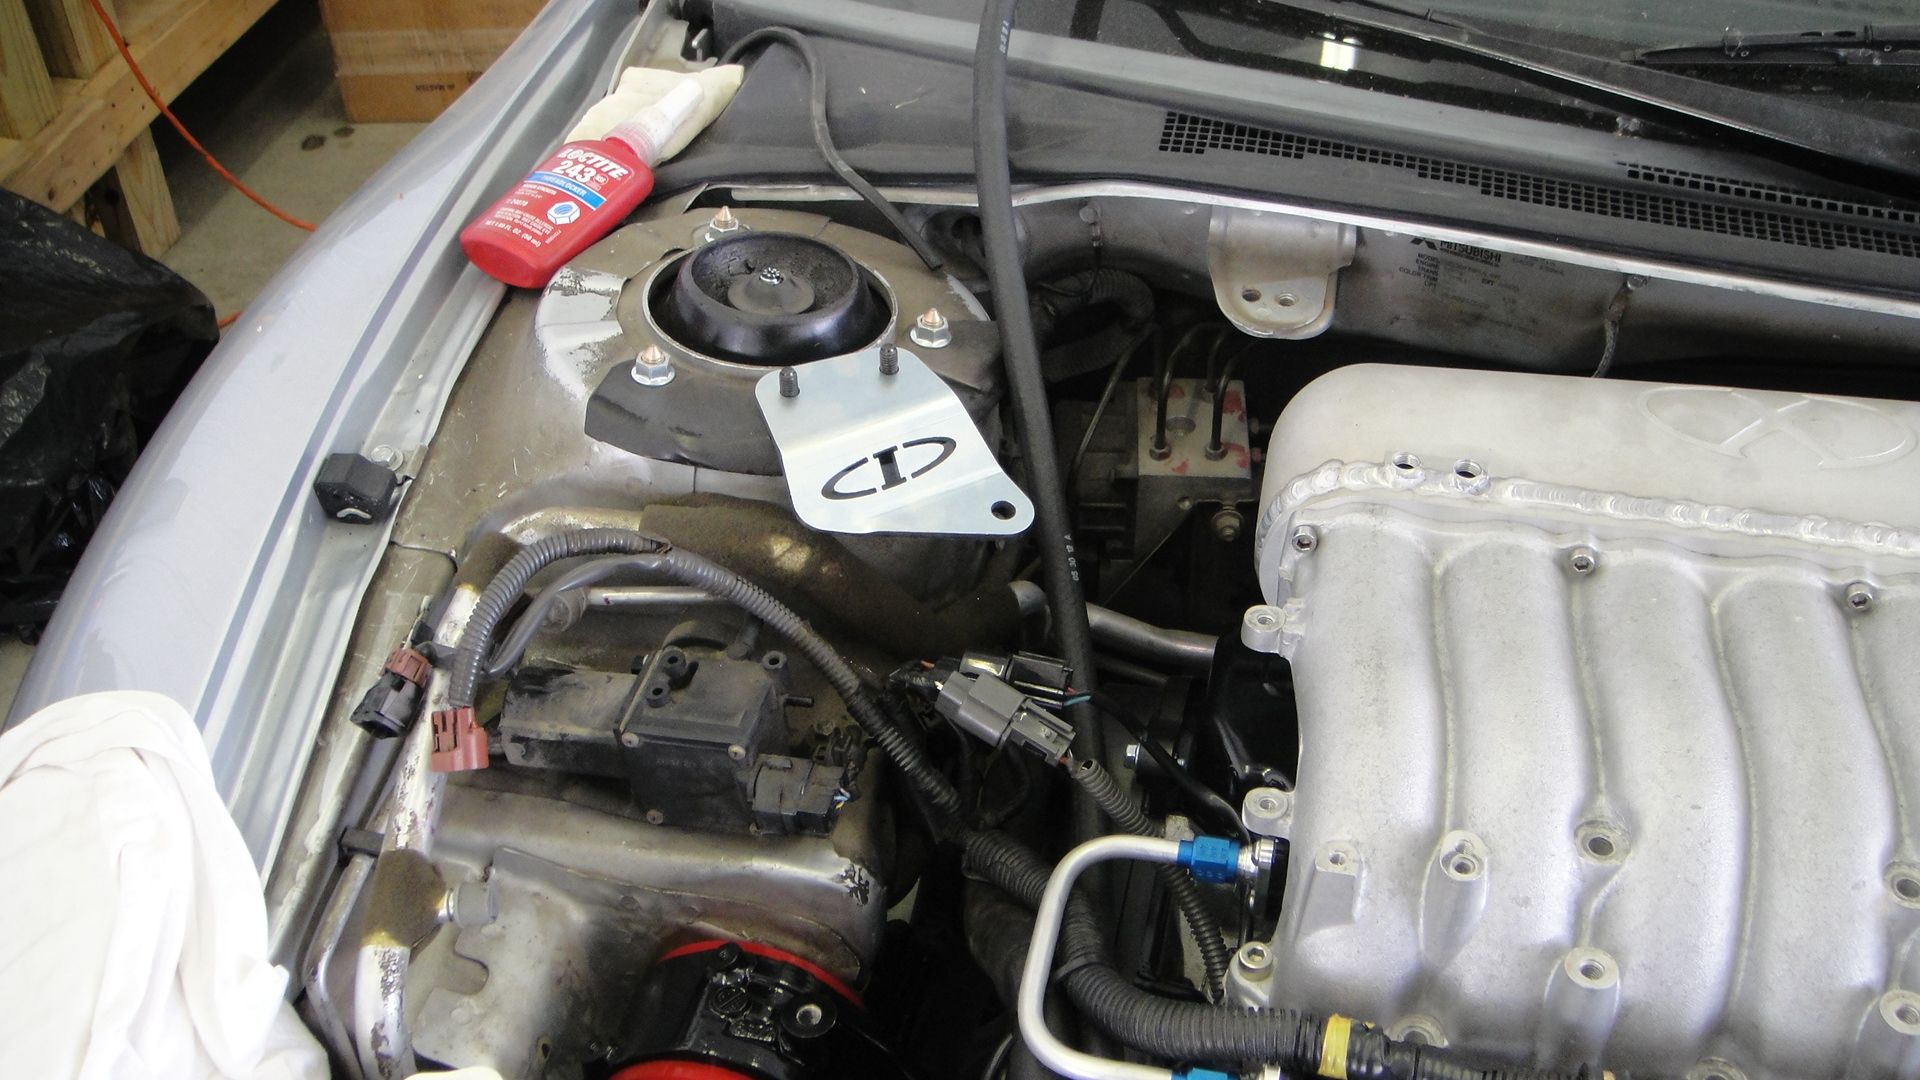
Both accessory belt tensioners from the stock 3.0 liter were used. Even the original accessory belts remain the same as stock. There are two brackets that need to be sourced if you wish to use your stock alternator and power steering pump. The 6g75 is taller than the original 6g72 so you need taller brackets. The first is the upper alternator mounting bracket. You must get this from the Diamante. The second is the upper power steering bracket. If you were lucky enough to have the stock 6g75 upper power steering bracket still installed to the engine, you may use that. If you were not supplied with this bracket, you may get one from the Diamante.
Upper power steering brackets:

-----------------------------------------------------------------------------------------------
Harmonic Balancer, Timing Belt, Timing Belt Covers:
When using the stock accessory belts tensioners and power steering pump, the 6g75 timing belt covers will not fit properly. The lower cover and left cam wheel covers will not fit. The timing marks on the timing cover will also interfere with the power steering pump belt routing. I purchased a complete set (all 3) timing covers for the Diamante. FYI – If you try installing the 6g75 harmonic balancer onto the engine with Diamante timing covers the timing marks will not align correctly. You either have to make a new timing mark on the 6g75 harmonic balancer or use your stock 3.0 balancer. The fact that the timing marks don’t line up isn’t necessarily bad. It only creates an issue if you ever try to check your timing with a timing light. (like when installing a standalone ecu or ignition controller)
The diamante 3.5, stock 3.0, and 6g75 harmonic balancers are identical in weight and pulley size. The only difference is the actual timing mark on the balancer.
In a nut shell, if you can afford a set of Diamante timing covers, get them It provides for a much cleaner and better looking install. It also allows you to use all of your stock belt adjusters, pulleys and accessories.
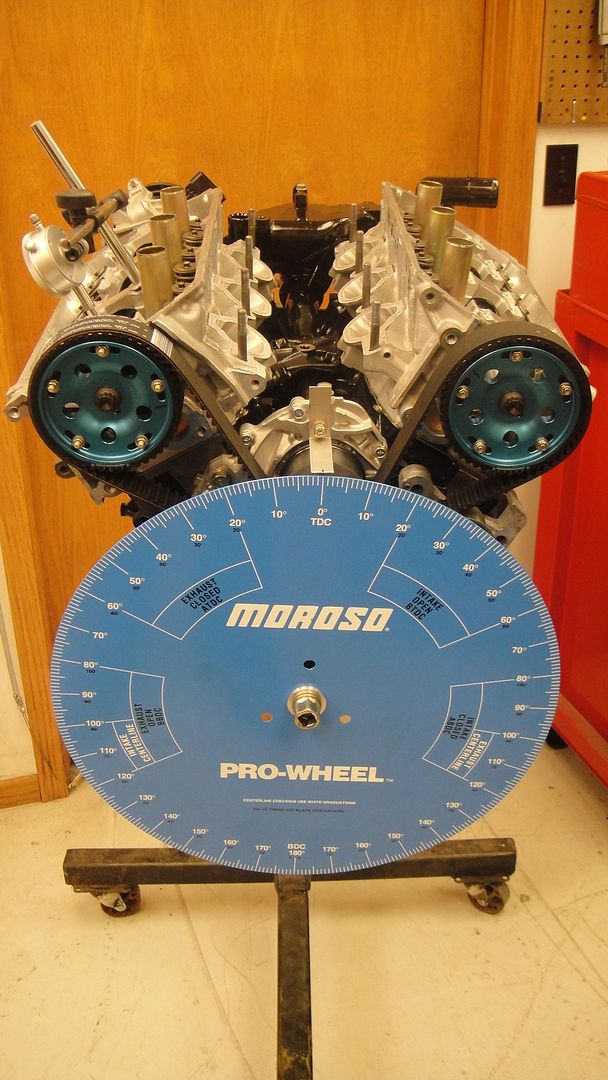
Because my stock 3.0 harmonic balancer had 80k miles I decided to use the new 6G75 balancer (3k miles) and make a new timing mark via piston stop and degree wheel:

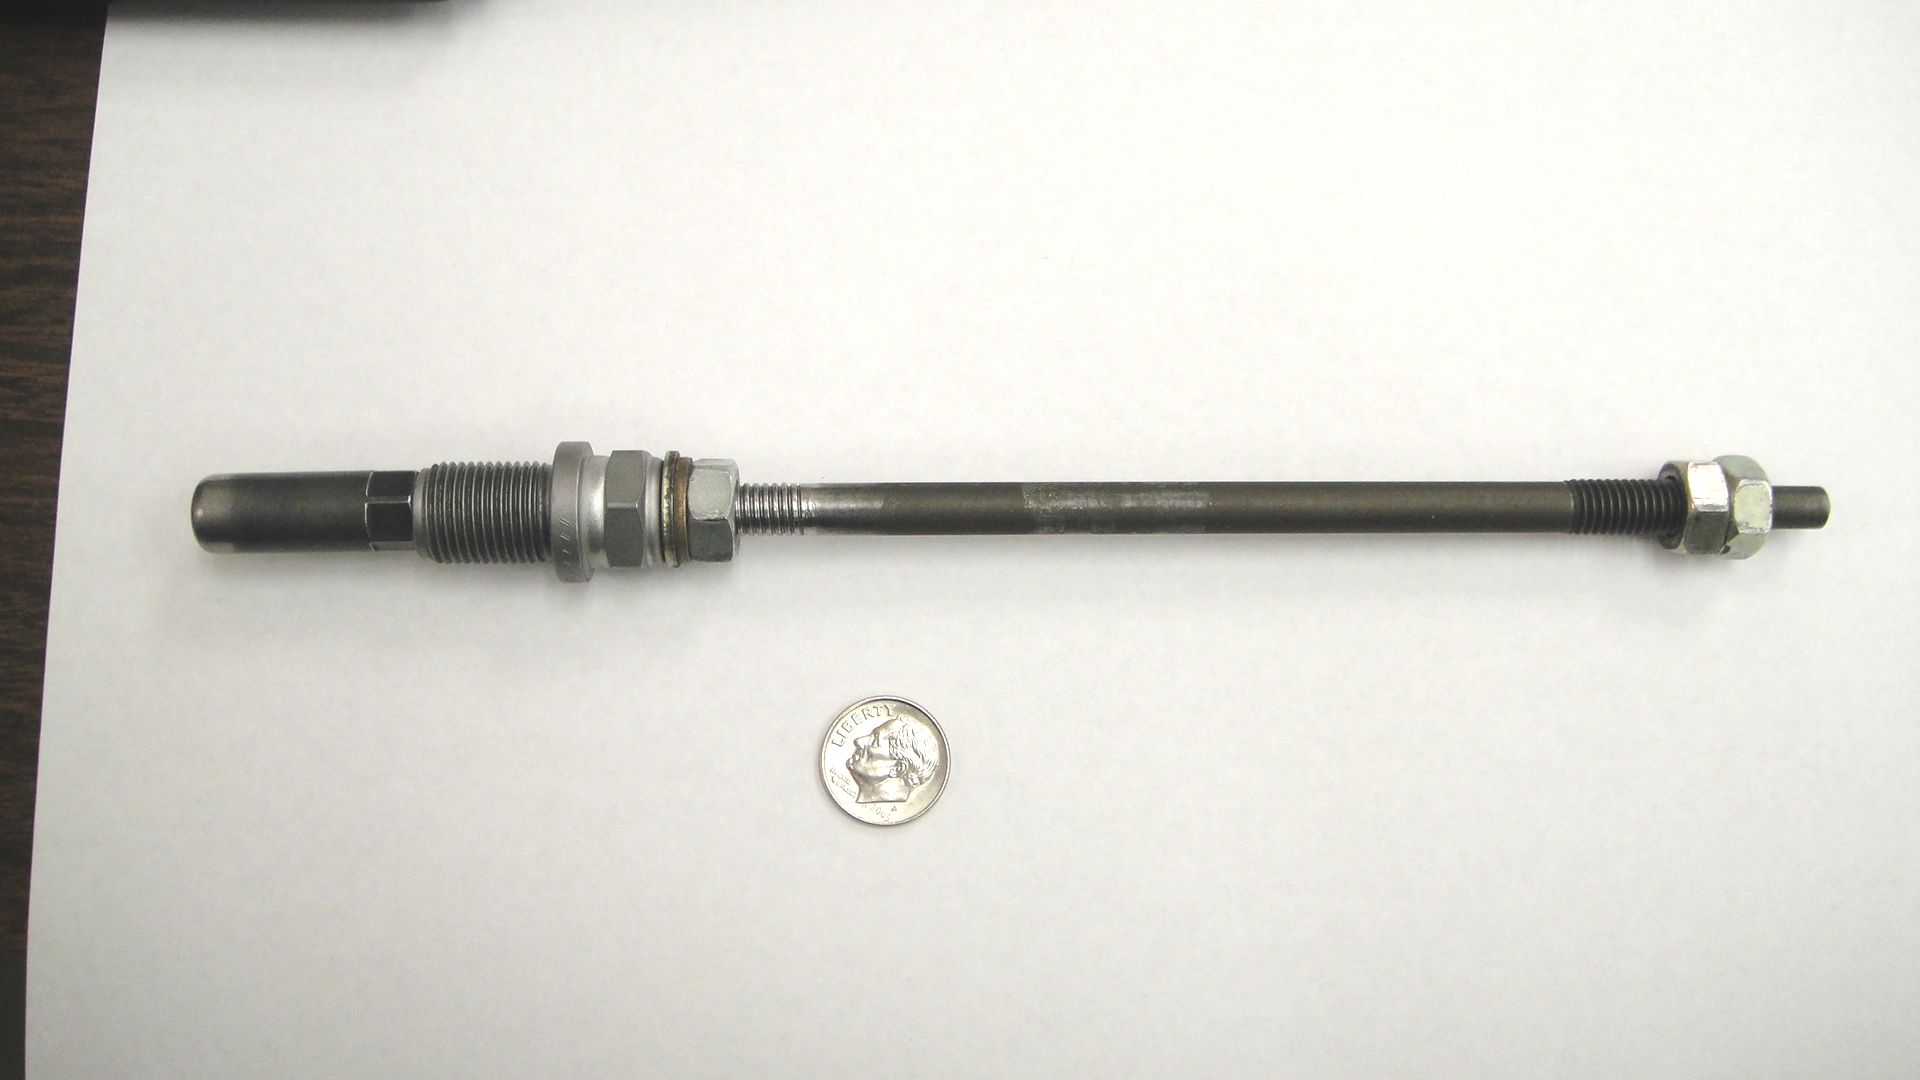
Picture of my home made piston stop:
Degree wheel setup for timing camshafts and finding true TDC:
-----------------------------------------------------------------------------------------------
Cooling System:
The stock radiator was not large enough for the new engine. I chose a Mishimoto radiator but it was a real pain to install. If I didn’t need the larger cooling capacity I would have never installed it. It fit so poorly that I thought it was defective. Mishimoto sent me another radiator with the exact same fitment issues. I had to do a lot of modifications so it fit correctly. The first thing that was noticed is the OEM fans don’t fit very well. I used stainless spacers of different thicknesses to keep the fans from pushing into the radiator and the mounting holes don’t line up real well. The lower radiator hose fitting is too close to the lower engine mount support. I had to space the support away from the car to provide adequate clearance. This also required me to space the lower engine mount farther off the lower support. The upper radiator mounts also needed to be spaced up in that the new radiator was taller. A set of Mishimoto coolant hoses finished it off.
The tube that connects the water pump to the cross over casting, the cross over casting itself, and heater core lines from the Diamante must be used for this to work. The small coolant tubes that were supposed to run from the heater core lines to the FIAV were cut off and welded closed. There is no FIAV on the new EVO throttle body.
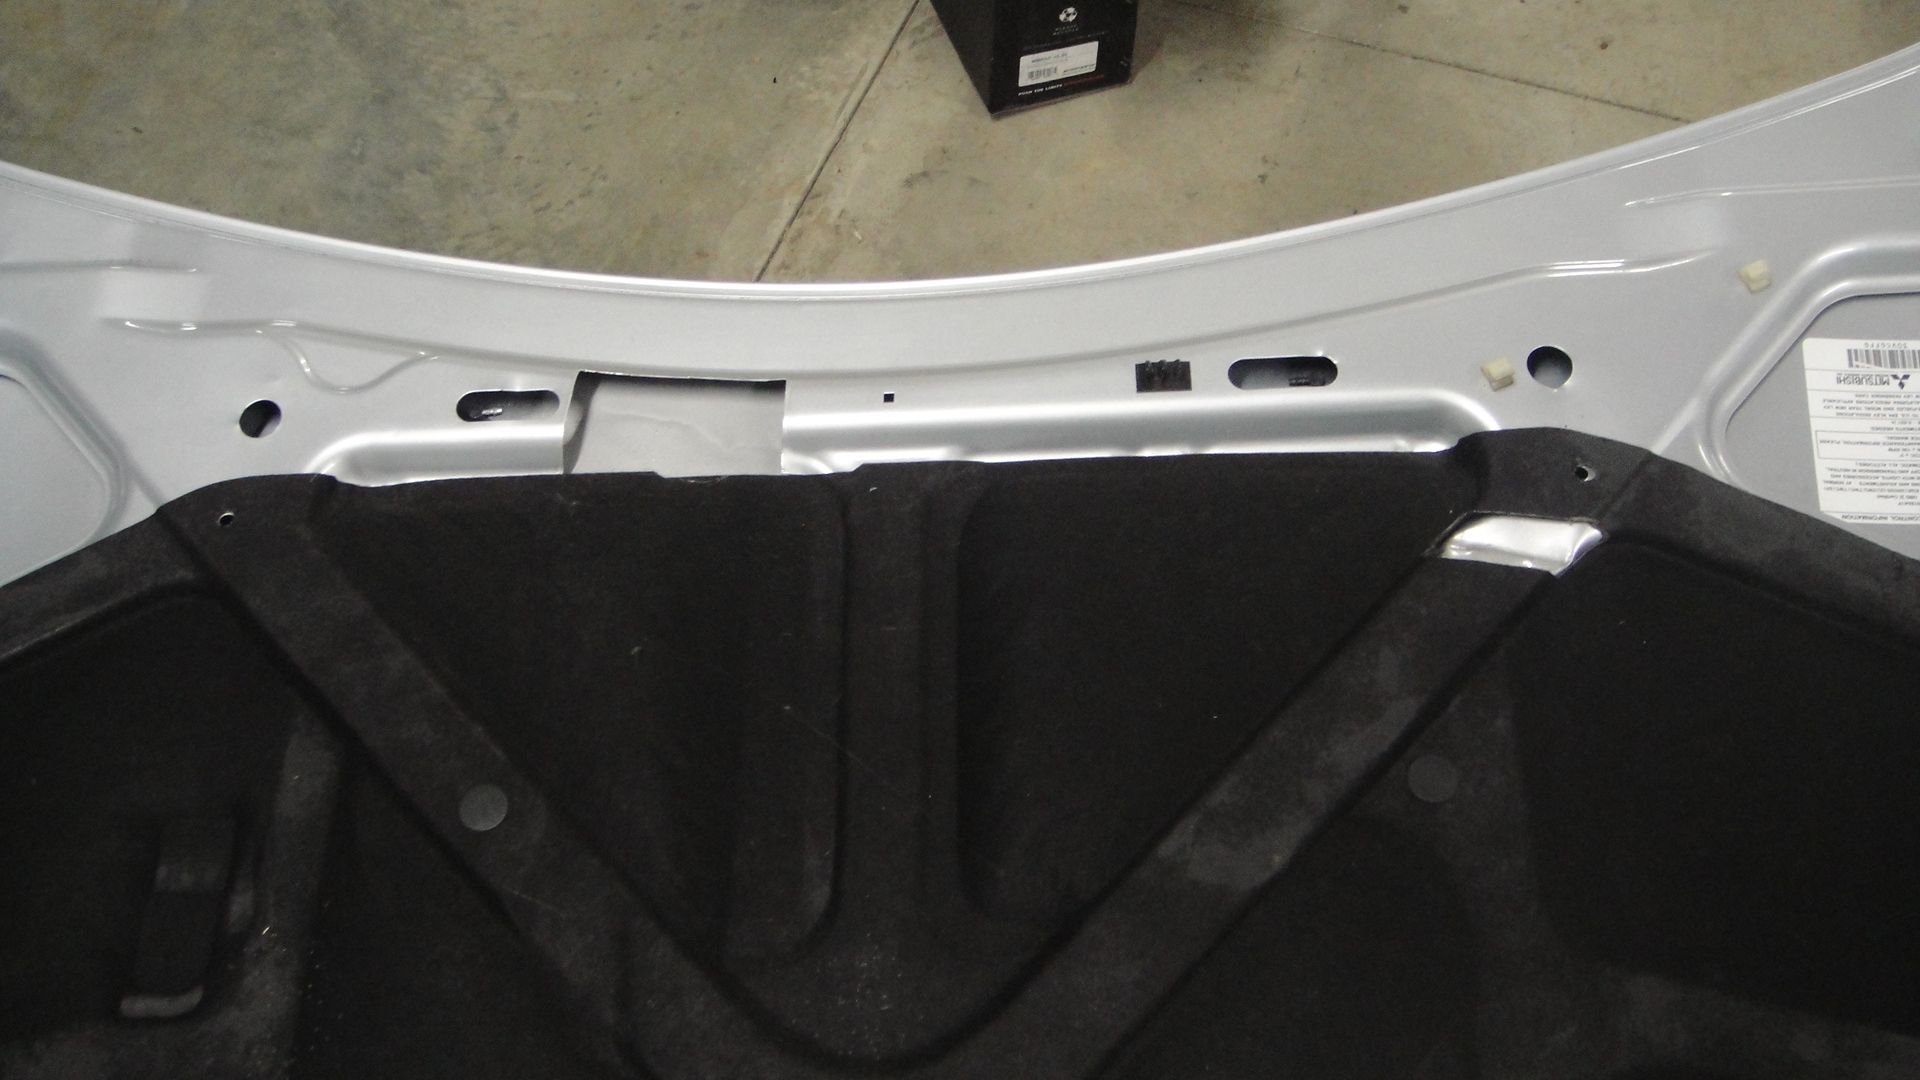
In order for the radiator to fit some hood bracing had to be cut:

A few parts from the Diamante that are required:

Upper rad mounts shimmed up:

-----------------------------------------------------------------------------------------------
Fuel System:
Stock fuel pump was removed and replaced with the Walbro 255 high pressure unit. A new in tank fuel filter was installed at the same time. While fuel pump assy is out of the car, the fuel return nozzle must be opened up to allow for the additional fuel flow. If you do not open up the fuel return the fuel pressure will not be adjustable. An Aeromotive compact fuel pressure regulator was selected and installed under the brake booster. 440cc matched Deatschwerks fuel injectors were used. Because of the increased height of the injector over the stock 6g72, custom fuel rail spacers were fabbed. A high flow cross over tube was also fabbed in that no stock one would fit per the new spacers.
Here is a picture of the fuel return that must be opened when installing a larger fuel pump:
Stock:

After it's been modified:
New Fuel Pump Installed:

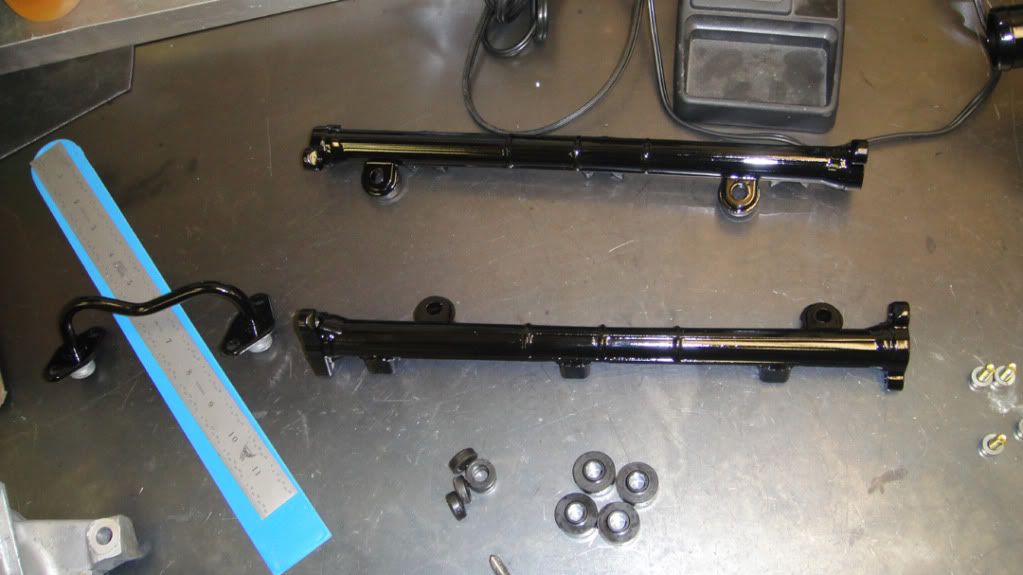
3000GT/Diamante Fuel Rails:
Stock 3.0 injector vs new injectors:
Fuel injector specs:
Injectors, rails, crossover, custom spacers installed:


-----------------------------------------------------------------------------------------------
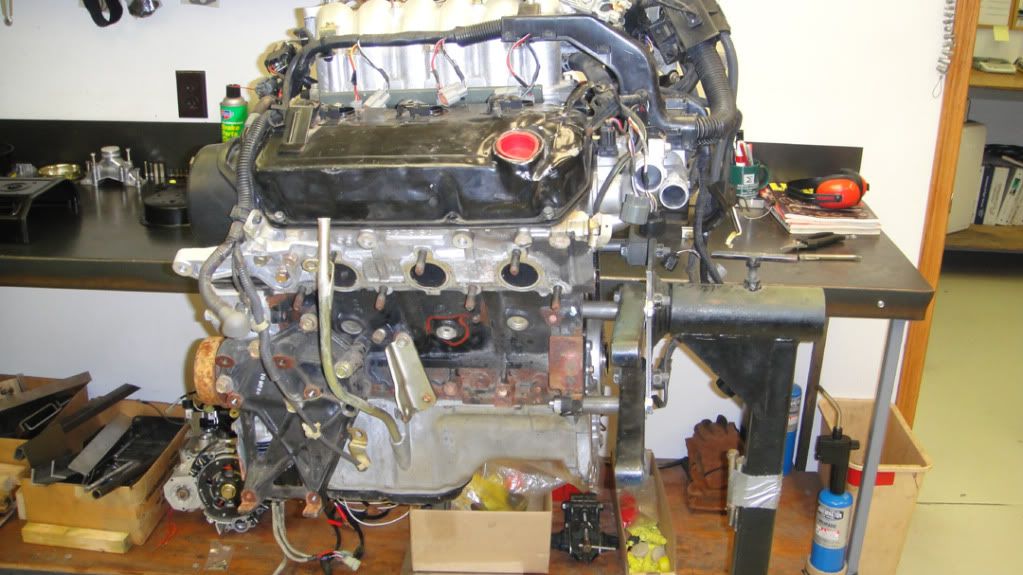
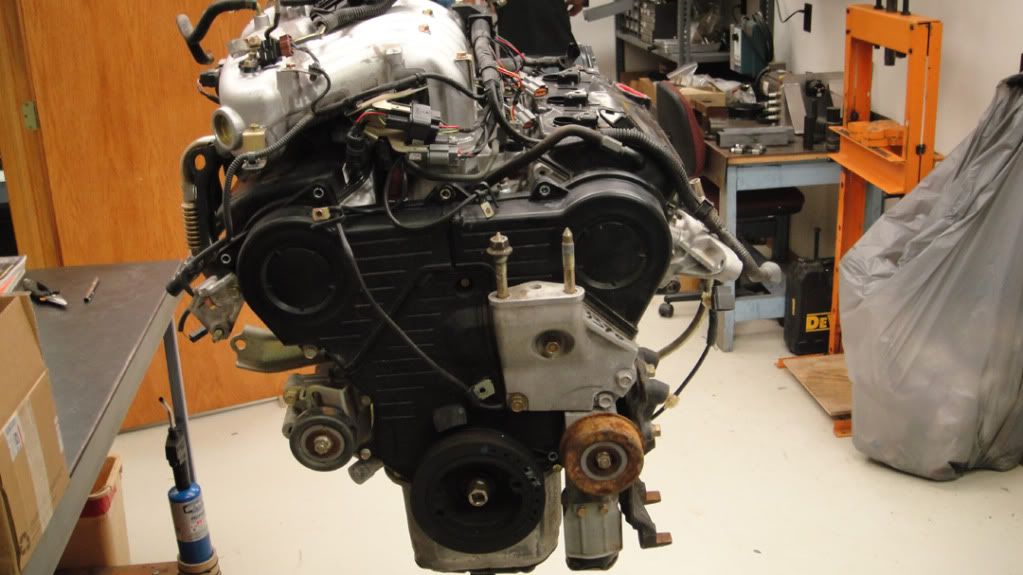
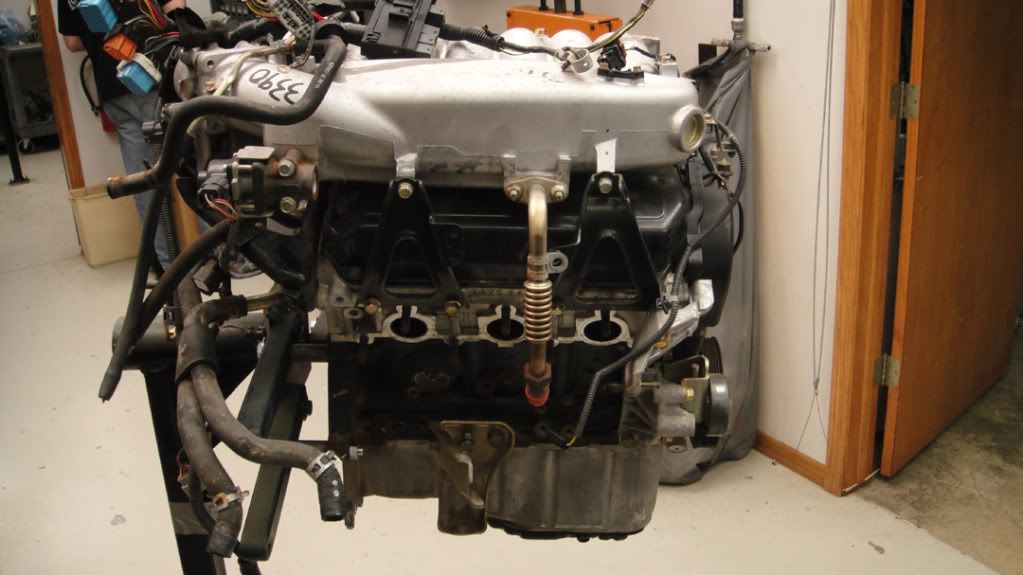
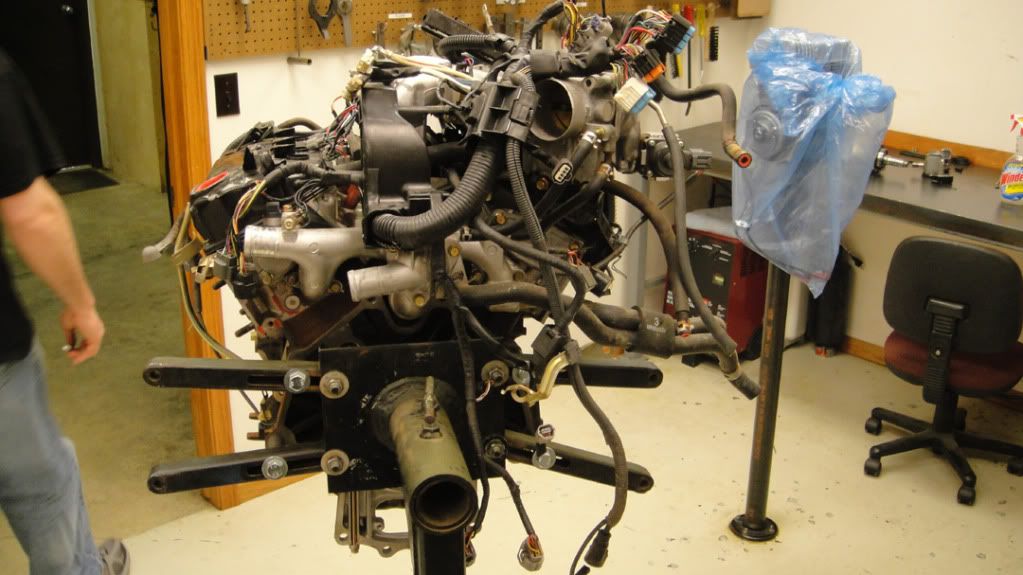
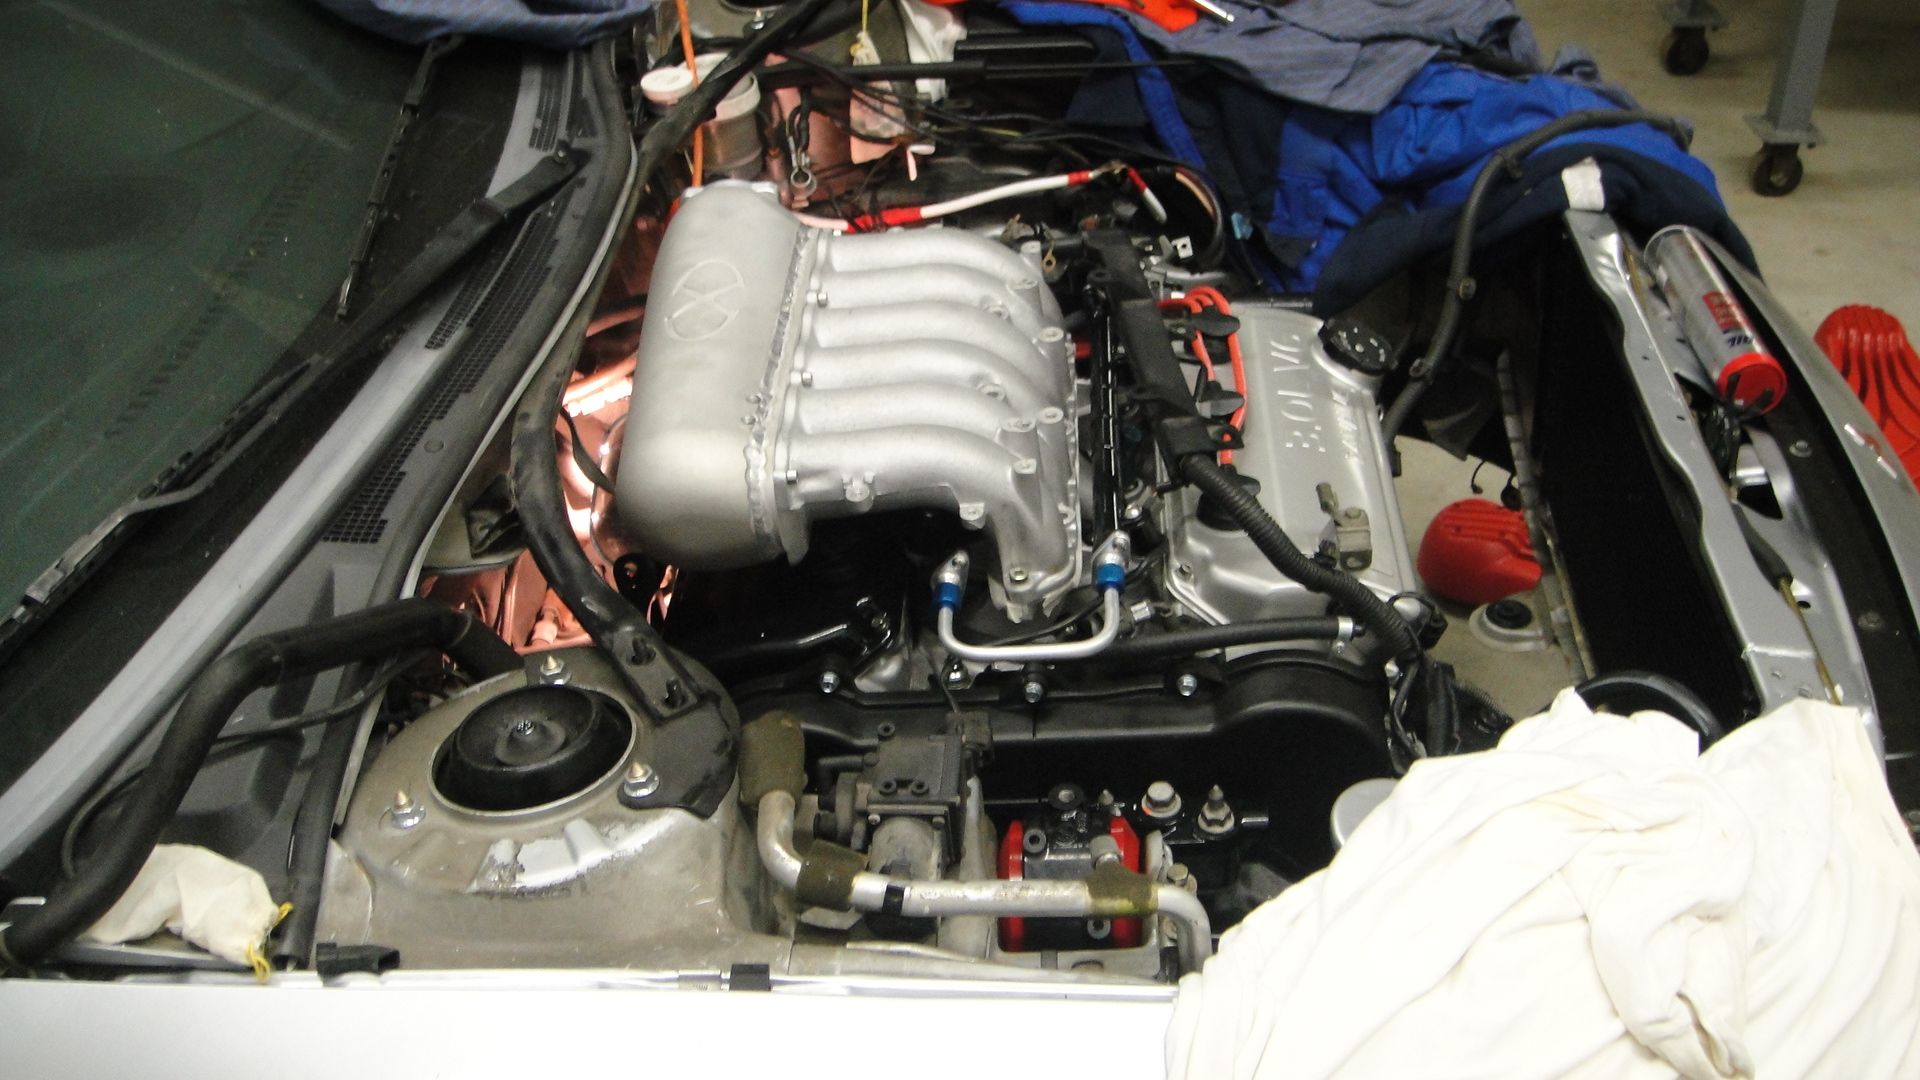
Ready for her new engine:
Engine in, plumbing and fitting:


-----------------------------------------------------------------------------------------------
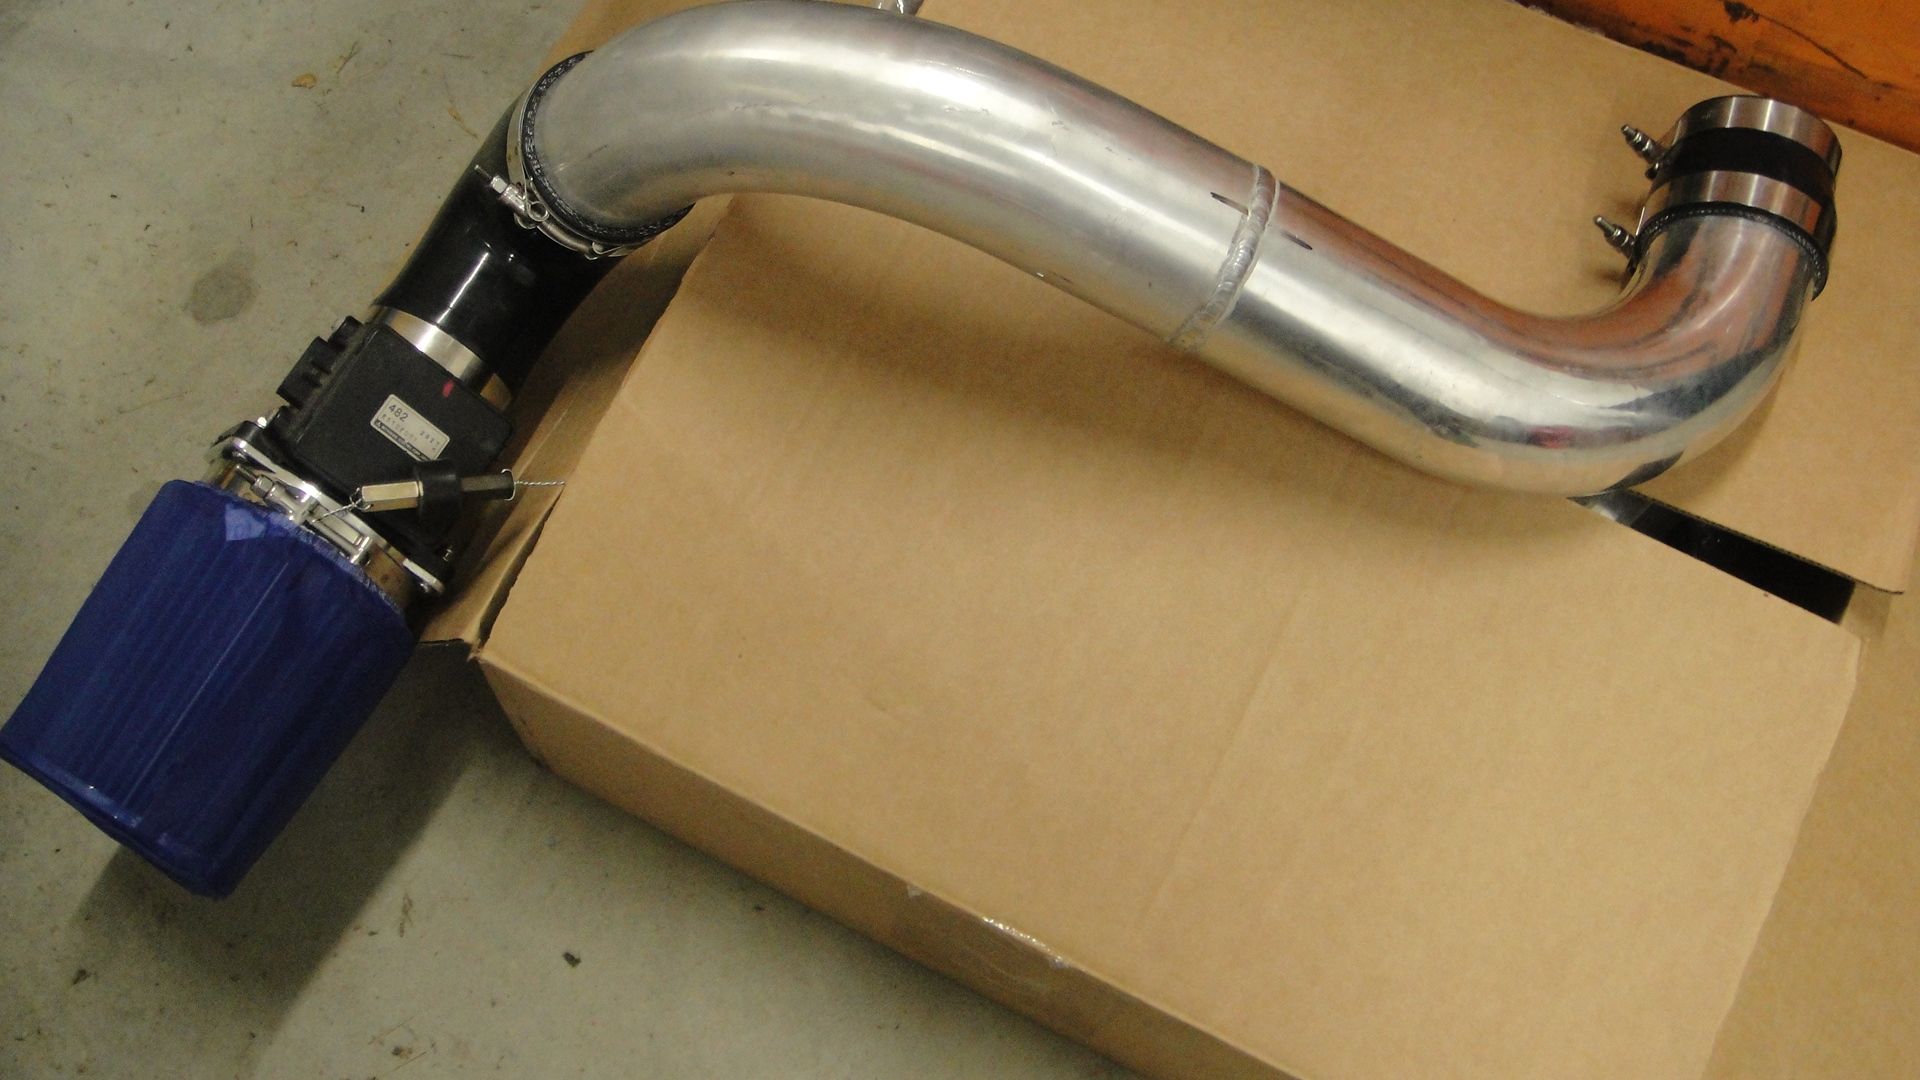
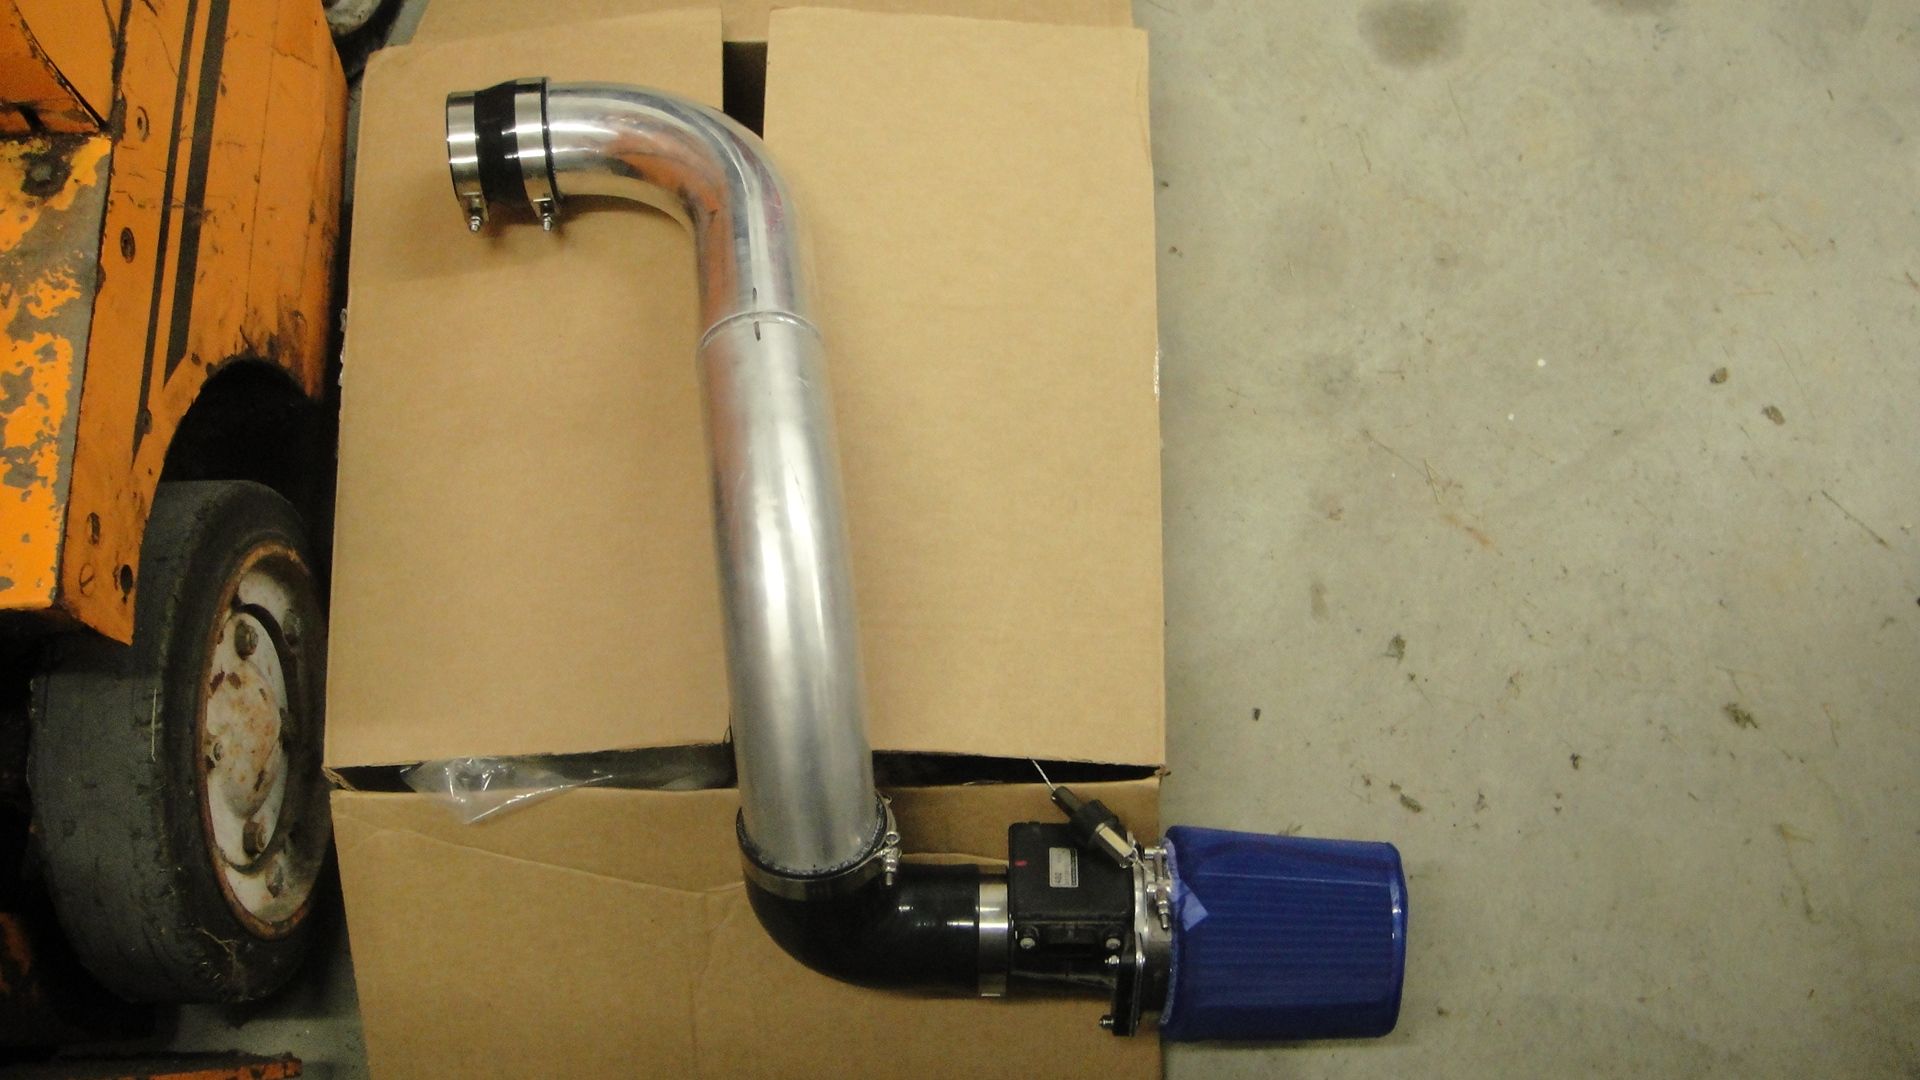
Cold Air Intake:
There wasn't a CAI out I could find that fit very well, plus I wanted some additional size for the 4.0 to breathe. A custom 3.5 inch piece was welded up in aluminum. The MAF sensor was relocated to the end of the CAI to allow for the installation of the largest MAF to air filter adapter I could find. Silicone adapters, the proper clamps, and an Amsoil dry filter finished it off. A 3/8 male fitting was also welded in to allow for the PCV system to draw filtered air as normal.


-----------------------------------------------------------------------------------------------
Exhaust:
Because I was absolutely set on using the 6G75 oil pan with the mivec oil baffle I was forced to modify the front header. This was by far the worst part of the project. I had to basically cut the header in half, fit extensions in and tack weld it. It took over 8 fittings to the car to get it right before final welding. What worked well at the end was making a jig from one of my original 3.0 liter heads. This held the pieces together better during the final welding process. The collector on the front header also had an extension welded on to reach farther toward the back of the car. Most people don't have to make modifications to make the rear header fit. I did. Because of the increased engine height and my thicker heavy duty head gaskets, the collector touched the large cast aluminum piece which is part of the subframe/suspension. Using a die grinder I made some wiggle room for the collector. Not much material was removed but I didn't want to chance the collector banging against the car. Nothing more annoying than a permanent exhaust rattle. Because of the modified header, a slip joint was used to more easily connect the existing 3 inch custom exhaust.


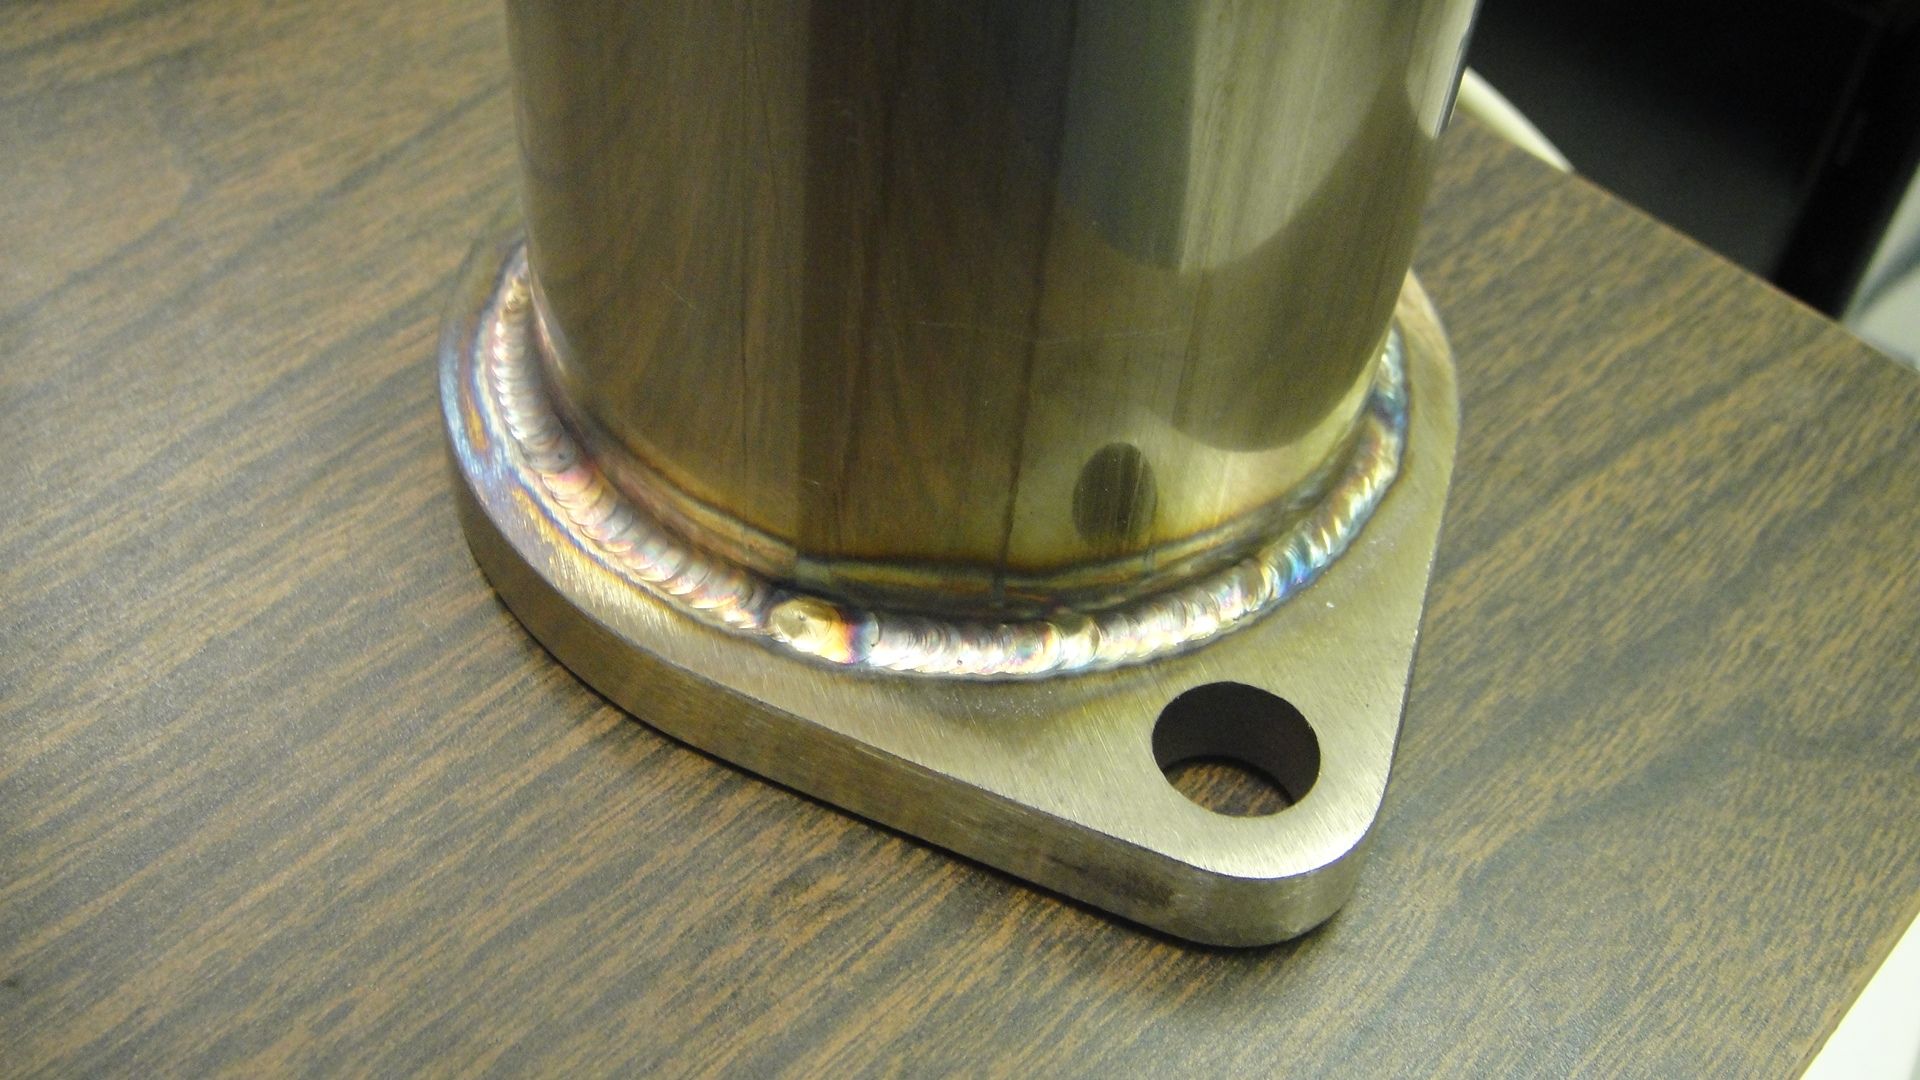
New stainless flange welded to the slip joint:
Collector touching aluminum piece of subrame. Picture from rear of vehicle looking forward:

-----------------------------------------------------------------------------------------------
Ignition System and Tachometer:
The stock ignition system would not keep up with the demands of the new engine. A MSD digital ignition was chosen. The MSD 6A and 6AL fit underneath the hood in a known install spot, but did not have all the features I was looking for. I ended selecting the MSD Digital 6 Plus. It has all the features of the 6AL but also has nitrous retard and stage rev limiter. This Digital 6 Plus unit is larger in size and would not fit in the normal install spot (cruise control area). The MSD Digital 6 Plus control box ended up being mounted next to the driver’s head light. Copper core spark plugs one step colder were installed (NGK BKR7E stock number 4644) and gap opened up to .050. After installing the new ignition the car idled noticeably better, throttle response was greatly improved, and the tuner noticed a reduction in knock count.
The tachometer was a headache all in its own. It was the general consensus that you had to use an aftermarket tachometer is you wanted to use a MSD ignition. Using an aftermarket tach causes issues I refused to deal with. The first is finding a place for the aftermarket tachometer. I like the understated look and having a tach mounted on my dash wasn’t acceptable. A common place to install an aftermarket tach is right in front of the OEM tach. I had just installed an AEM UEGO in front of my OEM tach and was not going to modify it. Second and more important, if the OEM tachometer did not operate, the ECU would trip a permanent check engine light, P0300 – random/multiple cylinder misfire because the ECU could not “see” the ignition operating. There had to be a way to keep the OEM tachometer running correctly.
In the past, different tach signal adapters were installed with no luck, some with catastrophic results. The MSD 8910 and MSD 8910-EIS are not suitable for use. Both of these “modify” the stock distributor signal and attempt to run both the tachometer adapter and MSD unit from one signal. Although I have not attempted to install either the 8910 or 8910-EIS, I was not going to chance ignition system malfunction. This is NOT CONFIRMED, but I was told the above adapters can/would cause ghost spark issues ie nasty detonation. After reading about these issues, I now have another standard I must meet. Not only do I have to get the OEM tach working which no one else seems to have done, I have to do it without modifying the stock distributor signal.
I tried multiple wiring combos attempting to get the OEM tach to work. I connected the MSD tach output to the ECU, tried diodes, dual diodes, you name it. None of which worked. The MSD tech support guys were no help. “We don’t recommend an MSD ignition on that vehicle.” As anyone in the 3g Eclipse world knows, there is almost no aftermarket support for our vehicles so I wasn’t surprised they didn’t know how to help.
There was a major misunderstanding between members of club3g, myself and the dealership. No one really knew what signal was being sent to the ECU for it to interpret that the ignition was operating correctly. After all the headaches and research I decided to take a chance and try the MSD 8920 tach adapter. I found this adapter on accident reading about different V-8 MSD ignition installs on the net.
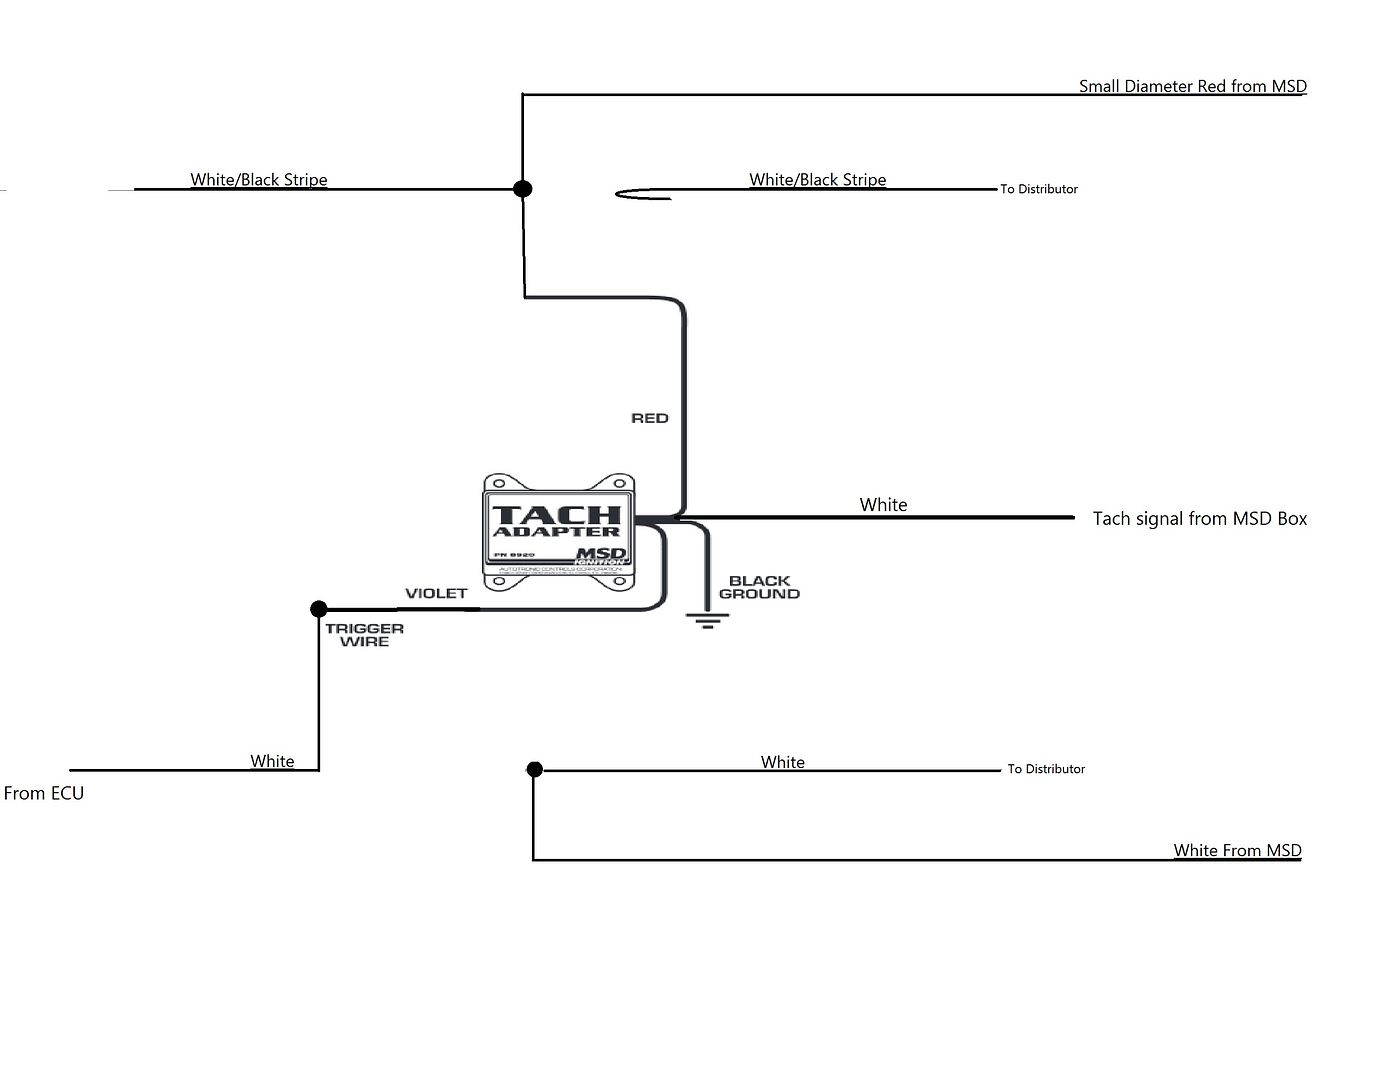
MSD tech support never even brought up this product when I spent 15 min on the phone with them. The MSD 8920 tach signal adapter is exactly what was needed. It provides an accurate tach signal to the ECU WITHOUT modifying the stock distributor signal. No possible knock issues, the OEM tach works, and no CEL. Here is the how to I followed to install the MSD. Posted on that link and listed shown below is how I wired the correct tach adapter. http://www.club3g.com/forum/performance/161103-how-wire-up-msd-ignition-right-way-v6.html


Emissions:
The EVAP solenoid located on the intake manifold is installed as per OEM and functions normally.
The catalytic converter was removed for greater oil and fuel selection so oxygen sensor simulators were installed in place of the POST CAT sensors. New precat o2 sensors were installed during engine installation.
The new Xcessive Manufacturing intake manifold does not have provisions for EGR. I thought I could have the EGR coded out of the ROM but it’s been more difficult for the coder than previously thought. This ECU patch is still in the works but at this time, I’m experimenting, trying to simulate EGR. The ECU checks for a couple different things in regards to EGR. The first item that is monitored by the ECU is the EGR control solenoid. The ECU checks for the correct resistance in the circuit. If the control solenoid is bad (or in my case, not present at all), the ECU will trip the CEL. The second and trickier thing to get around is the manifold pressure drop. When the EGR valve opens and is working correctly, the ECU can “see” the change in manifold pressure. If you block off or don’t have the EGR valve opening and closing the CEL is tripped. Spring of 2014 I will have an update on my possible easy EGR fix for guys with custom intakes.
MVIC is only present on the GTS models, but needs to addressed to prevent a CEL. There is a MVIC control solenoid on the GTS models, similar to the EGR. This solenoid is monitored by the ECU and must have the correct resistance in the circuit. I just left it plugged in but tucked out of the way.
Engine First Run:
This was one of the most nerve racking experiences I've had. My hands were shaking. I attempted to start the vehicle with stock ROM and it didn't even pop once. I got a modified ROM from a member on C3G and it fired to life. The valve train made some noise for the first few minutes of the run which can be easily heard on the videos. I had to adjust idle a few times to keep it running.
First Sign of Life:
6G75 4.0 Liter First Start - YouTube
After Idle Adjustment:
6G75 4.0 Liter First Run After Idle Adjustment - YouTube
Now comes the hard part. Waiting for spring to get a tune at AMS. The vehicle has never been operated in snow or salt so it's tucked away until thaw. I did get a chance to do some data logs and driving before putting it away last fall. A total of 123 miles have accrued on the new engine. Even with a poor tune and the fact it goes lean at WOT, it pulls harder than the 3.0 ever did.
As soon as I have some more info I'll post it up, for those interested.
2003 GTS
Manual Trans
I performed this swap using parts from 3 different engines. Here are the 3 vehicles and their corresponding VIN numbers I used for selection of parts.
2003 Mitsubishi Eclipse GTS w/ Manual Trans - 4A3AC74H83E156019
3.0 liter V6 SOHC 6G72
2007 Mitsubishi Galant GTS w/ Auto Trans - 4A3AB36S97E025546
Non Mivec 3.8 liter V6 SOHC 6G75
(Engine removed from this vehicle for the engine swap)
2002 Mitsubishi Diamante LS w/ Auto Trans - 6MMAP67P42T020894
3.5 liter V6 SOHC 6G74
-----------------------------------------------------------------------------------------------
Finding a good engine:
It took weeks of daily scouring to find an engine I really wanted. I ended up finding a 3.8 Non Mivec out of a 2007 Mitsubishi Galant GTS. It only had an astonishing 3000 miles accumulated on it. The engine was listed on car-part.com on the east coast. This was an awesome find. I wanted an engine that wouldn’t need new valve guides, new valves, excessive machine work, etc. I had it truck shipped to WI.
After some investigation with the VIN I found that the car was a rental and was in a bad accident. The car was totaled, but the engine was in one piece except for a few items. It was a front end collision. The front valve cover was dented in, the oil cap was broken and the basically new 6g75 upper intake manifold was dented right were the map sensor was supposed to be installed. Additionally, the oil pan was dented-in enough to cause concern. After removing the valve cover and oil pan, I was relieved to find no contact had been made with the internal engine components and not a spot of corrosion.


Thankful to find ZERO corrosion:

-----------------------------------------------------------------------------------------------
Lower End:
The 6g75 comes from the factory with a forged crankshaft and 4 bolt main bearing caps. To complement the set up, I had the crankshaft nitrited, straightened, polished, and balanced. All new Clevite Trimetal 77 main bearings and rod bearings were also installed after being coated by Calico. (Calico Coatings) This coating helps the bearings hold oil in the event of shock loading i.e. what’s experienced when using nitrous oxide or drag racing. To finish it off, the main bearing bolts were replaced with ARP studs and nuts. The entire rotating assembly was balanced including the aluminum flywheel and pressure plate. Even the harmonic dampener was checked.
The MIVEC version of the 6G75 found in the 4g Eclipses and Galant Ralliart utilize an oil pan baffle that helps direct oil to the oil pump pick up tube during +/- G forces. I purchased this baffle and fit it to my non mivec oil pan. The threaded holes to attach the baffle were already in the original oil pan, so all I had to do was bolt it in.
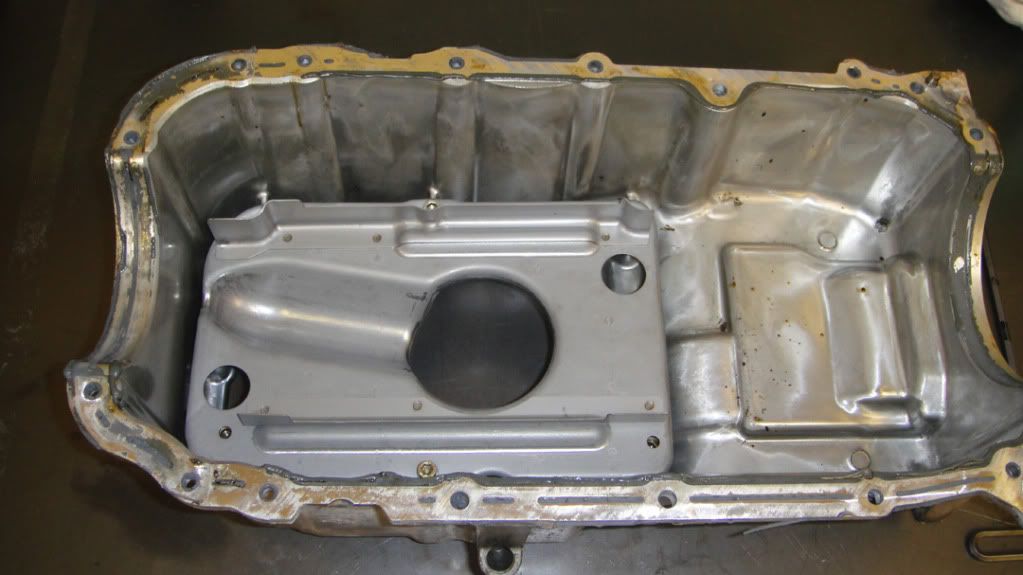
Here is the oil pan as it comes on the non-mivec models:

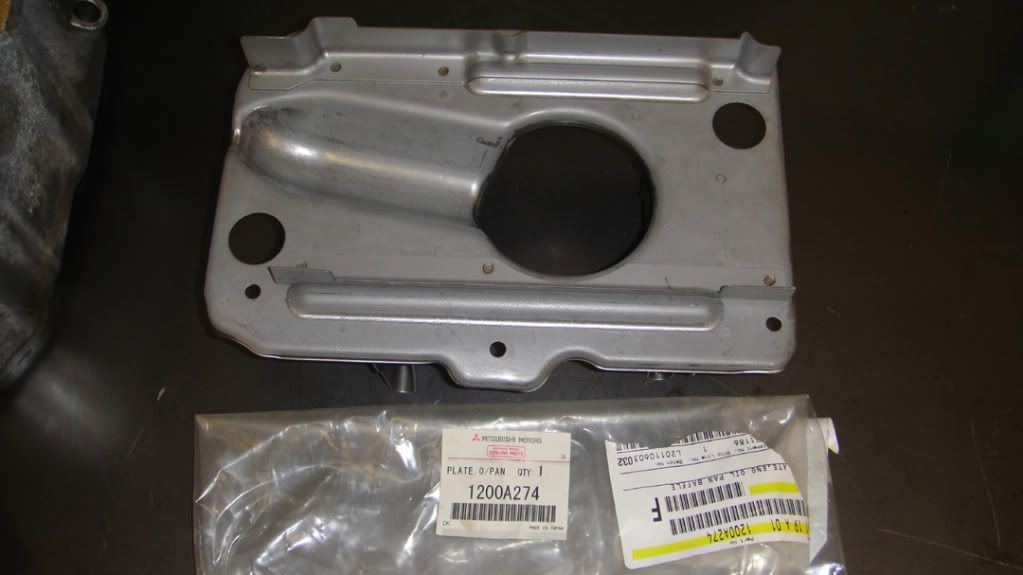
Here is the oil pan baffle used on the mivec engines:

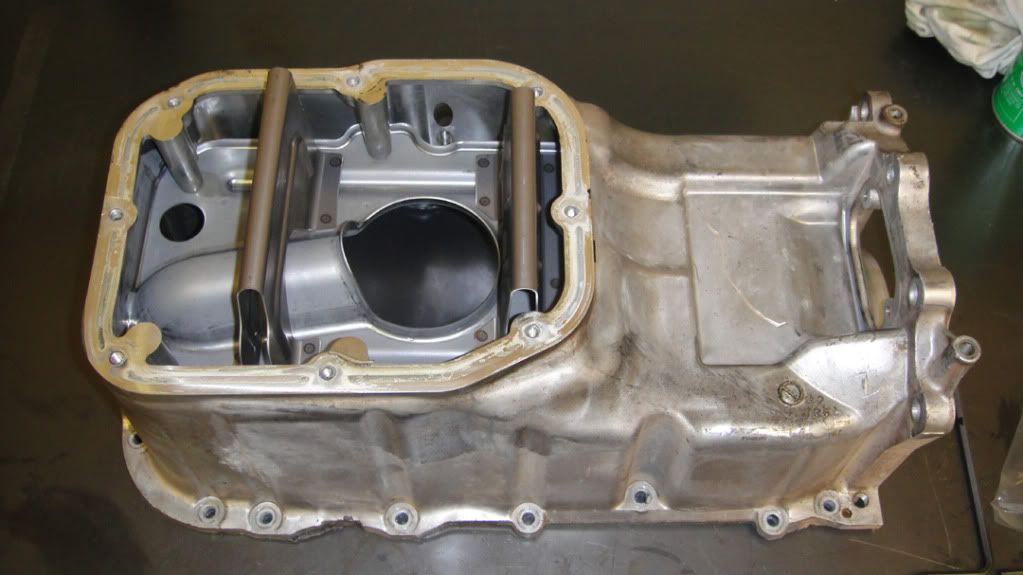
Here are a couple pics of the baffle installed to the oil pan:


-----------------------------------------------------------------------------------------------
Pistons, Connecting Rods, and Displacement:
I wanted to increase the stock 3.8 liters of displacement to whatever would be possible, but still safe for up to a +100 shot of nitrous and have a long life 100,000+ miles. The block was sonic tested and the consensus of the testing facility and the engine builder was that the bores could be opened up from the stock 95mm to 97mm. This would be an increase in bore size of 2mm (.080”) raising the total displacement from 3.8 liters (232 ci) to 4.0 liters (244 ci). Custom head gaskets were produced by Cometic to accommodate the larger bore size.
As for pistons I went with custom 10.5:1 pieces produced by CP. They’re forged instead of cast like the stock pistons. For the connecting rods, I selected Brian Crower Sportsman Series with ARP hardware (BC6139). They are good to 200hp per cylinder, obviously more than I’ll ever need.
I also looked into increasing displacement via increasing the stroke. It was originally thought that the engine could be stroked another 1mm to 2mm but because I had already purchased the Brian Crower connecting rods, I would have to scrap those and get custom ones made. There was not enough room between the piston pin and piston rings to make a shorter piston so that was out. If custom rods were produced and the crankshaft machined, an estimated total displacement of 4.1 liters to 4.2 liters could be achieved. This would be an extremely high cost to horsepower ratio though for the additional 100ccs to 200ccs of displacement. I decided to stay with the Brian Crower connecting rods and didn’t pursue increasing the stroke.
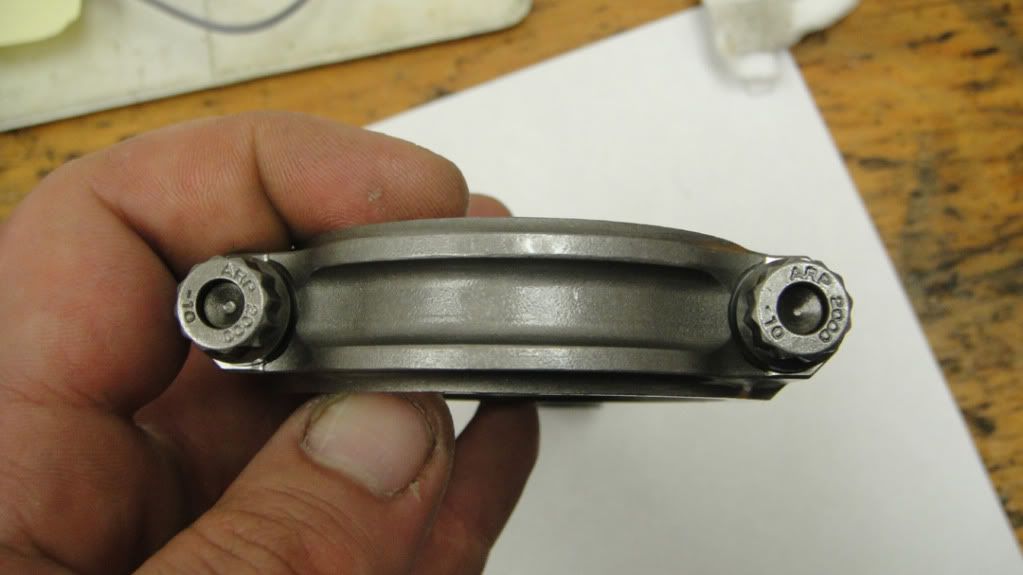
Connecting Rods:


Custom 10.5:1 Oversized Pistons:

Custom Head Gaskets:

All machining and short block assembly was done by Advanced Engine Concepts in Green Lake, WI. They have a boring/honing plate for the 6G75 engines and do excellent work.
Here are some pictures after it came back from the engine builder:


-----------------------------------------------------------------------------------------------
Cylinder Heads:
The cylinder heads and gasket set were sent in for a complete professional port job & gasket match. See work sheets for before and after flow numbers. The combustion chambers were also polished for possible nitrous use.
A radius valve job was then performed and a minimal truing cut was made to ensure flatness at gasket surface. After machining and cleaning, the valves were installed using Racing Performance Works heavy duty valve springs with the original valve cotters and spring retainers. I was pleased to find out the heads come with stainless valves stock.
The stock cam shafts were replaced with Racing Performance Works Stage 2 cam shafts. This set was made specifically for a manual transmission and naturally aspirated engine. I had to specifically ask for this grind as RPW no longer offers different grinds for automatic and manual transmissions. These are made from new blanks, not reground existing parts. To finish off the valve train, Fidanza adjustable camshaft wheels were installed with ARP hardware.
Cam timing was set to centerline between exhaust and intake lobes max lift TDCE on both banks. The spacing between the intake and exhaust lobes on the right bank is slightly further apart. I was told by Racing Performance Works that this is normal and allows for belt stretch. This difference can even be found on the OEM cam shafts. It will not cause any appreciable effects on performance or drivability.
The original 6g72 valve covers fit the new 6g75 perfectly except for one point. The PCV air inlet tube in the rear valve cover was too tall for the new custom upper intake manifold. It was cut down to 8mm in height and a 90 degree AN fitting was installed to clear the manifold. The rear valve cover was also fitted with an AN4 threaded oil return port for a bypass oiling system or any future turbo installation.
During Porting and Head Work:


Head Flow Numbers:
Before Porting:

After Porting:

Here are some comparisons between the stock 6G72 3.0 liter valve spring and RPW heavy duty:


-----------------------------------------------------------------------------------------------
Intake:
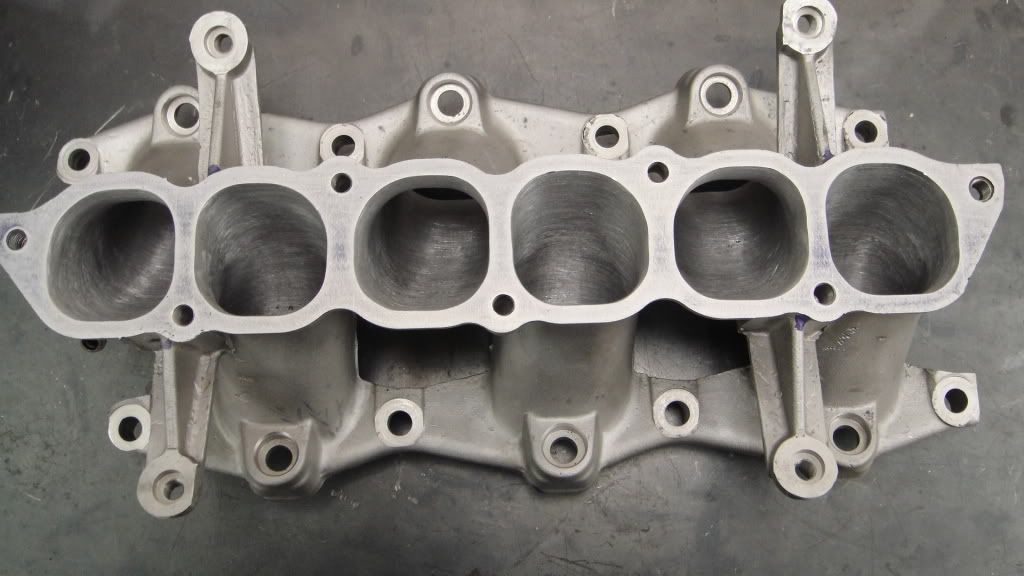
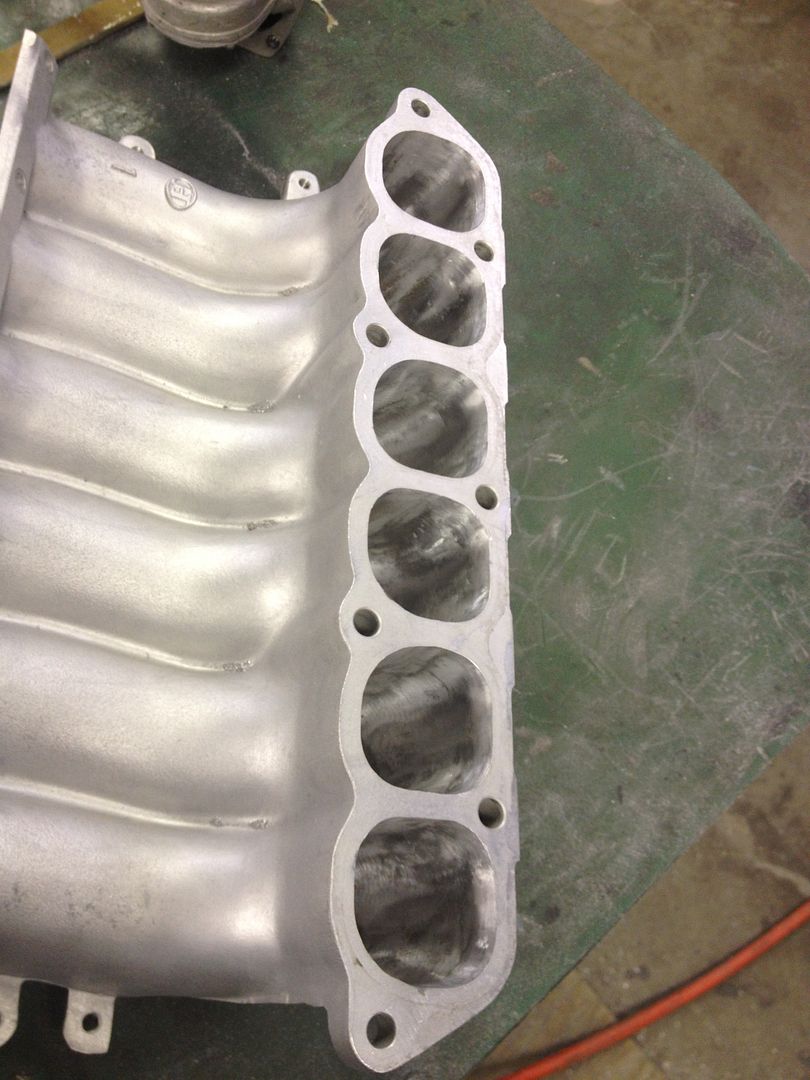
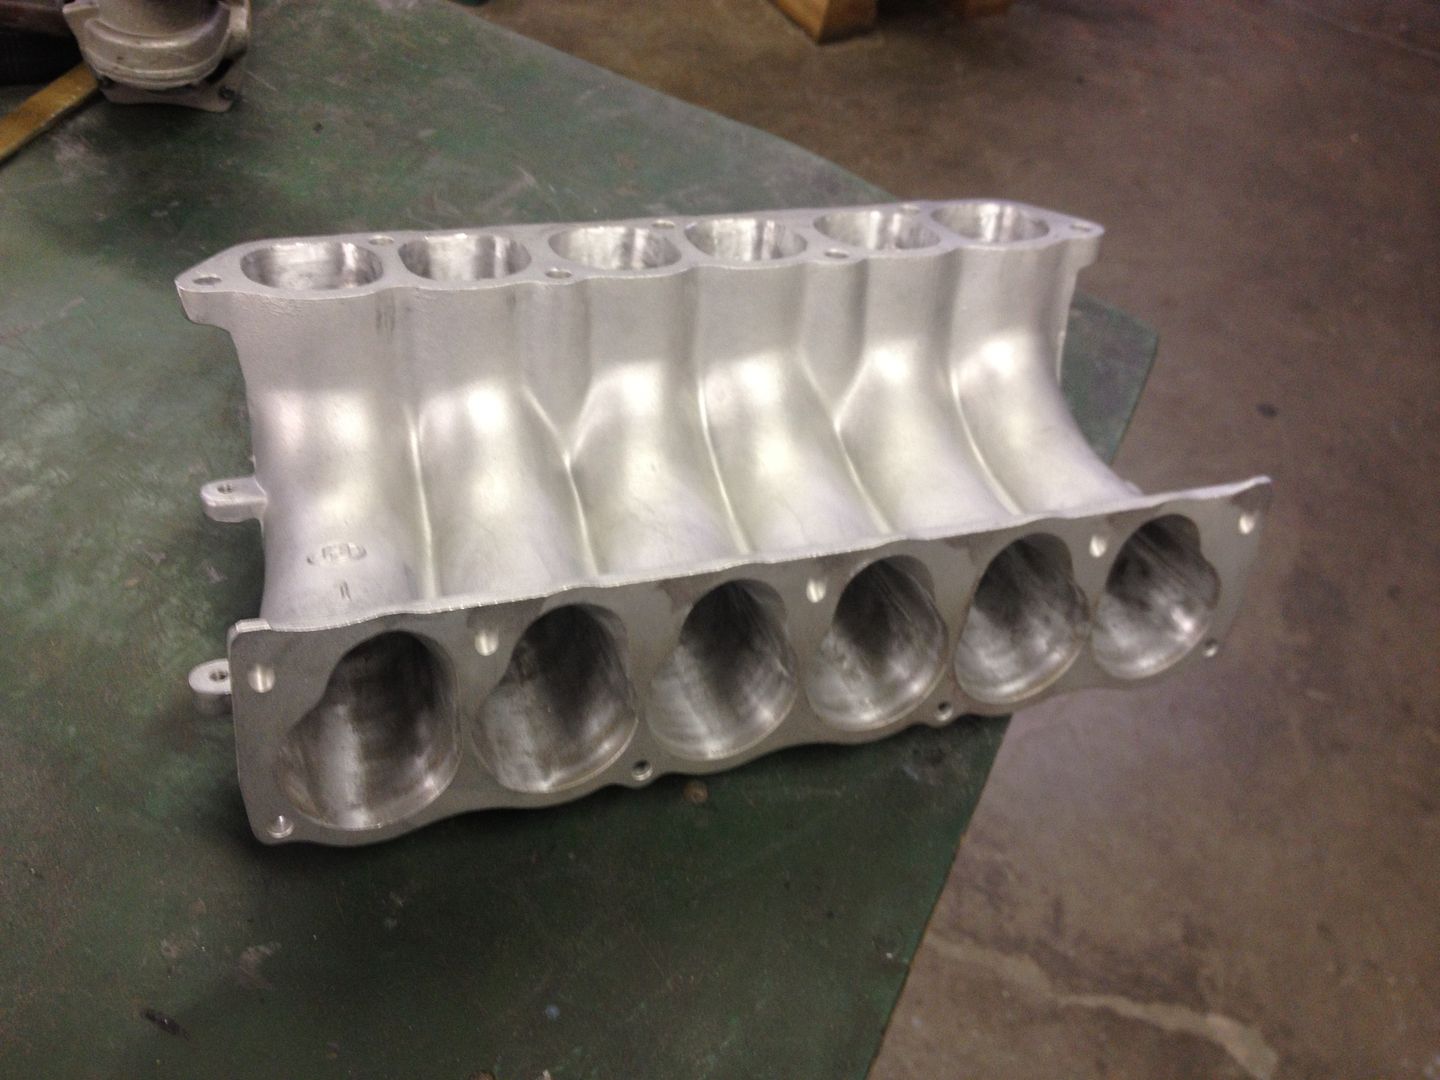
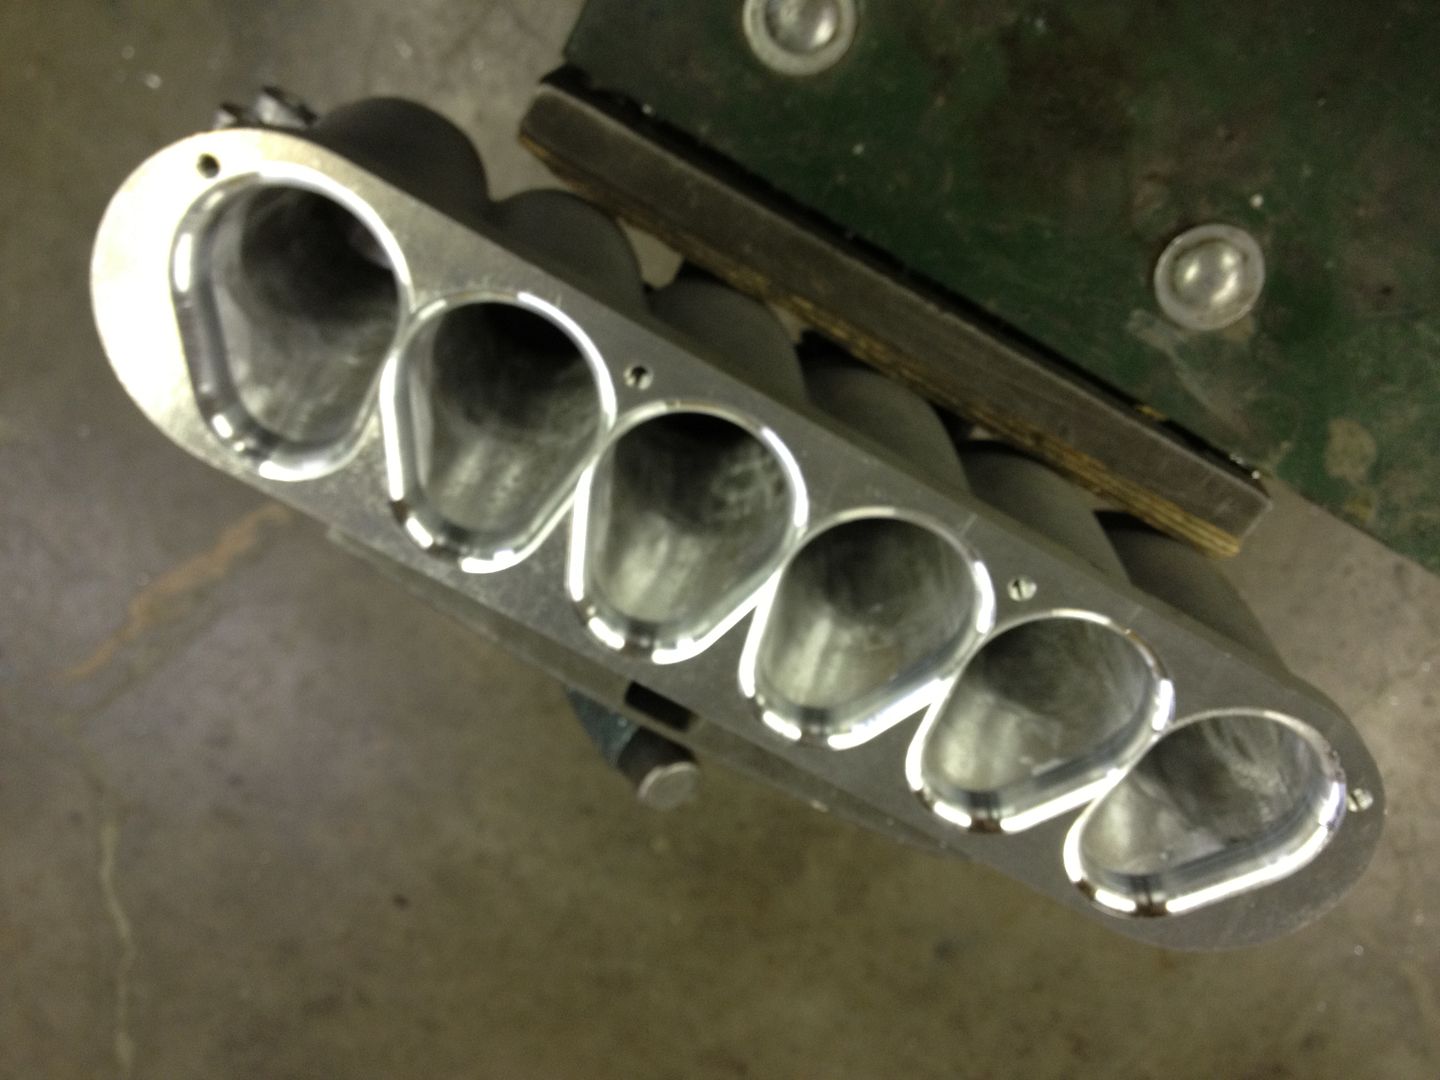
For the lower intake manifold the 6g74 Diamante piece is used, also ported and gasket matched. There were holes in the runners at which the old PCV system used to flow into the engine. These holes were weld filled and dressed during porting for a smooth runner surface. This lower intake manifold also allows the use of the Mitsubishi 3000gt fuel rails which is why it was selected over the 6g75 lower.
After much research and deliberation, I decided to go with a custom upper intake manifold from Xcessive Manufacturing. This intake manifold is designed more for the mid to upper RPM ranges. It has a 3.5 liter plenum and utilizes the Hyundai XG 350 intake runners. These runners are large and will bolt to the lower intake manifold. The upper intake manifold was also ported and gasket matched. The upper manifold itself did not have the needed provisions for brake booster vacuum, PCV, fuel pressure regulator, MAP sensor, etc. So all of these items needed to be installed to the manifold. A Moroso air/oil seperator was also installed to keep the intake tract clean.
DO NOT ATTEMPT TO DISASSEMBLE OR MODIFY ANY THROTTLE BODY. THIS IS MODIFICATION THAT SHOULD BE DONE BY PROFESSIONALS ONLY. A Full Blown Motorsports 70mm EVO throttle body was selected. It was disassembled and the half shaft mod was performed. No spare parts are available for the throttle body (at the time I inquired, maybe they are now), so I had to improvise when replacing the bearings and seals. The bearings they use are some Chinese bearing that's not available in the USA unless you order some ungodly amount like 500 or 1000 directly from China. I found a bearing that fit well, has more bearing surface area and is made in the USA. It's slightly wider than the original but works great. DO NOT ATTEMPT TO DISASSEMBLE OR MODIFY ANY THROTTLE BODY. THIS IS MODIFICATION THAT SHOULD BE DONE BY PROFESSIONALS ONLY. A new EVO 8 IAC and TPS were installed to the unit. This throttle body does not have provisions for cruise control. The stock throttle cable was adapted to fit on top of the new upper intake manifold to operate the throttle body.
Lower Intake after Porting:


Upper Intake Manifold:


Installing the Needed Ports and Fittings:


Throttle Body Half Shaft Mod:
Before

After - There are no butterfly screws shown in this pic. DON'T FORGET TO INSTALL THEM

You can use an EVO 8 TPS on a 3g Eclipse. All you need to do is swap the pins in your OEM TPS connectors like this:

In order for the hood to close, clearance must by made by cutting and forming some of the metal on the hood. The throttle body itself and throttle cable kept the hood open:


-----------------------------------------------------------------------------------------------
Lubrication:
A new OEM oil pump was installed. A Mishimoto oil filter sandwich adapter was installed to monitor oil temperature and provide a source of pressurized oil for the bypass oil filtration set up or any future turbo set up.

-----------------------------------------------------------------------------------------------
Accessory Brackets, Tensioners, and Belts:
Both accessory belt tensioners from the stock 3.0 liter were used. Even the original accessory belts remain the same as stock. There are two brackets that need to be sourced if you wish to use your stock alternator and power steering pump. The 6g75 is taller than the original 6g72 so you need taller brackets. The first is the upper alternator mounting bracket. You must get this from the Diamante. The second is the upper power steering bracket. If you were lucky enough to have the stock 6g75 upper power steering bracket still installed to the engine, you may use that. If you were not supplied with this bracket, you may get one from the Diamante.
Upper power steering brackets:

-----------------------------------------------------------------------------------------------
Harmonic Balancer, Timing Belt, Timing Belt Covers:
When using the stock accessory belts tensioners and power steering pump, the 6g75 timing belt covers will not fit properly. The lower cover and left cam wheel covers will not fit. The timing marks on the timing cover will also interfere with the power steering pump belt routing. I purchased a complete set (all 3) timing covers for the Diamante. FYI – If you try installing the 6g75 harmonic balancer onto the engine with Diamante timing covers the timing marks will not align correctly. You either have to make a new timing mark on the 6g75 harmonic balancer or use your stock 3.0 balancer. The fact that the timing marks don’t line up isn’t necessarily bad. It only creates an issue if you ever try to check your timing with a timing light. (like when installing a standalone ecu or ignition controller)
The diamante 3.5, stock 3.0, and 6g75 harmonic balancers are identical in weight and pulley size. The only difference is the actual timing mark on the balancer.
In a nut shell, if you can afford a set of Diamante timing covers, get them It provides for a much cleaner and better looking install. It also allows you to use all of your stock belt adjusters, pulleys and accessories.
Because my stock 3.0 harmonic balancer had 80k miles I decided to use the new 6G75 balancer (3k miles) and make a new timing mark via piston stop and degree wheel:

Picture of my home made piston stop:

Degree wheel setup for timing camshafts and finding true TDC:

-----------------------------------------------------------------------------------------------
Cooling System:
The stock radiator was not large enough for the new engine. I chose a Mishimoto radiator but it was a real pain to install. If I didn’t need the larger cooling capacity I would have never installed it. It fit so poorly that I thought it was defective. Mishimoto sent me another radiator with the exact same fitment issues. I had to do a lot of modifications so it fit correctly. The first thing that was noticed is the OEM fans don’t fit very well. I used stainless spacers of different thicknesses to keep the fans from pushing into the radiator and the mounting holes don’t line up real well. The lower radiator hose fitting is too close to the lower engine mount support. I had to space the support away from the car to provide adequate clearance. This also required me to space the lower engine mount farther off the lower support. The upper radiator mounts also needed to be spaced up in that the new radiator was taller. A set of Mishimoto coolant hoses finished it off.
The tube that connects the water pump to the cross over casting, the cross over casting itself, and heater core lines from the Diamante must be used for this to work. The small coolant tubes that were supposed to run from the heater core lines to the FIAV were cut off and welded closed. There is no FIAV on the new EVO throttle body.
In order for the radiator to fit some hood bracing had to be cut:

A few parts from the Diamante that are required:

Upper rad mounts shimmed up:


-----------------------------------------------------------------------------------------------
Fuel System:
Stock fuel pump was removed and replaced with the Walbro 255 high pressure unit. A new in tank fuel filter was installed at the same time. While fuel pump assy is out of the car, the fuel return nozzle must be opened up to allow for the additional fuel flow. If you do not open up the fuel return the fuel pressure will not be adjustable. An Aeromotive compact fuel pressure regulator was selected and installed under the brake booster. 440cc matched Deatschwerks fuel injectors were used. Because of the increased height of the injector over the stock 6g72, custom fuel rail spacers were fabbed. A high flow cross over tube was also fabbed in that no stock one would fit per the new spacers.
Here is a picture of the fuel return that must be opened when installing a larger fuel pump:
Stock:

After it's been modified:

New Fuel Pump Installed:

3000GT/Diamante Fuel Rails:

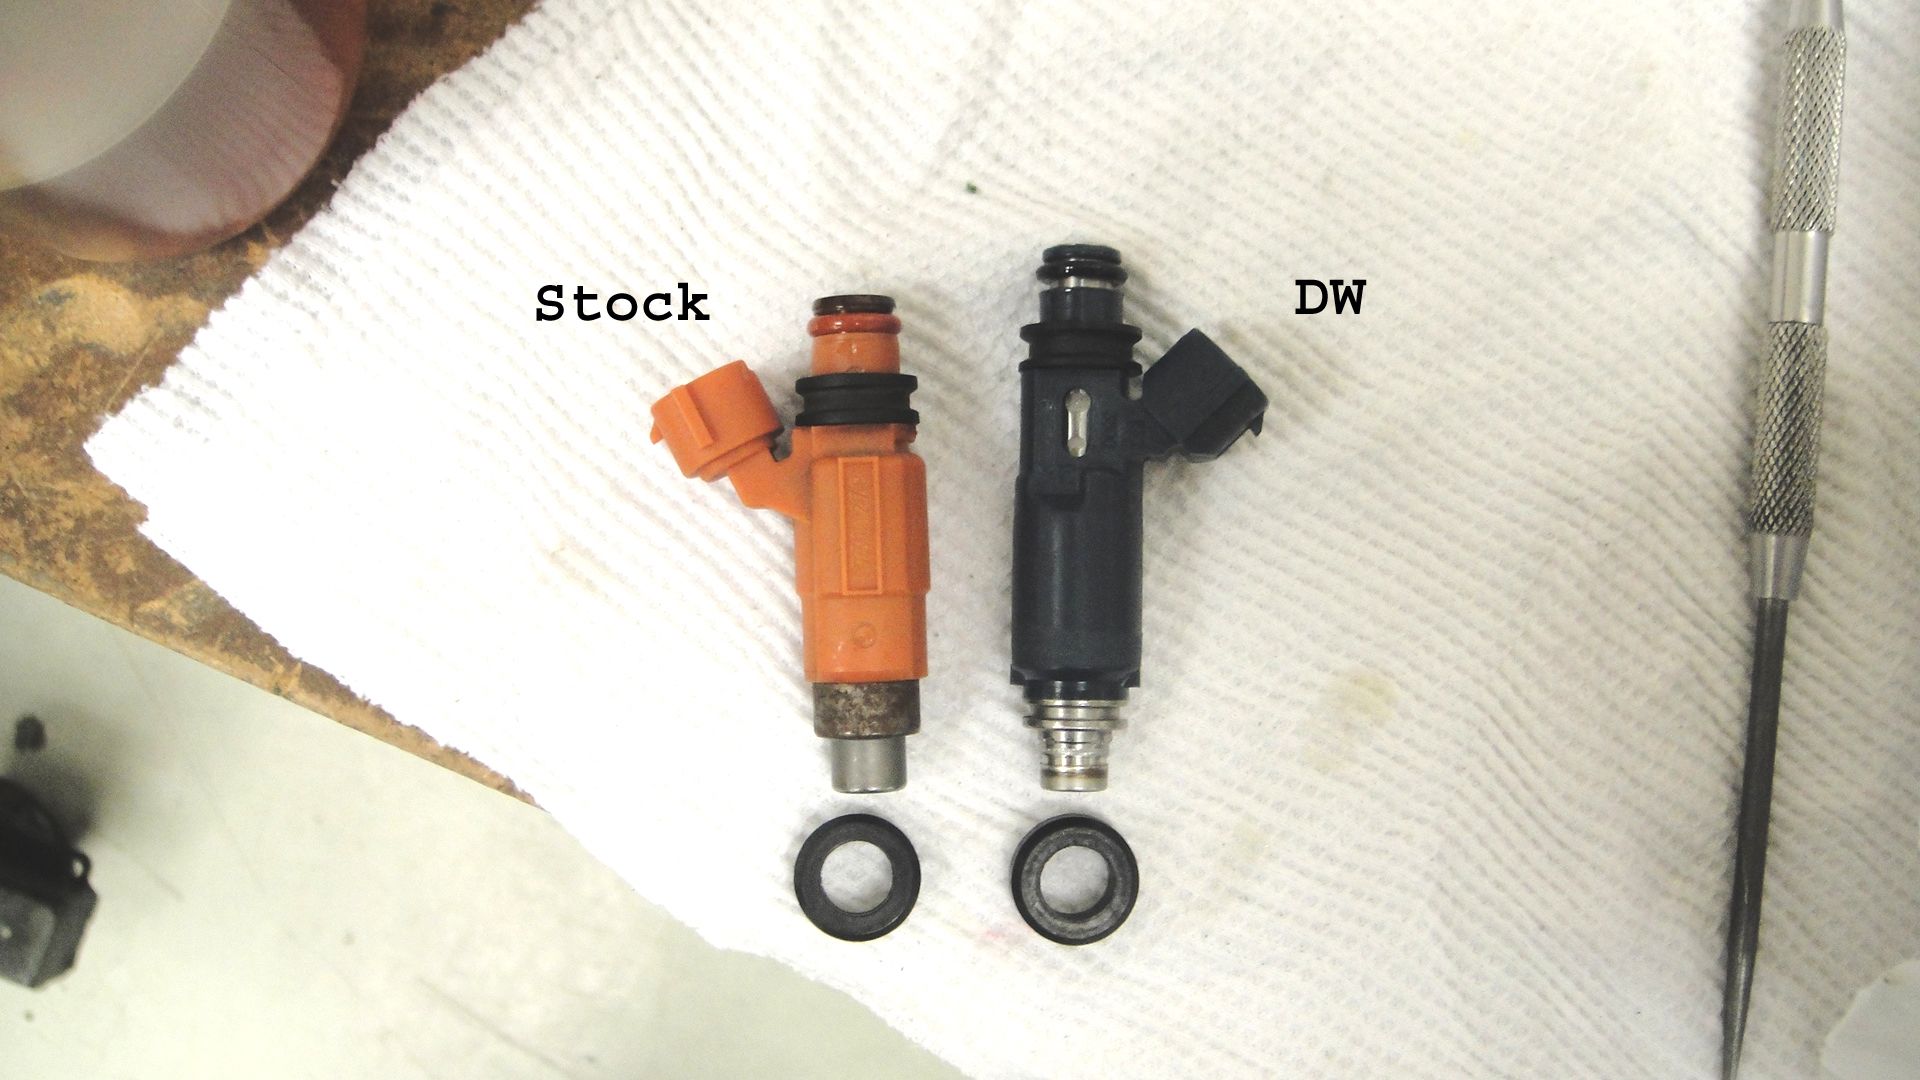
Stock 3.0 injector vs new injectors:

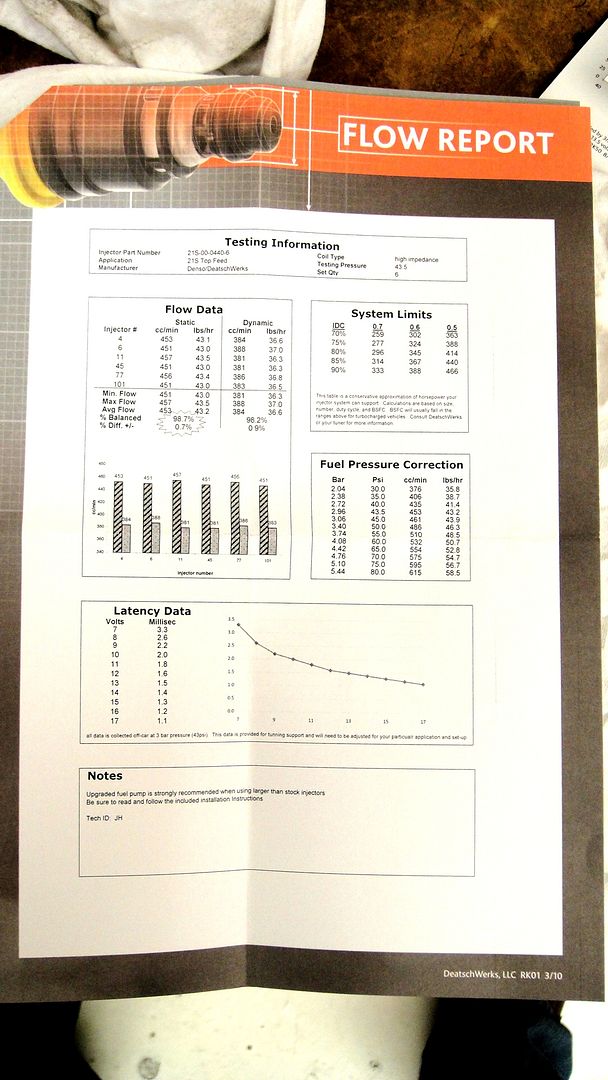
Fuel injector specs:

Injectors, rails, crossover, custom spacers installed:


-----------------------------------------------------------------------------------------------
Ready for her new engine:


Engine in, plumbing and fitting:


-----------------------------------------------------------------------------------------------
Cold Air Intake:
There wasn't a CAI out I could find that fit very well, plus I wanted some additional size for the 4.0 to breathe. A custom 3.5 inch piece was welded up in aluminum. The MAF sensor was relocated to the end of the CAI to allow for the installation of the largest MAF to air filter adapter I could find. Silicone adapters, the proper clamps, and an Amsoil dry filter finished it off. A 3/8 male fitting was also welded in to allow for the PCV system to draw filtered air as normal.


-----------------------------------------------------------------------------------------------
Exhaust:
Because I was absolutely set on using the 6G75 oil pan with the mivec oil baffle I was forced to modify the front header. This was by far the worst part of the project. I had to basically cut the header in half, fit extensions in and tack weld it. It took over 8 fittings to the car to get it right before final welding. What worked well at the end was making a jig from one of my original 3.0 liter heads. This held the pieces together better during the final welding process. The collector on the front header also had an extension welded on to reach farther toward the back of the car. Most people don't have to make modifications to make the rear header fit. I did. Because of the increased engine height and my thicker heavy duty head gaskets, the collector touched the large cast aluminum piece which is part of the subframe/suspension. Using a die grinder I made some wiggle room for the collector. Not much material was removed but I didn't want to chance the collector banging against the car. Nothing more annoying than a permanent exhaust rattle. Because of the modified header, a slip joint was used to more easily connect the existing 3 inch custom exhaust.


New stainless flange welded to the slip joint:

Collector touching aluminum piece of subrame. Picture from rear of vehicle looking forward:

-----------------------------------------------------------------------------------------------
Ignition System and Tachometer:
The stock ignition system would not keep up with the demands of the new engine. A MSD digital ignition was chosen. The MSD 6A and 6AL fit underneath the hood in a known install spot, but did not have all the features I was looking for. I ended selecting the MSD Digital 6 Plus. It has all the features of the 6AL but also has nitrous retard and stage rev limiter. This Digital 6 Plus unit is larger in size and would not fit in the normal install spot (cruise control area). The MSD Digital 6 Plus control box ended up being mounted next to the driver’s head light. Copper core spark plugs one step colder were installed (NGK BKR7E stock number 4644) and gap opened up to .050. After installing the new ignition the car idled noticeably better, throttle response was greatly improved, and the tuner noticed a reduction in knock count.
The tachometer was a headache all in its own. It was the general consensus that you had to use an aftermarket tachometer is you wanted to use a MSD ignition. Using an aftermarket tach causes issues I refused to deal with. The first is finding a place for the aftermarket tachometer. I like the understated look and having a tach mounted on my dash wasn’t acceptable. A common place to install an aftermarket tach is right in front of the OEM tach. I had just installed an AEM UEGO in front of my OEM tach and was not going to modify it. Second and more important, if the OEM tachometer did not operate, the ECU would trip a permanent check engine light, P0300 – random/multiple cylinder misfire because the ECU could not “see” the ignition operating. There had to be a way to keep the OEM tachometer running correctly.
In the past, different tach signal adapters were installed with no luck, some with catastrophic results. The MSD 8910 and MSD 8910-EIS are not suitable for use. Both of these “modify” the stock distributor signal and attempt to run both the tachometer adapter and MSD unit from one signal. Although I have not attempted to install either the 8910 or 8910-EIS, I was not going to chance ignition system malfunction. This is NOT CONFIRMED, but I was told the above adapters can/would cause ghost spark issues ie nasty detonation. After reading about these issues, I now have another standard I must meet. Not only do I have to get the OEM tach working which no one else seems to have done, I have to do it without modifying the stock distributor signal.
I tried multiple wiring combos attempting to get the OEM tach to work. I connected the MSD tach output to the ECU, tried diodes, dual diodes, you name it. None of which worked. The MSD tech support guys were no help. “We don’t recommend an MSD ignition on that vehicle.” As anyone in the 3g Eclipse world knows, there is almost no aftermarket support for our vehicles so I wasn’t surprised they didn’t know how to help.
There was a major misunderstanding between members of club3g, myself and the dealership. No one really knew what signal was being sent to the ECU for it to interpret that the ignition was operating correctly. After all the headaches and research I decided to take a chance and try the MSD 8920 tach adapter. I found this adapter on accident reading about different V-8 MSD ignition installs on the net.
MSD tech support never even brought up this product when I spent 15 min on the phone with them. The MSD 8920 tach signal adapter is exactly what was needed. It provides an accurate tach signal to the ECU WITHOUT modifying the stock distributor signal. No possible knock issues, the OEM tach works, and no CEL. Here is the how to I followed to install the MSD. Posted on that link and listed shown below is how I wired the correct tach adapter. http://www.club3g.com/forum/performance/161103-how-wire-up-msd-ignition-right-way-v6.html


Emissions:
The EVAP solenoid located on the intake manifold is installed as per OEM and functions normally.
The catalytic converter was removed for greater oil and fuel selection so oxygen sensor simulators were installed in place of the POST CAT sensors. New precat o2 sensors were installed during engine installation.
The new Xcessive Manufacturing intake manifold does not have provisions for EGR. I thought I could have the EGR coded out of the ROM but it’s been more difficult for the coder than previously thought. This ECU patch is still in the works but at this time, I’m experimenting, trying to simulate EGR. The ECU checks for a couple different things in regards to EGR. The first item that is monitored by the ECU is the EGR control solenoid. The ECU checks for the correct resistance in the circuit. If the control solenoid is bad (or in my case, not present at all), the ECU will trip the CEL. The second and trickier thing to get around is the manifold pressure drop. When the EGR valve opens and is working correctly, the ECU can “see” the change in manifold pressure. If you block off or don’t have the EGR valve opening and closing the CEL is tripped. Spring of 2014 I will have an update on my possible easy EGR fix for guys with custom intakes.
MVIC is only present on the GTS models, but needs to addressed to prevent a CEL. There is a MVIC control solenoid on the GTS models, similar to the EGR. This solenoid is monitored by the ECU and must have the correct resistance in the circuit. I just left it plugged in but tucked out of the way.
Engine First Run:
This was one of the most nerve racking experiences I've had. My hands were shaking. I attempted to start the vehicle with stock ROM and it didn't even pop once. I got a modified ROM from a member on C3G and it fired to life. The valve train made some noise for the first few minutes of the run which can be easily heard on the videos. I had to adjust idle a few times to keep it running.
First Sign of Life:
6G75 4.0 Liter First Start - YouTube
After Idle Adjustment:
6G75 4.0 Liter First Run After Idle Adjustment - YouTube
Now comes the hard part. Waiting for spring to get a tune at AMS. The vehicle has never been operated in snow or salt so it's tucked away until thaw. I did get a chance to do some data logs and driving before putting it away last fall. A total of 123 miles have accrued on the new engine. Even with a poor tune and the fact it goes lean at WOT, it pulls harder than the 3.0 ever did.
As soon as I have some more info I'll post it up, for those interested.